Lenovo ThinkCentre M92z (English) User Guide - Page 60
If your computer comes with the 23-inch display, align the four pins on the hard disk drive bracket
 |
View all Lenovo ThinkCentre M92z manuals
Add to My Manuals
Save this manual to your list of manuals |
Page 60 highlights
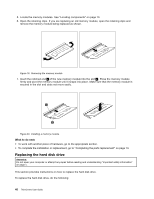
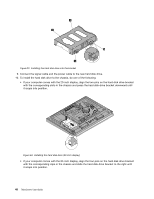
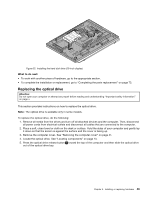
Figure 23. Installing the hard disk drive into the bracket 9. Connect the signal cable and the power cable to the new hard disk drive. 10. To install the hard disk drive to the chassis, do one of the following: • If your computer comes with the 20-inch display, align the two pins on the hard disk drive bracket with the corresponding slots in the chassis and press the hard disk drive bracket downward until it snaps into position. Figure 24. Installing the hard disk drive (20-inch display) • If your computer comes with the 23-inch display, align the four pins on the hard disk drive bracket with the corresponding clips in the chassis and slide the hard disk drive bracket to the right until it snaps into position. 48 ThinkCentre User Guide
-
 1
1 -
2
-
3
-
4
-
5
-
6
-
7
-
8
-
9
-
10
-
11
-
12
-
13
-
14
-
15
-
16
-
17
-
18
-
19
-
20
-
21
-
22
-
23
-
24
-
25
-
26
-
27
-
28
-
29
-
30
-
31
-
32
-
33
-
34
-
35
-
36
-
37
-
38
-
39
-
40
-
41
-
42
-
43
-
44
-
45
-
46
-
47
-
48
-
49
-
50
-
51
-
52
-
53
-
54
-
 55
55 -
 56
56 -
 57
57 -
 58
58 -
 59
59 -
 60
60 -
 61
61 -
 62
62 -
 63
63 -
 64
64 -
 65
65 -
66
-
67
-
68
-
69
-
70
-
71
-
72
-
73
-
74
-
75
-
76
-
77
-
78
-
79
-
80
-
81
-
82
-
83
-
84
-
85
-
86
-
87
-
88
-
89
-
90
-
91
-
92
-
93
-
94
-
95
-
96
-
97
-
98
-
99
-
100
-
101
-
102
-
103
-
104
-
105
-
106
-
107
-
108
-
109
-
110
-
111
-
112
-
113
-
114
-
115
-
116
-
117
-
118
-
119
-
120
-
121
-
122
-
123
-
124
-
125
-
126
-
127
-
128
-
129
-
130
-
131
-
132
-
133
-
134
-
135
-
136
-
137
-
138
-
139
-
140
-
141
-
142
-
143
-
144
-
145
-
146
-
147
-
148
-
149
-
150
 |
 |
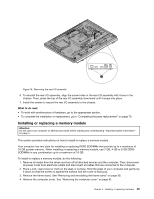
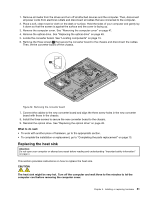
Figure 23. Installing the hard disk drive into the bracket
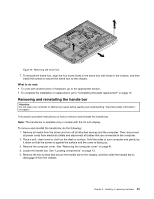
9. Connect the signal cable and the power cable to the new hard disk drive.
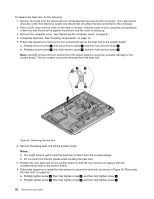
10. To install the hard disk drive to the chassis, do one of the following:
•
If your computer comes with the 20-inch display, align the two pins on the hard disk drive bracket
with the corresponding slots in the chassis and press the hard disk drive bracket downward until
it snaps into position.
Figure 24. Installing the hard disk drive (20-inch display)
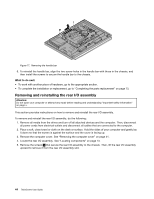
•
If your computer comes with the 23-inch display, align the four pins on the hard disk drive bracket
with the corresponding clips in the chassis and slide the hard disk drive bracket to the right until
it snaps into position.
48
ThinkCentre User Guide