Lenovo ThinkCentre M92z (English) User Guide - Page 69
Replacing the thermal sensor, off the chassis.
 |
View all Lenovo ThinkCentre M92z manuals
Add to My Manuals
Save this manual to your list of manuals |
Page 69 highlights
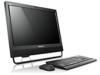
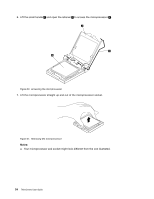
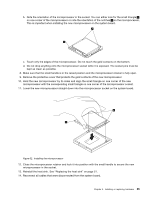
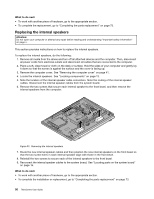
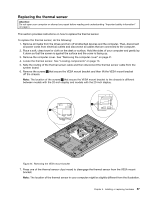
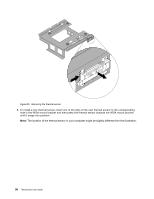
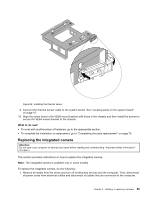
Replacing the thermal sensor Attention: Do not open your computer or attempt any repair before reading and understanding "Important safety information" on page v. This section provides instructions on how to replace the thermal sensor. To replace the thermal sensor, do the following: 1. Remove all media from the drives and turn off all attached devices and the computer. Then, disconnect all power cords from electrical outlets and disconnect all cables that are connected to the computer. 2. Place a soft, clean towel or cloth on the desk or surface. Hold the sides of your computer and gently lay it down so that the screen is against the surface and the cover is facing up. 3. Remove the computer cover. See "Removing the computer cover" on page 41. 4. Locate the thermal sensor. See "Locating components" on page 13. 5. Note the routing of the thermal sensor cable and then disconnect the thermal sensor cable from the system board. 6. Remove the screws 1 that secure the VESA mount bracket and then lift the VESA mount bracket off the chassis. Note: The location of the screws 1 that secure the VESA mount bracket to the chassis is different between models with the 20-inch display and models with the 23-inch display. Figure 34. Removing the VESA mount bracket 7. Press one of the thermal sensor clips inward to disengage the thermal sensor from the VESA mount bracket. Note: The location of the thermal sensor in your computer might be slightly different from the illustration. Chapter 5. Installing or replacing hardware 57
-
 1
1 -
2
-
3
-
4
-
5
-
6
-
7
-
8
-
9
-
10
-
11
-
12
-
13
-
14
-
15
-
16
-
17
-
18
-
19
-
20
-
21
-
22
-
23
-
24
-
25
-
26
-
27
-
28
-
29
-
30
-
31
-
32
-
33
-
34
-
35
-
36
-
37
-
38
-
39
-
40
-
41
-
42
-
43
-
44
-
45
-
46
-
47
-
48
-
49
-
50
-
51
-
52
-
53
-
54
-
55
-
56
-
57
-
58
-
59
-
60
-
61
-
62
-
63
-
 64
64 -
 65
65 -
 66
66 -
 67
67 -
 68
68 -
 69
69 -
 70
70 -
 71
71 -
 72
72 -
 73
73 -
 74
74 -
75
-
76
-
77
-
78
-
79
-
80
-
81
-
82
-
83
-
84
-
85
-
86
-
87
-
88
-
89
-
90
-
91
-
92
-
93
-
94
-
95
-
96
-
97
-
98
-
99
-
100
-
101
-
102
-
103
-
104
-
105
-
106
-
107
-
108
-
109
-
110
-
111
-
112
-
113
-
114
-
115
-
116
-
117
-
118
-
119
-
120
-
121
-
122
-
123
-
124
-
125
-
126
-
127
-
128
-
129
-
130
-
131
-
132
-
133
-
134
-
135
-
136
-
137
-
138
-
139
-
140
-
141
-
142
-
143
-
144
-
145
-
146
-
147
-
148
-
149
-
150
 |
 |