Lexmark Pro915 User's Guide - Page 66
E-mailing, Setting up the printer to e-mail, Setting up the e-mail function
 |
View all Lexmark Pro915 manuals
Add to My Manuals
Save this manual to your list of manuals |
Page 66 highlights
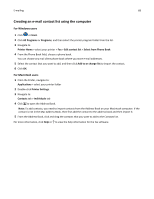
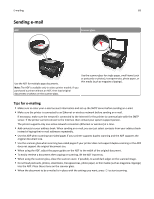
E-mailing 66 E-mailing You can use your printer to send e-mail to one or more recipients without using a computer. To do this, you can either scan a document or photo and then send it as an e-mail, or you can attach a saved document or photo from a memory device to an e-mail. Before you can send e-mail using the printer control panel, you must first configure the network connection and e-mail settings of your printer. Setting up the printer to e-mail Setting up the e‑mail function 1 From the home screen, navigate to: > E‑mail Setup > Yes 2 Enter your e‑mail address, and then touch OK. The printer compares your e‑mail address to the list of known e‑mail providers. 3 Follow the prompts on the display: • If your e‑mail address matches one of the domains on the list, then the printer automatically assigns the SMTP server settings. Note: You may be required to enter your e‑mail user name and password, depending on the e‑mail address you entered. • If the e‑mail domain is not known, then the Advanced E‑mail Setup Wizard appears on the display. Enter the necessary information. Touch OK or Accept to save each item. Changing the e‑mail settings after setup If you want to change the SMTP server settings 1 From the home screen, touch > E‑mail Setup > SMTP Setup. 2 Touch each item to enter the necessary information. Touch OK or Accept to save each item. • Server-Enter the name or address of the SMTP server. • Port-Enter the SMTP port. • Use SSL/TLS-Select how the e‑mail client and the SMTP server use encryption when sending e‑mails. • Authentication-Select the authentication type for your e‑mail account. If you select None, then you will not be required to enter the User Name and Password. For more information, contact your e-mail provider or your system support person. Note: The Authentication screen may not appear on the display, depending on the e‑mail address you entered during e‑mail setup. • Sender's Name-Enter your name. • User Name-Enter your e‑mail address.
-
 1
1 -
2
-
3
-
4
-
5
-
6
-
7
-
8
-
9
-
10
-
11
-
12
-
13
-
14
-
15
-
16
-
17
-
18
-
19
-
20
-
21
-
22
-
23
-
24
-
25
-
26
-
27
-
28
-
29
-
30
-
31
-
32
-
33
-
34
-
35
-
36
-
37
-
38
-
39
-
40
-
41
-
42
-
43
-
44
-
45
-
46
-
47
-
48
-
49
-
50
-
51
-
52
-
53
-
54
-
55
-
56
-
57
-
58
-
59
-
60
-
 61
61 -
 62
62 -
 63
63 -
 64
64 -
 65
65 -
 66
66 -
 67
67 -
 68
68 -
 69
69 -
 70
70 -
 71
71 -
72
-
73
-
74
-
75
-
76
-
77
-
78
-
79
-
80
-
81
-
82
-
83
-
84
-
85
-
86
-
87
-
88
-
89
-
90
-
91
-
92
-
93
-
94
-
95
-
96
-
97
-
98
-
99
-
100
-
101
-
102
-
103
-
104
-
105
-
106
-
107
-
108
-
109
-
110
-
111
-
112
-
113
-
114
-
115
-
116
-
117
-
118
-
119
-
120
-
121
-
122
-
123
-
124
-
125
-
126
-
127
-
128
-
129
-
130
-
131
-
132
-
133
-
134
-
135
-
136
-
137
-
138
-
139
-
140
-
141
-
142
-
143
-
144
-
145
-
146
-
147
-
148
-
149
-
150
-
151
-
152
-
153
-
154
-
155
-
156
-
157
-
158
-
159
-
160
-
161
-
162
-
163
-
164
-
165
-
166
-
167
-
168
-
169
-
170
-
171
-
172
-
173
-
174
-
175
-
176
-
177
-
178
-
179
-
180
-
181
-
182
-
183
-
184
-
185
-
186
-
187
-
188
-
189
-
190
-
191
-
192
-
193
-
194
-
195
-
196
-
197
-
198
-
199
-
200
 |
 |