Lexmark Z647 User's Guide for Mac OS 9 - Page 41
Step 3: Print your poster, Step 4: Assemble your poster, Print, Paper Type/Quality, Plain, Layout
 |
View all Lexmark Z647 manuals
Add to My Manuals
Save this manual to your list of manuals |
Page 41 highlights
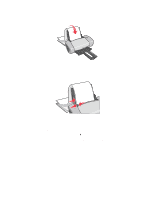
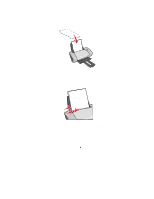
d Click OK. 2 Choose a paper type and print quality: a From the software program, choose File Print. b From the pop-up menu in the upper left corner, choose Paper Type/Quality. c From the Paper Type pop-up menu, choose Plain. d From Print Quality, select your preferred print quality. Normal is the default. Note: Higher print quality settings result in better quality documents, but may take longer to print. 3 Choose a layout: a With the Print dialog box open, choose Layout from the pop-up menu in the upper left corner. b Click Poster. c Select a poster size. Valid values are 2x2 (four pages), 3x3 (nine pages), and 4x4 (16 pages). Step 3: Print your poster Click Print. Step 4: Assemble your poster 1 On each printed page, trim the white edges from two adjacent sides. For example, trim the white edge from the top and left sides of each page. Printed pages with the white edge trimmed from two adjacent sides Trimmed edges Untrimmed edges 2 Arrange the pages so that every trimmed edge overlap an untrimmed edge (the white edge). Printing a poster 41
-
 1
1 -
2
-
3
-
4
-
5
-
6
-
7
-
8
-
9
-
10
-
11
-
12
-
13
-
14
-
15
-
16
-
17
-
18
-
19
-
20
-
21
-
22
-
23
-
24
-
25
-
26
-
27
-
28
-
29
-
30
-
31
-
32
-
33
-
34
-
35
-
 36
36 -
 37
37 -
 38
38 -
 39
39 -
 40
40 -
 41
41 -
 42
42 -
 43
43 -
 44
44 -
 45
45 -
 46
46 -
47
-
48
-
49
-
50
-
51
-
52
-
53
-
54
-
55
-
56
-
57
-
58
-
59
-
60
-
61
-
62
-
63
-
64
-
65
-
66
-
67
-
68
-
69
-
70
-
71
-
72
-
73
-
74
-
75
 |
 |