Lexmark Z647 User's Guide for Mac OS 9 - Page 48
Improving print quality, Print, Paper Type/Quality, Better, Control Panels, Z600 Series Control Panel - ink for
 |
View all Lexmark Z647 manuals
Add to My Manuals
Save this manual to your list of manuals |
Page 48 highlights
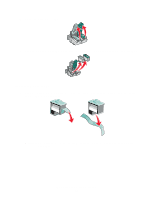
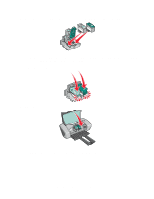
6 On the screen, use the arrows in the Align Cartridge dialog box to select the number that matches the darkest arrow on the printed page for each alignment group. 7 Click OK. If the alignment page does not print, see "Alignment page does not print" on page 58. Improving print quality If you are not satisfied with the print quality of your document, first make sure you: • Use the appropriate paper for the document. For example, use photo paper if you are printing a photo. • Use paper that is heavier, bright white, or coated. • Select a higher print quality: a From the software program, choose File Print. b From the pop-up menu in the upper left corner, choose Paper Type/Quality. c Select Better or Best. If your document still does not have the print quality you want, follow these steps: 1 Reinsert the print cartridges. a Remove the print cartridges. For help, see "Remove the used cartridges" on page 44. b Insert the print cartridges. For help, see "Install the cartridges" on page 45. c Print your document again. d If print quality has not improved, clean the print cartridge nozzles. 2 Clean the print cartridge nozzles. a Load paper. b From the Apple menu, choose Control Panels Z600 Series Control Panel. c From the Cartridges tab, click Clean Print Nozzles. A nozzle page prints forcing ink through the nozzles to clean any that are clogged. d Print your document again to verify that your print quality has improved. e To further improve print quality, continue with step 3. Improving print quality 48
-
 1
1 -
2
-
3
-
4
-
5
-
6
-
7
-
8
-
9
-
10
-
11
-
12
-
13
-
14
-
15
-
16
-
17
-
18
-
19
-
20
-
21
-
22
-
23
-
24
-
25
-
26
-
27
-
28
-
29
-
30
-
31
-
32
-
33
-
34
-
35
-
36
-
37
-
38
-
39
-
40
-
41
-
42
-
 43
43 -
 44
44 -
 45
45 -
 46
46 -
 47
47 -
 48
48 -
 49
49 -
 50
50 -
 51
51 -
 52
52 -
 53
53 -
54
-
55
-
56
-
57
-
58
-
59
-
60
-
61
-
62
-
63
-
64
-
65
-
66
-
67
-
68
-
69
-
70
-
71
-
72
-
73
-
74
-
75
 |
 |