Lexmark Z705 User's Guide for Mac OS X - Page 41
Aligning the print cartridges, Continue, Yes, it is old, No, it is new, Z700-P700 Series Printer - ink
 |
UPC - 734646890007
View all Lexmark Z705 manuals
Add to My Manuals
Save this manual to your list of manuals |
Page 41 highlights
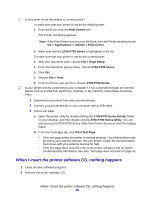
3 Click Continue. The Cartridge Verification dialog appears. 4 Select the part numbers of the cartridges you are installing. 5 Select Yes, it is old if the cartridge has been used before, or No, it is new if the cartridge has not been used before. Note: If an old cartridge is incorrectly identified as new cartridge, ink levels in the printer utility may be incorrect. 6 Click OK. Aligning the print cartridges Typically, you only align print cartridges after installing or replacing a cartridge. However, you may also need to align cartridges when: • Characters are improperly formed or are misaligned at the left margin. • Vertical, straight lines are wavy. To align the cartridges: 1 Load paper. 2 Open the printer utility by double-clicking the Z700-P700 Series Printer folder on your desktop, and then double-clicking Z700-P700 Series Utility. You can also access the Z700P700 Series Utility from Printer Services in the Print dialog menu. 3 From the Cartridges tab, click Align Cartridges. The Cartridge Alignment dialog appears. 4 Click Continue to print the alignment page. 5 On the Alignment Status dialog, click OK if automatic alignment is successful. If automatic alignment is not successful, click Yes to print a manual alignment page. 6 Find the number under the darkest arrow for each alignment group on the printed alignment page. 7 On the screen, use the arrows in the Align Cartridges dialog to select the number that matches the darkest arrow on the printed page for each alignment group. 8 Click OK. If the alignment page does not print, see "Alignment page does not print" on page 52. Aligning the print cartridges 41
-
 1
1 -
2
-
3
-
4
-
5
-
6
-
7
-
8
-
9
-
10
-
11
-
12
-
13
-
14
-
15
-
16
-
17
-
18
-
19
-
20
-
21
-
22
-
23
-
24
-
25
-
26
-
27
-
28
-
29
-
30
-
31
-
32
-
33
-
34
-
35
-
 36
36 -
 37
37 -
 38
38 -
 39
39 -
 40
40 -
 41
41 -
 42
42 -
 43
43 -
 44
44 -
 45
45 -
 46
46 -
47
-
48
-
49
-
50
-
51
-
52
-
53
-
54
-
55
-
56
-
57
-
58
-
59
-
60
-
61
-
62
-
63
-
64
-
65
-
66
-
67
 |
 |
