Lexmark Z705 User's Guide for Mac OS X - Page 42
Improving print quality, Print, Quality & Media, Better, Z700-P700 Series Printer - ink cartridge
 |
UPC - 734646890007
View all Lexmark Z705 manuals
Add to My Manuals
Save this manual to your list of manuals |
Page 42 highlights
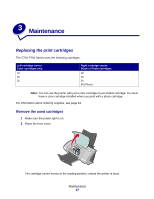
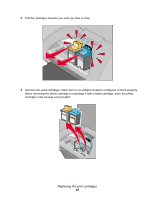
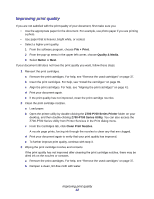
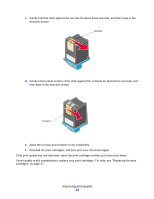
Improving print quality If you are not satisfied with the print quality of your document, first make sure you: • Use the appropriate paper for the document. For example, use photo paper if you are printing a photo. • Use paper that is heavier, bright white, or coated. • Select a higher print quality: 1 From the software program, choose File Print. 2 From the pop-up menu in the upper left corner, choose Quality & Media. 3 Select Better or Best. If your document still does not have the print quality you want, follow these steps: 1 Reinsert the print cartridges. a Remove the print cartridges. For help, see "Remove the used cartridges" on page 37. b Insert the print cartridges. For help, see "Install the cartridges" on page 39. c Align the print cartridges. For help, see "Aligning the print cartridges" on page 41. d Print your document again. e If the print quality has not improved, clean the print cartridge nozzles. 2 Clean the print cartridge nozzles. a Load paper. b Open the printer utility by double-clicking the Z700-P700 Series Printer folder on your desktop, and then double-clicking Z700-P700 Series Utility. You can also access the Z700-P700 Series Utility from Printer Services in the Print dialog menu. c From the Cartridges tab, click Clean Print Nozzles. A nozzle page prints, forcing ink through the nozzles to clean any that are clogged. d Print your document again to verify that your print quality has improved. e To further improve print quality, continue with step 3. 3 Wiping the print cartridge nozzles and contacts. If the print quality has not improved after cleaning the print cartridge nozzles, there may be dried ink on the nozzles or contacts. a Remove the print cartridges. For help, see "Remove the used cartridges" on page 37. b Dampen a clean, lint-free cloth with water. Improving print quality 42
-
 1
1 -
2
-
3
-
4
-
5
-
6
-
7
-
8
-
9
-
10
-
11
-
12
-
13
-
14
-
15
-
16
-
17
-
18
-
19
-
20
-
21
-
22
-
23
-
24
-
25
-
26
-
27
-
28
-
29
-
30
-
31
-
32
-
33
-
34
-
35
-
36
-
 37
37 -
 38
38 -
 39
39 -
 40
40 -
 41
41 -
 42
42 -
 43
43 -
 44
44 -
 45
45 -
 46
46 -
 47
47 -
48
-
49
-
50
-
51
-
52
-
53
-
54
-
55
-
56
-
57
-
58
-
59
-
60
-
61
-
62
-
63
-
64
-
65
-
66
-
67
 |
 |
