Linksys SPA921 Cisco SPA9000 Voice System Administration Guide - Page 77
Entering a Phone Dial Plan, STEP 3
 |
UPC - 745883570799
View all Linksys SPA921 manuals
Add to My Manuals
Save this manual to your list of manuals |
Page 77 highlights
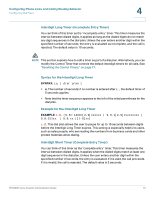
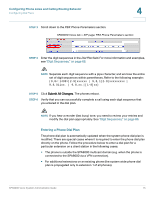
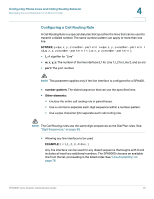
Configuring Phone Lines and Calling Routing Behavior Configuring Dial Plans 4 STEP 3 Scroll down to the PBX Phone Parameters section. SPA9000 Voice tab > SIP page: PBX Phone Parameters section STEP 4 Enter the digit sequences in the Dial Plan field. For more information and examples, see "Digit Sequences," on page 66. NOTE Separate each digit sequence with a pipe character, and enclose the entire set of digit sequences within parentheses. Refer to the following example: (9,8[2-9]xxxxxx | 9,8,1[2-9]xxxxxxxxx | 9,8,011xx. | 9,8,xx.|[1-8]xx) STEP 5 Click Submit All Changes. The phones reboot. STEP 6 Verify that you can successfully complete a call using each digit sequence that you entered in the dial plan. NOTE If you hear a reorder (fast busy) tone, you need to review your entries and modify the dial plan appropriately. See "Digit Sequences," on page 66. Entering a Phone Dial Plan The phone dial plan is automatically updated when the system phone dial plan is modified. There are special cases where it is required to enter the phone dial plan directly on the phone. Follow the procedure below to enter a dial plan for a particular extension on a client station in the following cases: • The phone is outside the SPA9000 multicast domain (e.g. when the phone is connected to the SPA9000 via a VPN connection). • For additional extensions on an existing phone (the system wide phone dial plan is propagated only to extension 1 of all phones). SPA9000 Voice System Administration Guide 75
-
 1
1 -
2
-
3
-
4
-
5
-
6
-
7
-
8
-
9
-
10
-
11
-
12
-
13
-
14
-
15
-
16
-
17
-
18
-
19
-
20
-
21
-
22
-
23
-
24
-
25
-
26
-
27
-
28
-
29
-
30
-
31
-
32
-
33
-
34
-
35
-
36
-
37
-
38
-
39
-
40
-
41
-
42
-
43
-
44
-
45
-
46
-
47
-
48
-
49
-
50
-
51
-
52
-
53
-
54
-
55
-
56
-
57
-
58
-
59
-
60
-
61
-
62
-
63
-
64
-
65
-
66
-
67
-
68
-
69
-
70
-
71
-
 72
72 -
 73
73 -
 74
74 -
 75
75 -
 76
76 -
 77
77 -
 78
78 -
 79
79 -
 80
80 -
 81
81 -
 82
82 -
83
-
84
-
85
-
86
-
87
-
88
-
89
-
90
-
91
-
92
-
93
-
94
-
95
-
96
-
97
-
98
-
99
-
100
-
101
-
102
-
103
-
104
-
105
-
106
-
107
-
108
-
109
-
110
-
111
-
112
-
113
-
114
-
115
-
116
-
117
-
118
-
119
-
120
-
121
-
122
-
123
-
124
-
125
-
126
-
127
-
128
-
129
-
130
-
131
-
132
-
133
-
134
-
135
-
136
-
137
-
138
-
139
-
140
-
141
-
142
-
143
-
144
-
145
-
146
-
147
-
148
-
149
-
150
-
151
-
152
-
153
-
154
-
155
-
156
-
157
-
158
-
159
-
160
-
161
-
162
-
163
-
164
-
165
-
166
-
167
-
168
-
169
-
170
-
171
-
172
-
173
-
174
-
175
-
176
-
177
-
178
-
179
-
180
-
181
-
182
-
183
-
184
-
185
-
186
-
187
-
188
-
189
-
190
-
191
-
192
-
193
-
194
-
195
-
196
-
197
-
198
-
199
-
200
-
201
-
202
-
203
-
204
-
205
-
206
-
207
-
208
-
209
-
210
-
211
-
212
-
213
-
214
-
215
-
216
-
217
-
218
-
219
-
220
-
221
-
222
-
223
-
224
-
225
-
226
-
227
-
228
-
229
-
230
-
231
-
232
-
233
-
234
-
235
-
236
-
237
-
238
-
239
-
240
-
241
-
242
-
243
-
244
-
245
-
246
-
247
-
248
-
249
-
250
-
251
-
252
-
253
-
254
-
255
-
256
-
257
-
258
-
259
-
260
-
261
-
262
-
263
-
264
-
265
-
266
-
267
-
268
-
269
-
270
-
271
-
272
-
273
-
274
-
275
-
276
-
277
-
278
-
279
-
280
-
281
-
282
-
283
-
284
-
285
-
286
 |
 |
