Linksys SPA922 Cisco SPA9000 Voice System Administration Guide - Page 29
Connecting to the SPA9000 Administration Web Server, Saving or Discarding Changes SPA9000, Admin Login - default password
 |
UPC - 745883570836
View all Linksys SPA922 manuals
Add to My Manuals
Save this manual to your list of manuals |
Page 29 highlights
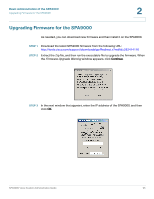
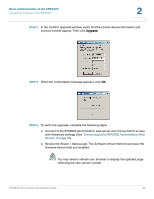
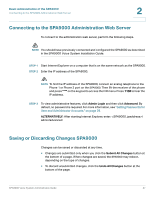
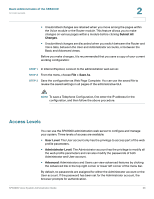
Basic Administration of the SPA9000 Connecting to the SPA9000 Administration Web Server 2 Connecting to the SPA9000 Administration Web Server To connect to the administration web server, perform the following steps. NOTE You should have previously connected and configured the SPA9000 as described in the SPA9000 Voice System Installation Guide. STEP 1 Start Internet Explorer on a computer that is on the same network as the SPA9000. STEP 2 Enter the IP address of the SPA9000. NOTE To find the IP address of the SPA9000, connect an analog telephone to the Phone 1 or Phone 2 port on the SPA9000. Then lift the receiver of the phone and press **** on the keypad to access the IVR menu. Press 110# to hear the IP address. STEP 3 To view administrative features, click Admin Login and then click Advanced. By default, no password is required. For more information, see "Setting Passwords for User and Administrator Accounts," on page 29. ALTERNATIVELY: After starting Internet Explorer, enter: / admin/advanced Saving or Discarding Changes SPA9000 Changes can be saved or discarded at any time. • Changes are submitted only when you click the Submit All Changes button at the bottom of a page. When changes are saved, the SPA9000 may reboot, depending on the type of changes. • To discard unsubmitted changes, click the Undo All Changes button at the bottom of the page. SPA9000 Voice System Administration Guide 27
-
 1
1 -
2
-
3
-
4
-
5
-
6
-
7
-
8
-
9
-
10
-
11
-
12
-
13
-
14
-
15
-
16
-
17
-
18
-
19
-
20
-
21
-
22
-
23
-
 24
24 -
 25
25 -
 26
26 -
 27
27 -
 28
28 -
 29
29 -
 30
30 -
 31
31 -
 32
32 -
 33
33 -
 34
34 -
35
-
36
-
37
-
38
-
39
-
40
-
41
-
42
-
43
-
44
-
45
-
46
-
47
-
48
-
49
-
50
-
51
-
52
-
53
-
54
-
55
-
56
-
57
-
58
-
59
-
60
-
61
-
62
-
63
-
64
-
65
-
66
-
67
-
68
-
69
-
70
-
71
-
72
-
73
-
74
-
75
-
76
-
77
-
78
-
79
-
80
-
81
-
82
-
83
-
84
-
85
-
86
-
87
-
88
-
89
-
90
-
91
-
92
-
93
-
94
-
95
-
96
-
97
-
98
-
99
-
100
-
101
-
102
-
103
-
104
-
105
-
106
-
107
-
108
-
109
-
110
-
111
-
112
-
113
-
114
-
115
-
116
-
117
-
118
-
119
-
120
-
121
-
122
-
123
-
124
-
125
-
126
-
127
-
128
-
129
-
130
-
131
-
132
-
133
-
134
-
135
-
136
-
137
-
138
-
139
-
140
-
141
-
142
-
143
-
144
-
145
-
146
-
147
-
148
-
149
-
150
-
151
-
152
-
153
-
154
-
155
-
156
-
157
-
158
-
159
-
160
-
161
-
162
-
163
-
164
-
165
-
166
-
167
-
168
-
169
-
170
-
171
-
172
-
173
-
174
-
175
-
176
-
177
-
178
-
179
-
180
-
181
-
182
-
183
-
184
-
185
-
186
-
187
-
188
-
189
-
190
-
191
-
192
-
193
-
194
-
195
-
196
-
197
-
198
-
199
-
200
-
201
-
202
-
203
-
204
-
205
-
206
-
207
-
208
-
209
-
210
-
211
-
212
-
213
-
214
-
215
-
216
-
217
-
218
-
219
-
220
-
221
-
222
-
223
-
224
-
225
-
226
-
227
-
228
-
229
-
230
-
231
-
232
-
233
-
234
-
235
-
236
-
237
-
238
-
239
-
240
-
241
-
242
-
243
-
244
-
245
-
246
-
247
-
248
-
249
-
250
-
251
-
252
-
253
-
254
-
255
-
256
-
257
-
258
-
259
-
260
-
261
-
262
-
263
-
264
-
265
-
266
-
267
-
268
-
269
-
270
-
271
-
272
-
273
-
274
-
275
-
276
-
277
-
278
-
279
-
280
-
281
-
282
-
283
-
284
-
285
-
286
 |
 |
