Netgear WNDR3700 WNDR3700 User Manual - Page 125
Enabling File and Printer Sharing, Configuring Windows 98SE and Windows ME
 |
UPC - 606449061314
View all Netgear WNDR3700 manuals
Add to My Manuals
Save this manual to your list of manuals |
Page 125 highlights
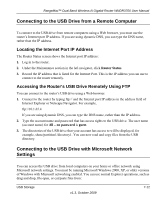
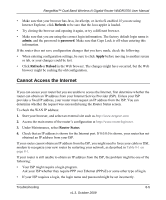
RangeMax™ Dual Band Wireless-N Gigabit Router WNDR3700 User Manual • Microsoft Windows Start Menu, Run option • Windows Explorer • Network Neighborhood or My Network Place. Enabling File and Printer Sharing Each computer's network properties must be set to enable network communication with the USB drive. File and Printer Sharing for Microsoft Networks must be enabled, as described below. Note: In Windows 2000 and Windows XP, File and Printer Sharing is enabled by default. Configuring Windows 98SE and Windows ME The easiest way to get to your network properties is to go to your desktop, right-click Network Neighborhood and then click Properties. File and printer sharing for Microsoft Windows should be listed. If not, click Add and follow the installation prompts. Note: If you have any questions on File and Printer Sharing, please contact Microsoft for assistance. Configuring Windows 2000 and Windows XP Right-click on the network connection for your local area network. File and Printer Sharing for Microsoft Windows should be listed. If not, click Install and follow the installation prompts. 4. On the Media Server (Settings) screen, check the Enable Media Server check box. (This check box is selected by default.) 5. Click Apply. 6. To set the router to scan for media files, select one of the following: • Automatic (when new files are added) - This option is selected by default. When selected, this option scans for media files whenever new files are added to the ReadyShare USB Hard Drive. • Scheduled Scan in ___ Minutes - This option lets you schedule a scan periodically, or you can click the Scan Now button to scan for new media immediately. USB Storage v1.3, October 2009 7-13
-
 1
1 -
2
-
3
-
4
-
5
-
6
-
7
-
8
-
9
-
10
-
11
-
12
-
13
-
14
-
15
-
16
-
17
-
18
-
19
-
20
-
21
-
22
-
23
-
24
-
25
-
26
-
27
-
28
-
29
-
30
-
31
-
32
-
33
-
34
-
35
-
36
-
37
-
38
-
39
-
40
-
41
-
42
-
43
-
44
-
45
-
46
-
47
-
48
-
49
-
50
-
51
-
52
-
53
-
54
-
55
-
56
-
57
-
58
-
59
-
60
-
61
-
62
-
63
-
64
-
65
-
66
-
67
-
68
-
69
-
70
-
71
-
72
-
73
-
74
-
75
-
76
-
77
-
78
-
79
-
80
-
81
-
82
-
83
-
84
-
85
-
86
-
87
-
88
-
89
-
90
-
91
-
92
-
93
-
94
-
95
-
96
-
97
-
98
-
99
-
100
-
101
-
102
-
103
-
104
-
105
-
106
-
107
-
108
-
109
-
110
-
111
-
112
-
113
-
114
-
115
-
116
-
117
-
118
-
119
-
 120
120 -
 121
121 -
 122
122 -
 123
123 -
 124
124 -
 125
125 -
 126
126 -
 127
127 -
 128
128 -
 129
129 -
 130
130 -
131
-
132
-
133
-
134
-
135
-
136
-
137
-
138
-
139
-
140
-
141
-
142
-
143
-
144
-
145
-
146
-
147
-
148
-
149
 |
 |
