Nikon COOLPIX P510 User Manual - Page 154
Notes on Connecting an HDMI Cable, When Nothing Appears on the TV - remote control
 |
View all Nikon COOLPIX P510 manuals
Add to My Manuals
Save this manual to your list of manuals |
Page 154 highlights
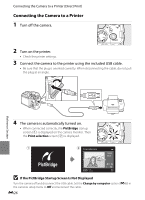
Connecting the Camera to a TV (Viewing Images on a TV) 3 Tune the television to the video channel. • See the instruction manual provided with your TV for details. 4 Hold down the c button to turn on the camera. • The camera enters playback mode, and the recorded pictures are displayed on the TV. • While the camera is connected to the TV, the monitor remains off. B Notes on Connecting an HDMI Cable An HDMI cable is not included. Use a commercially available HDMI cable to connect the camera to a TV. The output terminal on this camera is a HDMI Mini Connector (Type C). When purchasing an HDMI cable, be sure that the device end of the cable is a HDMI Mini Connector. B Notes on Connecting the Cable • When connecting the cable, be sure that the plug is oriented correctly. Do not force the plug into the camera. When disconnecting the cable, do not pull the plug at an angle. • Do not connect cables to the HDMI mini connector and USB/audio video connector simultaneously. B When Nothing Appears on the TV Make sure that TV settings (E86) in the setup menu is appropriate for your television. C Using the TV's Remote Control (HDMI Device Control) The remote control of a TV that conforms to the HDMI-CEC standard can be used to operate the camera during playback. Instead of the multi selector or zoom control, the remote control can be used for picture selection, playback/pause of movies, switching between full-frame playback and 4-picture thumbnail display, etc. • Set HDMI device control (E86) of TV settings to On (default setting) in the setup menu, and connect the camera to the TV with an HDMI cable. • Point the remote control at the TV to operate. • See your TV's instruction manual or other related documentation to check whether your TV conforms to the HDMI-CEC standard. E24 Reference Section
-
 1
1 -
2
-
3
-
4
-
5
-
6
-
7
-
8
-
9
-
10
-
11
-
12
-
13
-
14
-
15
-
16
-
17
-
18
-
19
-
20
-
21
-
22
-
23
-
24
-
25
-
26
-
27
-
28
-
29
-
30
-
31
-
32
-
33
-
34
-
35
-
36
-
37
-
38
-
39
-
40
-
41
-
42
-
43
-
44
-
45
-
46
-
47
-
48
-
49
-
50
-
51
-
52
-
53
-
54
-
55
-
56
-
57
-
58
-
59
-
60
-
61
-
62
-
63
-
64
-
65
-
66
-
67
-
68
-
69
-
70
-
71
-
72
-
73
-
74
-
75
-
76
-
77
-
78
-
79
-
80
-
81
-
82
-
83
-
84
-
85
-
86
-
87
-
88
-
89
-
90
-
91
-
92
-
93
-
94
-
95
-
96
-
97
-
98
-
99
-
100
-
101
-
102
-
103
-
104
-
105
-
106
-
107
-
108
-
109
-
110
-
111
-
112
-
113
-
114
-
115
-
116
-
117
-
118
-
119
-
120
-
121
-
122
-
123
-
124
-
125
-
126
-
127
-
128
-
129
-
130
-
131
-
132
-
133
-
134
-
135
-
136
-
137
-
138
-
139
-
140
-
141
-
142
-
143
-
144
-
145
-
146
-
147
-
148
-
 149
149 -
 150
150 -
 151
151 -
 152
152 -
 153
153 -
 154
154 -
 155
155 -
 156
156 -
 157
157 -
 158
158 -
 159
159 -
160
-
161
-
162
-
163
-
164
-
165
-
166
-
167
-
168
-
169
-
170
-
171
-
172
-
173
-
174
-
175
-
176
-
177
-
178
-
179
-
180
-
181
-
182
-
183
-
184
-
185
-
186
-
187
-
188
-
189
-
190
-
191
-
192
-
193
-
194
-
195
-
196
-
197
-
198
-
199
-
200
-
201
-
202
-
203
-
204
-
205
-
206
-
207
-
208
-
209
-
210
-
211
-
212
-
213
-
214
-
215
-
216
-
217
-
218
-
219
-
220
-
221
-
222
-
223
-
224
-
225
-
226
-
227
-
228
-
229
-
230
-
231
-
232
-
233
-
234
-
235
-
236
-
237
-
238
-
239
-
240
-
241
-
242
-
243
-
244
-
245
-
246
-
247
-
248
-
249
-
250
-
251
-
252
-
253
-
254
-
255
-
256
-
257
-
258
-
259
-
260
 |
 |
