Nikon COOLPIX P510 User Manual - Page 30
Using the Rotary Multi Selector, When Using Shooting Mode, When Using Playback Mode - reference manual
 |
View all Nikon COOLPIX P510 manuals
Add to My Manuals
Save this manual to your list of manuals |
Page 30 highlights
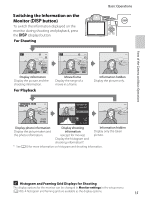
Basic Operations Parts of the Camera and Basic Operations Using the Rotary Multi Selector Operate by rotating the rotary multi selector, pressing up (H), down (I), left (J) or right (K) on the rotary multi selector, or pressing the k button. • The "rotary multi selector" is also referred to as the "multi selector" in this manual. When Using Shooting Mode Rotate to set the aperture value*/Select an item Display m (flash mode) (A66) menu Display n (Self-timer/ Smile timer) menu (A69, 70) Display the o (exposure compensation) guide (A74) Auto Apply selection Display D (focus mode) menu (A72) * The aperture value can be set in shooting mode l or m (A59). Items can be chosen while a menu is displayed. When Using Playback Mode Select the previous image1/Move the 15/05/2012 15:30 0004.JPG displayed area when the image is magnified (A35). Play back movies (A100)2 Select the next image1/Move the displayed area when the image is magnified (A35). 4/ 132 1 Previous or next images can also be chosen by rotating the rotary multi selector. 2 When displaying image thumbnail or when the image is magnified, this button switches the camera to full-frame playback mode. When Displaying Menus Select the item above* Select the item on the left/Return display to the previous screen Select the item below* Select the item on the right/Display sub-menu (apply selection) Apply selection Shooting menu Image quality Image size Picture Control Custom Picture Control White balance Metering Continuous 12 * Items above or below can also be chosen by rotating the rotary multi selector.
-
 1
1 -
2
-
3
-
4
-
5
-
6
-
7
-
8
-
9
-
10
-
11
-
12
-
13
-
14
-
15
-
16
-
17
-
18
-
19
-
20
-
21
-
22
-
23
-
24
-
 25
25 -
 26
26 -
 27
27 -
 28
28 -
 29
29 -
 30
30 -
 31
31 -
 32
32 -
 33
33 -
 34
34 -
 35
35 -
36
-
37
-
38
-
39
-
40
-
41
-
42
-
43
-
44
-
45
-
46
-
47
-
48
-
49
-
50
-
51
-
52
-
53
-
54
-
55
-
56
-
57
-
58
-
59
-
60
-
61
-
62
-
63
-
64
-
65
-
66
-
67
-
68
-
69
-
70
-
71
-
72
-
73
-
74
-
75
-
76
-
77
-
78
-
79
-
80
-
81
-
82
-
83
-
84
-
85
-
86
-
87
-
88
-
89
-
90
-
91
-
92
-
93
-
94
-
95
-
96
-
97
-
98
-
99
-
100
-
101
-
102
-
103
-
104
-
105
-
106
-
107
-
108
-
109
-
110
-
111
-
112
-
113
-
114
-
115
-
116
-
117
-
118
-
119
-
120
-
121
-
122
-
123
-
124
-
125
-
126
-
127
-
128
-
129
-
130
-
131
-
132
-
133
-
134
-
135
-
136
-
137
-
138
-
139
-
140
-
141
-
142
-
143
-
144
-
145
-
146
-
147
-
148
-
149
-
150
-
151
-
152
-
153
-
154
-
155
-
156
-
157
-
158
-
159
-
160
-
161
-
162
-
163
-
164
-
165
-
166
-
167
-
168
-
169
-
170
-
171
-
172
-
173
-
174
-
175
-
176
-
177
-
178
-
179
-
180
-
181
-
182
-
183
-
184
-
185
-
186
-
187
-
188
-
189
-
190
-
191
-
192
-
193
-
194
-
195
-
196
-
197
-
198
-
199
-
200
-
201
-
202
-
203
-
204
-
205
-
206
-
207
-
208
-
209
-
210
-
211
-
212
-
213
-
214
-
215
-
216
-
217
-
218
-
219
-
220
-
221
-
222
-
223
-
224
-
225
-
226
-
227
-
228
-
229
-
230
-
231
-
232
-
233
-
234
-
235
-
236
-
237
-
238
-
239
-
240
-
241
-
242
-
243
-
244
-
245
-
246
-
247
-
248
-
249
-
250
-
251
-
252
-
253
-
254
-
255
-
256
-
257
-
258
-
259
-
260
 |
 |
