Nikon COOLPIX P510 User Manual - Page 71
Note on 3D Photography, Viewing 3D Photography, Note on Viewing 3D Pictures
 |
View all Nikon COOLPIX P510 manuals
Add to My Manuals
Save this manual to your list of manuals |
Page 71 highlights
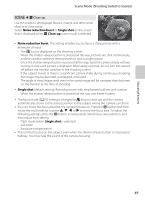
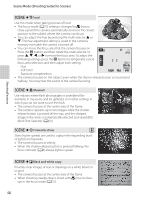
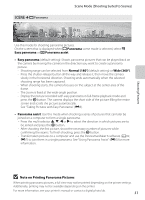
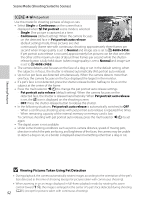
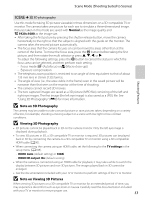
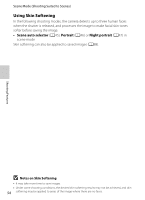
Scene Mode (Shooting Suited to Scenes) Shooting Features y M s 3D photography Use this mode for taking 3D pictures viewable in three dimensions on a 3D-compatible TV or monitor. The camera takes one picture for each eye to simulate a three-dimensional image. Pictures taken in this mode are saved with Normal as the image quality and O 1920×1080 as the image size. • After taking the first picture by pressing the shutter-release button, move the camera horizontally to the right so that the subject is aligned with the guide on the monitor. The camera takes the second picture automatically. • The focus area that the camera focuses on can be moved to areas other than at the center of the frame. To move the focus area, press the k button before taking the first picture, and then rotate the multi selector or press H, I, J, or K. To adjust the following settings, press the k button to cancel the status in which the focus area can be selected, and then perform each setting. - Focus mode (A (Autofocus) or p (Macro close-up)) - Exposure compensation • The telephoto zoom position is restricted to an angle of view equivalent to that of about 135 mm lens in 35mm [135] format. • The angle of view (i.e., the area visible in the frame) seen in the saved picture will be narrower than that seen on the monitor at the time of shooting. • The camera cannot record 3D movies. • The two captured images are saved as a 3D picture (MPO file) consisting of the left and right eye images. The first image (the left eye image) is also saved as a JPEG file. See "Using 3D Photography" (E8) for more information. B Note on 3D Photography The camera may be unable to take a second picture or save pictures taken, depending on a variety of factors, for example, shooting a moving subject or a scene with low light or low contrast conditions. B Viewing 3D Photography • 3D pictures cannot be played back in 3D on the camera monitor. Only the left eye image is displayed during playback. • To view 3D pictures in 3D, a 3D-compatible TV or monitor is required. 3D pictures can be played back in 3D by connecting the camera to a 3D-compatible TV or monitor using a 3D-compatible HDMI cable (A90). • When connecting the camera using an HDMI cable, set the following for the TV settings in the setup menu (A108). - HDMI: Auto (default setting) or 1080i - HDMI 3D output: On (default setting) • When the camera is connected using an HDMI cable for playback, it may take a while to switch the display between 3D pictures and non-3D pictures. The images played back in 3D cannot be enlarged. • See the documentation included with your TV or monitor to perform settings of the TV or monitor. B Note on Viewing 3D Pictures When viewing 3D pictures on a 3D-compatible TV or monitor for an extended period of time, you may experience discomfort such as eye strain or nausea. Carefully read the documentation included with your TV or monitor to ensure proper use. 53
-
 1
1 -
2
-
3
-
4
-
5
-
6
-
7
-
8
-
9
-
10
-
11
-
12
-
13
-
14
-
15
-
16
-
17
-
18
-
19
-
20
-
21
-
22
-
23
-
24
-
25
-
26
-
27
-
28
-
29
-
30
-
31
-
32
-
33
-
34
-
35
-
36
-
37
-
38
-
39
-
40
-
41
-
42
-
43
-
44
-
45
-
46
-
47
-
48
-
49
-
50
-
51
-
52
-
53
-
54
-
55
-
56
-
57
-
58
-
59
-
60
-
61
-
62
-
63
-
64
-
65
-
 66
66 -
 67
67 -
 68
68 -
 69
69 -
 70
70 -
 71
71 -
 72
72 -
 73
73 -
 74
74 -
 75
75 -
 76
76 -
77
-
78
-
79
-
80
-
81
-
82
-
83
-
84
-
85
-
86
-
87
-
88
-
89
-
90
-
91
-
92
-
93
-
94
-
95
-
96
-
97
-
98
-
99
-
100
-
101
-
102
-
103
-
104
-
105
-
106
-
107
-
108
-
109
-
110
-
111
-
112
-
113
-
114
-
115
-
116
-
117
-
118
-
119
-
120
-
121
-
122
-
123
-
124
-
125
-
126
-
127
-
128
-
129
-
130
-
131
-
132
-
133
-
134
-
135
-
136
-
137
-
138
-
139
-
140
-
141
-
142
-
143
-
144
-
145
-
146
-
147
-
148
-
149
-
150
-
151
-
152
-
153
-
154
-
155
-
156
-
157
-
158
-
159
-
160
-
161
-
162
-
163
-
164
-
165
-
166
-
167
-
168
-
169
-
170
-
171
-
172
-
173
-
174
-
175
-
176
-
177
-
178
-
179
-
180
-
181
-
182
-
183
-
184
-
185
-
186
-
187
-
188
-
189
-
190
-
191
-
192
-
193
-
194
-
195
-
196
-
197
-
198
-
199
-
200
-
201
-
202
-
203
-
204
-
205
-
206
-
207
-
208
-
209
-
210
-
211
-
212
-
213
-
214
-
215
-
216
-
217
-
218
-
219
-
220
-
221
-
222
-
223
-
224
-
225
-
226
-
227
-
228
-
229
-
230
-
231
-
232
-
233
-
234
-
235
-
236
-
237
-
238
-
239
-
240
-
241
-
242
-
243
-
244
-
245
-
246
-
247
-
248
-
249
-
250
-
251
-
252
-
253
-
254
-
255
-
256
-
257
-
258
-
259
-
260
 |
 |