Onkyo TX-RZ800 User Manual - Page 10
Connecting Components without HDMI, En-10 - advanced manual
 |
View all Onkyo TX-RZ800 manuals
Add to My Manuals
Save this manual to your list of manuals |
Page 10 highlights
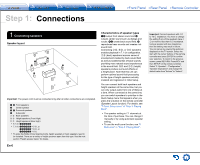
Control) compliant device, connection with ARC compatible TV, and HDMI Standby Through function. See "2 Source Connection" of "Step 2: Initial Setup". ・ Another TV can be connected to the HDMI OUT SUB jack. In this case, press the HDMI OUT button on the main unit several times to display "SUB" or "MAIN+SUB" and select the output method. You have to modify the settings to enable the CEC functions, such as ARC, for the TV connected to the HDMI OUT SUB jack. Set "Step 3: Playing Back" - "7 Quick Setup menu" - "Control TV" to "SUB". ・ To enjoy HDCP2.2 protected video, connect the player to one of the HDMI IN1 to IN5 jacks and connect the HDMI output jack on this unit and to a HDCP2.2 compatible HDMI input jack on the TV. You will be unable to view images protected by HDCP2.2 if your TV does not have a HDCP2.2 compatible input jack. ・ To play 4K or 1080p video, use a high speed HDMI cable or high speed HDMI with Ethernet cable. Connecting Components without HDMI If your AV component does not have HDMI jack, use an available jack of your component for cable connection with this unit. * It is possible to change assignment of the input jacks and input selector buttons. For how to make settings, see "1. Input/Output Assign" in "Advanced Settings (Setup Menu)" in the Advanced Manual. 3 2 1 5 4 Step 1: Connections ˙ Video signal connection The unit has a video upconversion function. For details, see the next section. 1 A TV with component video input jacks or a player with component video output jacks can be connected. * Only images input through the COMPONENT VIDEO IN jacks can be output through the COMPONENT VIDEO OUT jacks. Component video cable * Its transmitted video has higher quality than that of composite video cable. 2 A TV with composite video input jacks or a player with composite video output jacks can be connected. * Only images input through the VIDEO IN jack (composite) can be output through the VIDEO OUT jack. Composite video cable ˙ Audio signal connection 3 A player with a digital audio out jack can be connected. Digital optical cable (OPTICAL) * The DIGITAL IN OPTICAL jack of the unit has a cover. Push in the cable against the cover as it is turned inside. Digital coaxial cable (COAXIAL) 4 A player with analog audio out jacks can be connected. When using jacks 1 and 2 for video input, connect to the audio input jacks corresponding to the jacks connected at 1 and 2. (For example, when video input connection is to the 1 BD/DVD jack, the audio input connection should also be to the 4 BD/DVD jacks.) Analog audio (RCA) cable 5 Connect a turntable that uses an MM type cartridge and does not have a built-in audio equalizer. If the connected turntable has a built-in audio equalizer, connect it to the 4 analog audio input jack. * If it uses an MC type cartridge, install an audio equalizer compatible with MC type cartridge between the unit and the turntable by connecting it to the 4 analog audio input jack. For details, refer to the turntable's instruction manual. * If the turntable has a ground wire, connect it to the GND terminal of this unit. If connecting the ground wire increases noise, disconnect it. En-10
-
 1
1 -
2
-
3
-
4
-
 5
5 -
 6
6 -
 7
7 -
 8
8 -
 9
9 -
 10
10 -
 11
11 -
 12
12 -
 13
13 -
 14
14 -
 15
15 -
16
-
17
-
18
-
19
-
20
-
21
-
22
-
23
-
24
-
25
-
26
-
27
-
28
-
29
-
30
-
31
-
32
-
33
-
34
-
35
-
36
-
37
-
38
-
39
-
40
-
41
-
42
-
43
-
44
-
45
-
46
-
47
-
48
-
49
-
50
-
51
-
52
-
53
-
54
-
55
-
56
-
57
-
58
-
59
-
60
-
61
-
62
-
63
-
64
-
65
-
66
-
67
-
68
-
69
-
70
-
71
-
72
-
73
-
74
-
75
-
76
-
77
-
78
-
79
-
80
-
81
-
82
-
83
-
84
-
85
-
86
-
87
-
88
-
89
-
90
-
91
-
92
-
93
-
94
-
95
-
96
-
97
-
98
-
99
-
100
-
101
-
102
-
103
-
104
-
105
-
106
-
107
-
108
-
109
-
110
-
111
-
112
-
113
-
114
-
115
-
116
-
117
-
118
-
119
-
120
-
121
-
122
-
123
-
124
-
125
-
126
-
127
-
128
-
129
-
130
-
131
-
132
-
133
-
134
-
135
-
136
-
137
-
138
-
139
-
140
-
141
-
142
 |
 |
