Onkyo TX-RZ800 User Manual - Page 8
Instructions on how to connect speakers, When using commercially available banana plugs
 |
View all Onkyo TX-RZ800 manuals
Add to My Manuals
Save this manual to your list of manuals |
Page 8 highlights
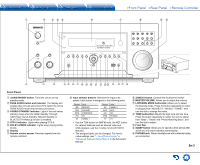
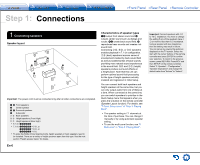
Using Dolby Enabled Speakers g i k h j l g h Dolby Enabled Speaker (Front) i j Dolby Enabled Speaker (Surround) k l Dolby Enabled Speaker (Back) A Dolby Enabled Speaker is specially designed to be used as a Height speaker. There are two types of Dolby Enabled Speakers; types placed on top of other speakers such as front speakers and surround speakers (), and types that are integrated with the normal speakers. Dolby Enabled Speakers placed with their diaphragms facing toward the ceiling create higher effect in the Dolby Atmos and Dolby Surround listening modes by providing sounds echoing off the ceiling. You can select gh, ij, or kl on this unit. For connection with the unit, use the HEIGHT speaker terminals. * You can put kl on top of back speakers, but even if you connect both back speakers and kl speakers at the same time, you can only output audio from one of these at a time. When playing Dolby Atmos, the speakers required depend on how you have setup your back speakers or height speakers. The following shows speaker combinations. Connection pattern 1 Back Back or Height 2 Front High 3 Rear High 4 Top Front 5 Top Middle 6 Top Rear 7 Dolby Enabled Speaker (Front) 8 Dolby Enabled Speaker (Surround) 9 Dolby Enabled Speaker (Back) Front Center Surround Required Optional Connection of a subwoofer is optional. Instructions on how to connect speakers Cut and remove the plastic coating from the end of the speaker cable, twist the core and connect it to the terminal. Make correct connection between the unit's jacks and speaker's jacks (+ to + and - to -) for each channel. If connection is wrong, a bass sound may become poor due to reverse phase. Up to two subwoofers with built-in power amplifier can be connected to the SUBWOOFER jacks. Set the cut-off filter selection switch of the subwoofer to DIRECT. If the subwoofer does not have a cut-off filter selection switch but has a cut-off frequency adjusting dial, turn it to the maximum frequency. If your subwoofer does not have built-in power amplifier, you can connect a power amplifier between the unit and the subwoofer. ・ Short-circuiting the + cable and - cable or contacting the cable core to the rear panel of the unit may cause failure. Also do not connect two or more cables to one speaker terminal or one speaker to several terminals. Step 1: Connections When using commercially available banana plugs: tighten the speaker terminals to the end and then insert the banana plugs. Do not insert the core of speaker cable directly into the hole for banana plug of speaker terminal. (North American model) En-8
-
 1
1 -
2
-
 3
3 -
 4
4 -
 5
5 -
 6
6 -
 7
7 -
 8
8 -
 9
9 -
 10
10 -
 11
11 -
 12
12 -
 13
13 -
14
-
15
-
16
-
17
-
18
-
19
-
20
-
21
-
22
-
23
-
24
-
25
-
26
-
27
-
28
-
29
-
30
-
31
-
32
-
33
-
34
-
35
-
36
-
37
-
38
-
39
-
40
-
41
-
42
-
43
-
44
-
45
-
46
-
47
-
48
-
49
-
50
-
51
-
52
-
53
-
54
-
55
-
56
-
57
-
58
-
59
-
60
-
61
-
62
-
63
-
64
-
65
-
66
-
67
-
68
-
69
-
70
-
71
-
72
-
73
-
74
-
75
-
76
-
77
-
78
-
79
-
80
-
81
-
82
-
83
-
84
-
85
-
86
-
87
-
88
-
89
-
90
-
91
-
92
-
93
-
94
-
95
-
96
-
97
-
98
-
99
-
100
-
101
-
102
-
103
-
104
-
105
-
106
-
107
-
108
-
109
-
110
-
111
-
112
-
113
-
114
-
115
-
116
-
117
-
118
-
119
-
120
-
121
-
122
-
123
-
124
-
125
-
126
-
127
-
128
-
129
-
130
-
131
-
132
-
133
-
134
-
135
-
136
-
137
-
138
-
139
-
140
-
141
-
142
 |
 |
