Onkyo TX-RZ800 User Manual - Page 11
Other connections, En-11
 |
View all Onkyo TX-RZ800 manuals
Add to My Manuals
Save this manual to your list of manuals |
Page 11 highlights
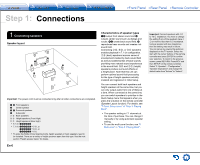
Video upconversion function Video signals input to the VIDEO IN jack or the COMPONENT VIDEO IN jacks will be upconverted to HDMI signals and then output from the HDMI output jack. AV Receiver * When you upconvert video signals input to the COMPONENT VIDEO IN jacks and output them from the HDMI OUT jack, set the output resolution of the player to 480i or 576i. If the input has 480p/576p or higher resolution, a message prompting you to change the resolution setting will appear. If your player does not support 480i or 576i output, use the VIDEO IN jack. * If multiple video signal inputs are put into one input system, HDMI signal output is prioritized. 3 Other connections AM/FM antenna connections Connect the antennas to listen to AM/FM broadcast. When listening to the broadcast for the first time, adjust the antenna position and orientation to get the best reception. Step 1: Connections Network connection You can enjoy Internet radio, DLNA, and AirPlay by connecting the unit to LAN. The unit can be connected to the router with an Ethernet cable or to the wireless LAN router with Wi-Fi connection. In case of wired connection, connect the LAN cable to the ETHERNET port. See "4 Network Connection" of "Step 2: Initial Setup" for Wi-Fi settings. AM loop antenna (supplied) Internet radio (North American models) Indoor FM antenna (supplied) Fix with a tack on the wall. (European, Australian and Asian models) Assemble the AM loop antenna (supplied). Router NAS Headphones connection Connect stereo headphones with a standard plug (1/4 inch or φ6.3 mm) to the PHONES jack on the front panel. Sound from the speakers will be off while you are using the headphones. ・ If you selected any other listening mode than Pure Audio, Stereo, Mono and Direct, connecting headphones will switch the listening mode to Stereo. Power cord This model includes a removable power cord. Connect the power cord to AC INLET of the unit and then connect to the outlet. Always disconnect the outlet side first when disconnecting the power cord. When the unit is turned on, a large instantaneous current may flow affecting functionality of the computer and other devices, so it is recommended to use a separate outlet. En-11
-
 1
1 -
2
-
3
-
4
-
5
-
 6
6 -
 7
7 -
 8
8 -
 9
9 -
 10
10 -
 11
11 -
 12
12 -
 13
13 -
 14
14 -
 15
15 -
 16
16 -
17
-
18
-
19
-
20
-
21
-
22
-
23
-
24
-
25
-
26
-
27
-
28
-
29
-
30
-
31
-
32
-
33
-
34
-
35
-
36
-
37
-
38
-
39
-
40
-
41
-
42
-
43
-
44
-
45
-
46
-
47
-
48
-
49
-
50
-
51
-
52
-
53
-
54
-
55
-
56
-
57
-
58
-
59
-
60
-
61
-
62
-
63
-
64
-
65
-
66
-
67
-
68
-
69
-
70
-
71
-
72
-
73
-
74
-
75
-
76
-
77
-
78
-
79
-
80
-
81
-
82
-
83
-
84
-
85
-
86
-
87
-
88
-
89
-
90
-
91
-
92
-
93
-
94
-
95
-
96
-
97
-
98
-
99
-
100
-
101
-
102
-
103
-
104
-
105
-
106
-
107
-
108
-
109
-
110
-
111
-
112
-
113
-
114
-
115
-
116
-
117
-
118
-
119
-
120
-
121
-
122
-
123
-
124
-
125
-
126
-
127
-
128
-
129
-
130
-
131
-
132
-
133
-
134
-
135
-
136
-
137
-
138
-
139
-
140
-
141
-
142
 |
 |
