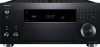
Onkyo TX-RZ800 User Manual - Page 3
Front Panel, HYBRID STANDBY indicator - receiver
 |
View all Onkyo TX-RZ800 manuals
Add to My Manuals
Save this manual to your list of manuals |
Page 3 highlights
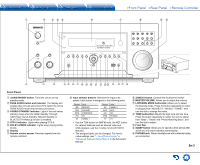
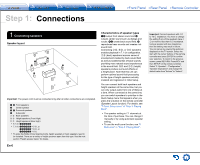
1 2 3 45 6 7 8 9F (European, Australian and Asian models) G H I J K L M N O P Q R ST U V W X Front Panel 1 zON/STANDBY button: Turns the unit on or into standby mode. 2 PURE AUDIO button and indicator: The display and analog video circuits are turned off to switch the unit to PURE AUDIO mode and provide purer sound. 3 HYBRID STANDBY indicator: Lights if the unit enters standby mode when the HDMI Standby Through, USB Power Out at Standby, Network Standby or BLUETOOTH Wakeup function is enabled. 4 DTS:X indicator: Lights when playing DTS:X. 5 DOLBY ATMOS indicator: Lights when playing Dolby Atmos. 6 Display 7 Remote control sensor: Receives signals from the remote controller. 8 Input selector buttons: Switches the input to be played. Each button is assigned to the following jacks. Button BD CBL STM PC G1 Jack BD/DVD CBL/SAT STRM BOX PC GAME 1 Button G2 AUX CD PHN TV Jack GAME 2 AUX CD PHONO TV ・ Use the TUN button for AM/FM radio, the NET button for network features such as Internet radio and USB playback, and the button for BLUETOOTH features. ・ The assigned jacks can be changed. For how to make settings, see "1. Input/Output Assign" in "Advanced Settings (Setup Menu)" in the Advanced Manual. 9 ZONE2/3 button: Controls the multi-zone function. F MASTER VOLUME: Allows you to adjust the volume. G LISTENING MODE button/dial: Allows you to select the listening mode. Press the button repeatedly to select a category from "MOVIE/TV", "MUSIC", "GAME", then turn the dial to change the mode. H TONE button/dial: Adjusts the high tone and low tone. Press the button repeatedly to select the item to adjust from "Bass", "Treble" and "Phase Matching Bass", and turn the dial to adjust. I Front flap J SLEEP button: Allows you to specify a time period after which the unit enters standby automatically. K PHONES jack: Stereo headphones with a standard plug are connected. En-3
-
 1
1 -
 2
2 -
 3
3 -
 4
4 -
 5
5 -
 6
6 -
 7
7 -
 8
8 -
 9
9 -
10
-
11
-
12
-
13
-
14
-
15
-
16
-
17
-
18
-
19
-
20
-
21
-
22
-
23
-
24
-
25
-
26
-
27
-
28
-
29
-
30
-
31
-
32
-
33
-
34
-
35
-
36
-
37
-
38
-
39
-
40
-
41
-
42
-
43
-
44
-
45
-
46
-
47
-
48
-
49
-
50
-
51
-
52
-
53
-
54
-
55
-
56
-
57
-
58
-
59
-
60
-
61
-
62
-
63
-
64
-
65
-
66
-
67
-
68
-
69
-
70
-
71
-
72
-
73
-
74
-
75
-
76
-
77
-
78
-
79
-
80
-
81
-
82
-
83
-
84
-
85
-
86
-
87
-
88
-
89
-
90
-
91
-
92
-
93
-
94
-
95
-
96
-
97
-
98
-
99
-
100
-
101
-
102
-
103
-
104
-
105
-
106
-
107
-
108
-
109
-
110
-
111
-
112
-
113
-
114
-
115
-
116
-
117
-
118
-
119
-
120
-
121
-
122
-
123
-
124
-
125
-
126
-
127
-
128
-
129
-
130
-
131
-
132
-
133
-
134
-
135
-
136
-
137
-
138
-
139
-
140
-
141
-
142
 |
 |
