Panasonic AG-HMC70 Memory Card Camera Recorder - Page 19
Push Auto Button [push Auto], Audio Level Knob[audio Level] - menu
 |
UPC - 092281893525
View all Panasonic AG-HMC70 manuals
Add to My Manuals
Save this manual to your list of manuals |
Page 19 highlights
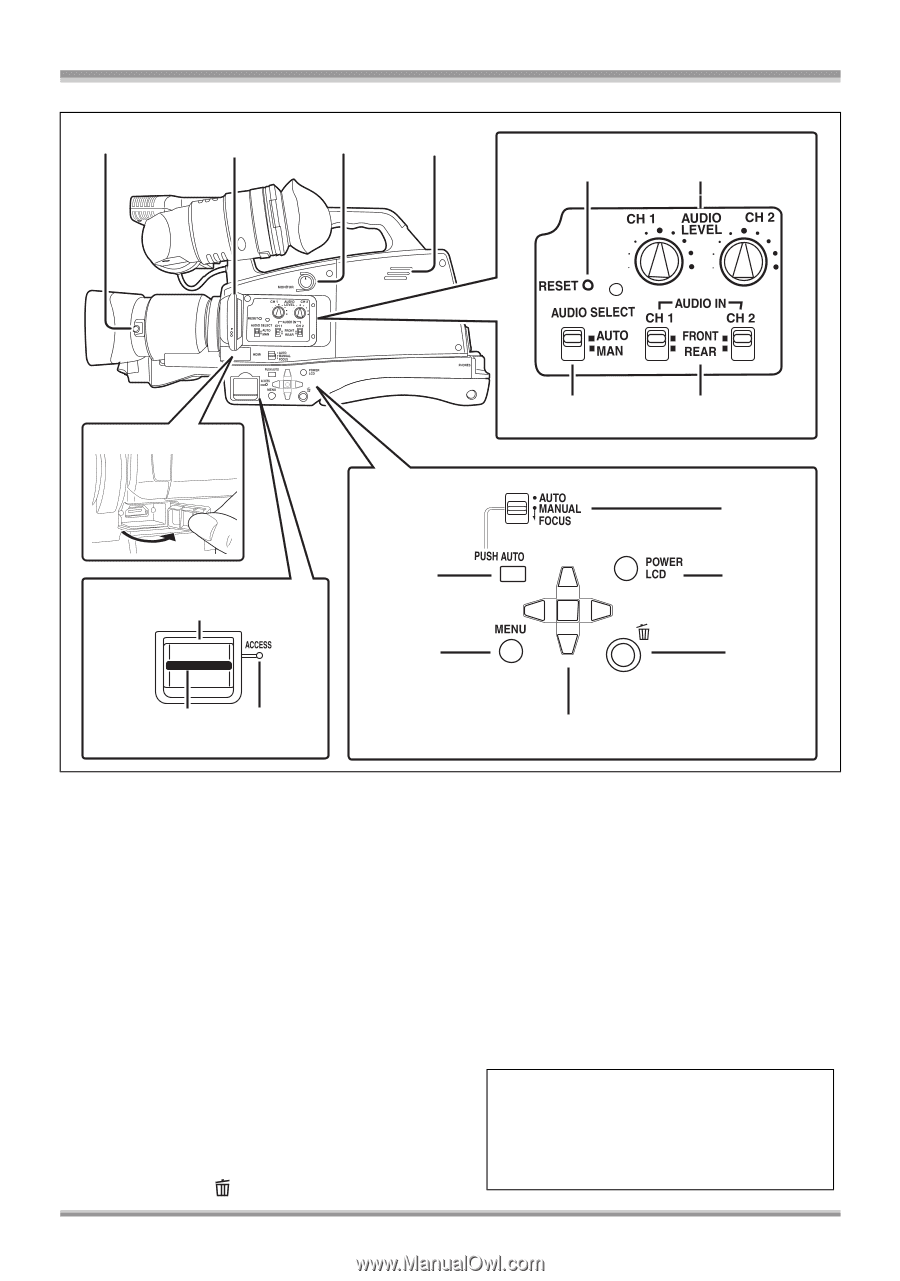
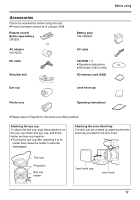
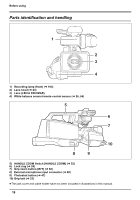
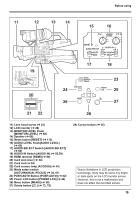
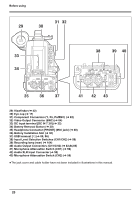
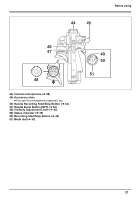
11 12 13 14 Before using 1145 1165 176 178 189 2232 2234 2254 1290 2256 2276 201 221 2278 11) Lens hood screw (l 23) 12) LCD monitor (l 24) 13) MONITOR LEVEL Knob [MONITOR LEVEL] (l 68) 14) Speaker (l 68) 15) Reset button [RESET] (l 115) 16) AUDIO LEVEL Knob[AUDIO LEVEL] (l 60) 17) AUDIO SELECT Switch [AUDIO SELECT] (l 60) 18) AUDIO IN Switch [AUDIO IN] (l 58,59) 19) HDMI terminal [HDMI] (l 80) 20) Card slot cover (l 34) 21) Card slot (l 34) 22) Card access lamp [ACCESS] (l 34) 23) Mode select switch [AUTO/MANUAL/FOCUS] (l 38, 61) 24) PUSH AUTO Button [PUSH AUTO] (l 62) 25) Power LCD button [POWER LCD] (l 42) 26) Menu button [MENU] (l 39) 27) Delete button [ ] (l 73, 75) 28) Cursor button (l 35) Due to limitations in LCD production technology, there may be some tiny bright or dark spots on the LCD monitor screen. However, this is not a malfunction and does not affect the recorded picture. 19
-
 1
1 -
2
-
3
-
4
-
5
-
6
-
7
-
8
-
9
-
10
-
11
-
12
-
13
-
 14
14 -
 15
15 -
 16
16 -
 17
17 -
 18
18 -
 19
19 -
 20
20 -
 21
21 -
 22
22 -
 23
23 -
 24
24 -
25
-
26
-
27
-
28
-
29
-
30
-
31
-
32
-
33
-
34
-
35
-
36
-
37
-
38
-
39
-
40
-
41
-
42
-
43
-
44
-
45
-
46
-
47
-
48
-
49
-
50
-
51
-
52
-
53
-
54
-
55
-
56
-
57
-
58
-
59
-
60
-
61
-
62
-
63
-
64
-
65
-
66
-
67
-
68
-
69
-
70
-
71
-
72
-
73
-
74
-
75
-
76
-
77
-
78
-
79
-
80
-
81
-
82
-
83
-
84
-
85
-
86
-
87
-
88
-
89
-
90
-
91
-
92
-
93
-
94
-
95
-
96
-
97
-
98
-
99
-
100
-
101
-
102
-
103
-
104
-
105
-
106
-
107
-
108
-
109
-
110
-
111
-
112
-
113
-
114
-
115
-
116
-
117
-
118
-
119
-
120
-
121
-
122
-
123
-
124
 |
 |