Panasonic AG-HMC70 Memory Card Camera Recorder - Page 32
Connecting to the AC outlet, Connect the DC cable to the DC
 |
UPC - 092281893525
View all Panasonic AG-HMC70 manuals
Add to My Manuals
Save this manual to your list of manuals |
Page 32 highlights
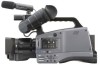
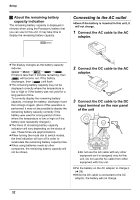
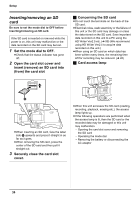
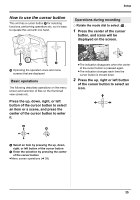
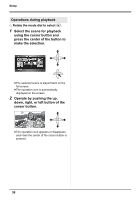
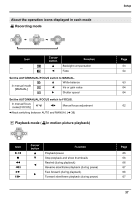
Setup ª About the remaining battery capacity indication The remaining battery capacity is displayed in minutes when using the Panasonic battery that you can use for this unit. It may take time to display the remaining battery capacity. 30min Connecting to the AC outlet ≥Even if the battery is inserted in this unit, it will not charge. 1 Connect the AC cable to the AC adaptor. ≥The display changes as the battery capacity reduces. # # # # . If there is less than 3 minutes remaining, then will become red. If the battery discharges, then ( ) will flash. ≥The remaining battery capacity may not be displayed correctly where the temperature is low or high or if the battery was not used for a long period of time. To correctly display the remaining battery capacity, recharge the battery, discharge it and then charge it again. (Even if this operation is performed, it may not be possible to display the remaining battery capacity correctly if the battery was used for a long period of time where the temperature is low or high or if the battery was repeatedly charged.) ≥The times of remaining battery capacity indication will vary depending on the status of use. These times are approximations. ≥When turning the mode dial to switch modes, the time indication will turn off in order to recalculate the remaining battery capacity time. ≥When using batteries made by other companies, the remaining battery capacity will not be shown. 2 Connect the DC cable to the AC adaptor. 3 Connect the DC cable to the DC input terminal on the rear panel of the unit ≥Do not use the AC cable with any other equipment as it is designed only for this unit. Do not use the AC cable from other equipment with this unit. ≥Put the battery on the AC adaptor to charge it. (l 29) ≥While the DC cable is connected to the AC adaptor, the battery will not charge. 32
-
 1
1 -
2
-
3
-
4
-
5
-
6
-
7
-
8
-
9
-
10
-
11
-
12
-
13
-
14
-
15
-
16
-
17
-
18
-
19
-
20
-
21
-
22
-
23
-
24
-
25
-
26
-
 27
27 -
 28
28 -
 29
29 -
 30
30 -
 31
31 -
 32
32 -
 33
33 -
 34
34 -
 35
35 -
 36
36 -
 37
37 -
38
-
39
-
40
-
41
-
42
-
43
-
44
-
45
-
46
-
47
-
48
-
49
-
50
-
51
-
52
-
53
-
54
-
55
-
56
-
57
-
58
-
59
-
60
-
61
-
62
-
63
-
64
-
65
-
66
-
67
-
68
-
69
-
70
-
71
-
72
-
73
-
74
-
75
-
76
-
77
-
78
-
79
-
80
-
81
-
82
-
83
-
84
-
85
-
86
-
87
-
88
-
89
-
90
-
91
-
92
-
93
-
94
-
95
-
96
-
97
-
98
-
99
-
100
-
101
-
102
-
103
-
104
-
105
-
106
-
107
-
108
-
109
-
110
-
111
-
112
-
113
-
114
-
115
-
116
-
117
-
118
-
119
-
120
-
121
-
122
-
123
-
124
 |
 |