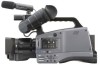
Panasonic AG-HMC70 Memory Card Camera Recorder - Page 42
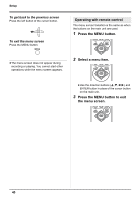
Adjusting LCD monitor/finder, Press the POWER LCD button.
 |
UPC - 092281893525
View all Panasonic AG-HMC70 manuals
Add to My Manuals
Save this manual to your list of manuals |
Page 42 highlights
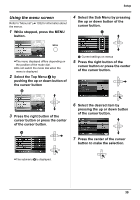
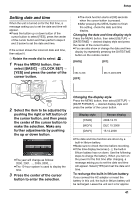
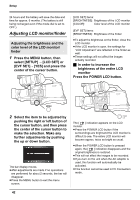
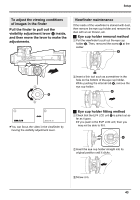
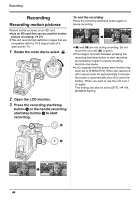
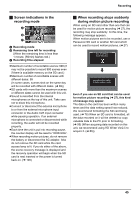
Setup 24 hours and the battery will save the date and time for approx. 6 months. (The battery is still being recharged even if the mode dial is set to OFF.) Adjusting LCD monitor/finder Adjusting the brightness and the color level of the LCD monitor/ finder 1 Press the MENU button, then select [SETUP] # [LCD SET] or [EVF SET]# [YES] and press the center of the cursor button. [LCD SET] items: [BRIGHTNESS]: Brightness of the LCD monitor [COLOR]: Color level of the LCD monitor [EVF SET] items: [BRIGHTNESS]: Brightness of the finder ≥To adjust the brightness on the finder, close the LCD monitor. ≥If the LCD monitor is open, the settings for "LCD Adjustment" are reflected in the finder as well. ≥These settings will not affect the images actually recorded. ª In order to increase the brightness of the entire LCD monitor Press the POWER LCD button. 2 Select the item to be adjusted by pushing the right or left button of the cursor button, and then press the center of the cursor button to make the selection. Make any further adjustments by pushing the up or down button. The bar display moves. ≥After adjustments are made if no operations are performed for about 2 seconds, the bar will disappear. ≥Press the MENU button to exit the menu screen. POWER LCD The [ ] indication appears on the LCD monitor. ≥Press the POWER LCD button if the surroundings are bright and the LCD monitor is difficult to see. The entire LCD monitor will become approx. twice as bright as usual. ≥When the POWER LCD button is pressed again, the [ ] indication disappears and the original brightness is restored. ≥This will not affect the images to be recorded. ≥If you turn on the unit when the AC adaptor is used, this function will automatically be activated. ≥This function cannot be used in PC Connection mode. 42
-
 1
1 -
2
-
3
-
4
-
5
-
6
-
7
-
8
-
9
-
10
-
11
-
12
-
13
-
14
-
15
-
16
-
17
-
18
-
19
-
20
-
21
-
22
-
23
-
24
-
25
-
26
-
27
-
28
-
29
-
30
-
31
-
32
-
33
-
34
-
35
-
36
-
 37
37 -
 38
38 -
 39
39 -
 40
40 -
 41
41 -
 42
42 -
 43
43 -
 44
44 -
 45
45 -
 46
46 -
 47
47 -
48
-
49
-
50
-
51
-
52
-
53
-
54
-
55
-
56
-
57
-
58
-
59
-
60
-
61
-
62
-
63
-
64
-
65
-
66
-
67
-
68
-
69
-
70
-
71
-
72
-
73
-
74
-
75
-
76
-
77
-
78
-
79
-
80
-
81
-
82
-
83
-
84
-
85
-
86
-
87
-
88
-
89
-
90
-
91
-
92
-
93
-
94
-
95
-
96
-
97
-
98
-
99
-
100
-
101
-
102
-
103
-
104
-
105
-
106
-
107
-
108
-
109
-
110
-
111
-
112
-
113
-
114
-
115
-
116
-
117
-
118
-
119
-
120
-
121
-
122
-
123
-
124
 |
 |
