Panasonic CF-19CHGACJM Reference Manual - Page 124
Hard Disk Data Erase Utility
 |
UPC - 092281871011
View all Panasonic CF-19CHGACJM manuals
Add to My Manuals
Save this manual to your list of manuals |
Page 124 highlights
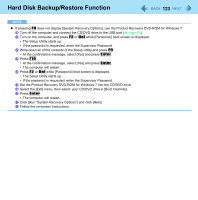
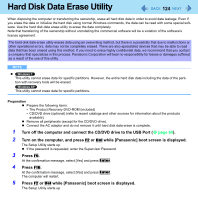
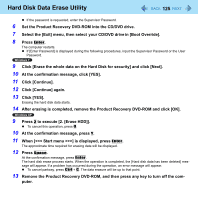
Hard Disk Data Erase Utility 124 When disposing the computer or transferring the ownership, erase all hard disk data in order to avoid data leakage. Even if you erase the data or initialize the hard disk using normal Windows commands, the data can be read with some special software. Use the hard disk data erase utility to erase the data completely. Note that transferring of the ownership without uninstalling the commercial software will be a violation of the software's license agreement. The hard disk data erase utility erases data using an overwriting method, but there is a possibility that due to malfunctions or other operational errors, data may not be completely erased. There are also specialized devices that may be able to read data that has been erased using this method. If you need to erase highly confidential data, we recommend that you contact a company that specializes in this process. Panasonic Corporation will bear no responsibility for losses or damages suffered as a result of the use of this utility. NOTE This utility cannot erase data for specific partitions. However, the entire hard disk data including the data of the partition with recovery tools will be erased. This utility cannot erase data for specific partitions. Preparation Prepare the following items: • The Product Recovery DVD-ROM (included) • CD/DVD drive (optional) (refer to recent catalogs and other sources for information about the products available) Remove all peripherals (except for the CD/DVD drive). Connect the AC adaptor and do not remove it until hard disk data erase is complete. 1 Turn off the computer and connect the CD/DVD drive to the USB Port ( page 60). 2 Turn on the computer, and press F2 or Del while [Panasonic] boot screen is displayed. The Setup Utility starts up. If the password is requested, enter the Supervisor Password. 3 Press F9. At the confirmation message, select [Yes] and press Enter. 4 Press F10. At the confirmation message, select [Yes] and press Enter. The computer will restart. 5 Press F2 or Del while [Panasonic] boot screen is displayed. The Setup Utility starts up.
-
 1
1 -
2
-
3
-
4
-
5
-
6
-
7
-
8
-
9
-
10
-
11
-
12
-
13
-
14
-
15
-
16
-
17
-
18
-
19
-
20
-
21
-
22
-
23
-
24
-
25
-
26
-
27
-
28
-
29
-
30
-
31
-
32
-
33
-
34
-
35
-
36
-
37
-
38
-
39
-
40
-
41
-
42
-
43
-
44
-
45
-
46
-
47
-
48
-
49
-
50
-
51
-
52
-
53
-
54
-
55
-
56
-
57
-
58
-
59
-
60
-
61
-
62
-
63
-
64
-
65
-
66
-
67
-
68
-
69
-
70
-
71
-
72
-
73
-
74
-
75
-
76
-
77
-
78
-
79
-
80
-
81
-
82
-
83
-
84
-
85
-
86
-
87
-
88
-
89
-
90
-
91
-
92
-
93
-
94
-
95
-
96
-
97
-
98
-
99
-
100
-
101
-
102
-
103
-
104
-
105
-
106
-
107
-
108
-
109
-
110
-
111
-
112
-
113
-
114
-
115
-
116
-
117
-
118
-
 119
119 -
 120
120 -
 121
121 -
 122
122 -
 123
123 -
 124
124 -
 125
125 -
 126
126 -
 127
127 -
 128
128 -
 129
129 -
130
-
131
-
132
-
133
-
134
-
135
-
136
-
137
-
138
-
139
-
140
-
141
-
142
-
143
-
144
-
145
-
146
 |
 |
