Panasonic WJRT416 WJRT416 User Guide
Panasonic WJRT416 - 16CH DIGITAL RECORDER Manual
 |
View all Panasonic WJRT416 manuals
Add to My Manuals
Save this manual to your list of manuals |
Panasonic WJRT416 manual content summary:
- Panasonic WJRT416 | WJRT416 User Guide - Page 1
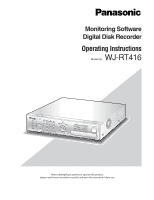
Software Digital Disk Recorder Operating Instructions WJ-RT416 Model No. ERROR ALARM TIMER OPERATE HDD SEQUENCE 1 2 3 SMCRUELETIN 4 5 ALARM RESET 6 1 2 5 6 9 10/0 13 14 3 4 7 8 11 12 15 16 SETUP SEARCH COPY ESC SET STOP PLAY PAUSE REC REC STOP REV FWD SKIP Digital - Panasonic WJRT416 | WJRT416 User Guide - Page 2
Start/stop of the manual recording using this software (Manual Rec. Control 38 Download/ Upload 40 Firmware update of the recorder Firmware Update (Maintenance - Firmware Update 41 Download recorded images from the recorder ..... 42 Remote Talk 43 Configure the settings of the monitoring software - Panasonic WJRT416 | WJRT416 User Guide - Page 3
ANY PERSON, EXCEPT FOR CERTAIN WARRANTY PROGRAM OFFERED BY THE LOCAL DEALER OF PANASONIC, FOR THE CASES INCLUDING BUT NOT LIMITED TO BELOW: (1) ANY DAMAGE , REPAIR OR MODIFICATION OF THE PRODUCT BY THE USER; (4) ANY PROBLEM, CONSEQUENTIAL INCONVENIENCE, OR LOSS OR DAMAGE, ARISING OUT OF THE SYS- - Panasonic WJRT416 | WJRT416 User Guide - Page 4
: • Playback of downloaded recorded images • Alteration check of data About These Operating Instructions There are 2 sets of operating instructions for the WJ-RT416 as follows. • Operating Instructions (PDF) of the monitoring software (this document) • Installation Guide (book) These "Operating - Panasonic WJRT416 | WJRT416 User Guide - Page 5
following system requirements, it may cause problems such as slow imaging or the software becomes inoperable. OS Computer CPU Memory the operating instructions on the provided CD-ROM. Notes: • When the graphic memory is less than 32 MB, the monitoring software can access only four camera channels - Panasonic WJRT416 | WJRT416 User Guide - Page 6
and the wizard will be displayed. Step 3 Install the software by following instructions displayed on the monitor. Select the display language and the television created. (The directory path is "C:\Program Files\Panasonic\RT4 Monitoring Software".) When the installation is completed, the program will - Panasonic WJRT416 | WJRT416 User Guide - Page 7
" - "Panasonic" - "RT4 Monitoring Software" "RT4Client") or double-click the shortcut icon of the RT4Client on the desktop. → The monitoring software will start and area Image display area Image display area Live images from the cameras and recorded images on the recorder will be displayed in this - Panasonic WJRT416 | WJRT416 User Guide - Page 8
operating instructions of the recorder for further information about the alarm reset. Recorder control buttons Login Logout Data Download Recorder Config Favorite Display Minimize • Configuration of the settings of the monitoring software ( page 44) • Frame display (Function to display only - Panasonic WJRT416 | WJRT416 User Guide - Page 9
camera by clicking the camera icon on the map) ( • Control panel ( page 24) • RT4Viewer ( page 52) The viewer software (RT4Viewer) that can play recorded images downloaded onto the PC will start • Minimize This software network. Manual + Monitor: The recorder is in the process of the manual recording - Panasonic WJRT416 | WJRT416 User Guide - Page 10
. • IP Address • Type Monitor: User is monitoring live images. Control: User is being logged in the recorder using the monitoring software. Backup: User is downloading recorded images from the recorder. Talk: User is transmitting/receiving audio to/from the recorder. Frame: User is displaying images - Panasonic WJRT416 | WJRT416 User Guide - Page 11
is possible to configure the settings or operate the recorder using the monitoring software after completing the connection. IP Address: 192.168.0.2 - 192.168.0. to the network environment of the PC. Refer to the installation guide of the recorder for further information about the network settings ( - Panasonic WJRT416 | WJRT416 User Guide - Page 12
Screenshot 2 The control panel will be displayed. Step 2 Click the "Network and Internet Connections" icon. Screenshot 3 The "Network and Internet Connections" window will be displayed. Step 3 Click "Network Connections". Screenshot 4 The "Network Connections" window will be displayed. Step 4 - Panasonic WJRT416 | WJRT416 User Guide - Page 13
Screenshot 5 The "Local Area Connection Status" window will be displayed. Step 5 Click "Properties". Screenshot 6 The "Local Area Connection Properties" window will be displayed. Step 6 Click "Internet Protocol (TCP/IP)", and then click "Properties". Screenshot 7 The "Properties" window of " - Panasonic WJRT416 | WJRT416 User Guide - Page 14
of the recorder, it is possible to restrict users to monitor images from the cameras by setting the password of the user level "Viewer" or "Operator". By ] button. Note: Refer to the installation guide of the recorder for further information about the connection works of the recorder and the PC. 14 - Panasonic WJRT416 | WJRT416 User Guide - Page 15
to display live images on a single screen or a multi-screen in the image display area. To monitor live images from the cameras, select the desired camera connected to the recorder first. Screenshot 1 Start operation when the operation window is being displayed. Step 1 Right-click on a blank area - Panasonic WJRT416 | WJRT416 User Guide - Page 16
displayed in the image display area. (16-screen): Areas 1 - 16 will be displayed in the image display area. Check the status of the camera The status of the camera respective to the area can be check with the displayed icon. (No icon): Displaying of live images or playback of recorded images are - Panasonic WJRT416 | WJRT416 User Guide - Page 17
the pop-up menu will be displayed. Select "White", "Magenta" or "Bright Green" to change the color of the text temporarily. Control the cameras The camera from which images are being displayed in the image display area can be controlled using the control panel ( page 24). When displaying images on - Panasonic WJRT416 | WJRT416 User Guide - Page 18
Login to the recorder Log in the recorder as follows. Screenshot 1 Click the [Login] button. → The "Login" window will be displayed. Step 1 Select the desired recorder and enter the password of the user level "Manager". Note: Only the recorders registered in advance can be selected on the "Login" - Panasonic WJRT416 | WJRT416 User Guide - Page 19
: It is impossible to play recorded images which is currently being played or copied on the recorder. Note: When displaying images from 5 or more camera channels of the same recorder, or when displaying recorded images in an area on a multi-screen, only I-frame will be displayed in all areas - Panasonic WJRT416 | WJRT416 User Guide - Page 20
Screenshot 3 The "List Search" window will be displayed. Step 3 Set the desired search filter. Camera Check the radio button of the desired camera channel to be searched. Filtering Off: Manual: Timer: Alarm: Terminal: VMD: Com: Searches without filtering Searches for only images recorded by the - Panasonic WJRT416 | WJRT416 User Guide - Page 21
be displayed. Step 2 Select "T&D Search Playback". Screenshot 3 The "T&D Search Playback" window will be displayed. Step 3 Set the following items. Camera Select the desired camera to be searched. Start Enter the start time and date for the search. Step 4 When completing the settings, click the - Panasonic WJRT416 | WJRT416 User Guide - Page 22
Screenshot 4 Playback of images recorded in the designated time and date will start in the area select in step 1. Notes: • When no recorded image was found at the designat- ed time and date, playback will start from the next record. • When there is no recorded image at all, playback will not start. - Panasonic WJRT416 | WJRT416 User Guide - Page 23
Stop playback When playback is stopped, the connection with the recorder will also be disconnected. Screenshot 1 Start operation when the operation window is being displayed. Step 1 Right-click on the area where recorded images are being played. Screenshot 2 The pop-up menu will be displayed. - Panasonic WJRT416 | WJRT416 User Guide - Page 24
both when displaying live images and when playing recorded images. • Saving an image on the PC • Capturing of images from the camera • Muting audio • Displaying of images from the camera on a full screen Display the control panel When the [Control Panel] button is clicked, the control panel will be - Panasonic WJRT416 | WJRT416 User Guide - Page 25
the image while playback is being stopped or paused. • When this software starts the alarm recording during saving a file, the file saving will : Audio is not muted. : Audio is being muted. Display images from the camera on a full screen When the [Full Screen] button is clicked, the images currently - Panasonic WJRT416 | WJRT416 User Guide - Page 26
position registered in advance Notes: • When "Home" is selected for "Preset position", the camera will move to the home position (only when controlling Panasonic's camera). Refer to the operating instructions of the camera for how to configure the related settings. • It is also possible to pan/tilt - Panasonic WJRT416 | WJRT416 User Guide - Page 27
the setting, moves to the submenu Moves to the parent page Moves the cursor, changes the parameter Displays the special menu (Refer to the operating instructions of the camera in use for further information about the special menu.) Resets the settings of the setup menu of the - Panasonic WJRT416 | WJRT416 User Guide - Page 28
Operations during playback Operations during playback can be made using the control panel ( page 24). Stop Pause Previous record Play/frame by frame play Next record Playback speed Playback point slider [Stop] button: [Pause] button: [Previous record] button: [Play/frame by frame play] button: [ - Panasonic WJRT416 | WJRT416 User Guide - Page 29
Map display These display function can be started by clicking the respective button of the system control buttons. Frame display Live images from the camera will be displayed in the frame play. Display interval can be set by configuring "I Frame Interval" on the "Common Setup" tab of the "Recording - Panasonic WJRT416 | WJRT416 User Guide - Page 30
up menu will be displayed. Step 3 To exit from the frame display, click the [×] button at the right top of the window. Notes: • When 5 cameras are selected, the frame display will start on a 9-screen as shown is the image of "Screenshot 2". • When the resolution setting (Field/SIF) for the selected - Panasonic WJRT416 | WJRT416 User Guide - Page 31
Sequential display The displayed images from multiple cameras will be switched automatically. To start the sequential display, configure the settings relating to the sequential display in advance. Refer to page 47 for how - Panasonic WJRT416 | WJRT416 User Guide - Page 32
displayed, discon- nect all the connections. Click the [OK] button to disconnect all the connection to continue operation. • When the camera of which the camera channel registered as a favorite is not connected, images may not be displayed as configured on the "My Favorite Display Setup" window - Panasonic WJRT416 | WJRT416 User Guide - Page 33
the pop-up menu, the connection window will be displayed. Enter the password, and then click the [OK] button. → Connection with the selected camera will be estab- lished and live image monitoring will become avail- able. When clicking on and selecting "Disconnect" from the displayed pop-up - Panasonic WJRT416 | WJRT416 User Guide - Page 34
this software • Determination whether to enable or disable the alarm output from the AUDIO IN/ALARM OUT terminal on the rear of the recorder • Reboot of the recorder • Download/upload of the setup data from/to the recorder • Download/upload of the language data from/to the recorder • Firmware update - Panasonic WJRT416 | WJRT416 User Guide - Page 35
NTP Setup] tab on the "Communication Setup" window are the same as the items on the setup menu ("Camera Control Setup", "Network Setup" and "RS485 Setup") of the recorder. Refer to the installation guide of the recorder for further information about the setup items. Refer to the following for how to - Panasonic WJRT416 | WJRT416 User Guide - Page 36
[NTP Setup] tab Time Adjustment Select "On" or "Off" to determine whether or not to adjust time by synchronizing with the NTP server. Default: Off NTP Server Address Enter the NTP server IP address when "On" is selected for "NTP Synchronization". Enter up to 128 alphanumeric characters (including - Panasonic WJRT416 | WJRT416 User Guide - Page 37
recorder. The contents of each log are the same as the contents that can be checked by operating the recorder directly. Refer to the installation guide of the recorder for further information. It is also possible to save each log on the PC in the CSV format by clicking the [Save - Panasonic WJRT416 | WJRT416 User Guide - Page 38
" window will be displayed. Step 1 Select "On" or "Off" to start or stop the manual recording. On: Starts the manual recording using this software. Off: Stops the manual recording using this software. Step 2 Click the [Apply] button. → The selected operation will be carried out. Determination - Panasonic WJRT416 | WJRT416 User Guide - Page 39
then select the setup data to be uploaded. Step 2 Designate the directory in which the setup data is to be downloaded (default name: RT4Set.bin), and then click the [Save] button. → Download of the setup data will start. Step 2 Click the [Upload] button. → Upload of the setup data will start. Note - Panasonic WJRT416 | WJRT416 User Guide - Page 40
from the pop-up menu ( page 34). → The "Language Data Download/Upload" window will be displayed. Download the language data Step 1 Click the [Download] button. Step 2 Designate the directory in which the language data is to be downloaded (default name: RT4Lang.txt), and then click the [Save] button - Panasonic WJRT416 | WJRT416 User Guide - Page 41
(the file size and the updated time and date) and the version will be displayed. Step 2 Click the [Firmware Update] button. → Update of the firmware will start. To validate the updated firmware, reboot the recorder. Important: Before rebooting the recorder, make sure that the recorder is not in the - Panasonic WJRT416 | WJRT416 User Guide - Page 42
8). → The "Data Download" window will be displayed. Step 1 Set the following search filters. Camera: Select the camera channels. To select all the camera channels, check the "All" checkbox. Filtering: Select the recording type. • Off: Searches without filtering • Manual: Searches for only - Panasonic WJRT416 | WJRT416 User Guide - Page 43
the recorded images to be down- loaded cannot be edited. • It is impossible to download recorded images which is currently being played or copied on the recorder or which is currently being played using the software. Remote Talk It is possible to communicate with the login recorder using audio. To - Panasonic WJRT416 | WJRT416 User Guide - Page 44
operations can be made on the "Recorder Setup" window. • Registration of the recorder to be operated using this software • Edit of the recorder information • Edit of the camera information Screenshot 1 Select "Recorder Setup" under "Monitor System Config" from the pop-up menu. → The "Recorder Setup - Panasonic WJRT416 | WJRT416 User Guide - Page 45
999 seconds. Alarm images recorded by the alarm recording using this software can be saved on the PC. (The alarm recording starts when the recorder detects an alarm occurrence.) The default is "30" (sec.). Alarm Recording: Select a camera channel to be used for recording when an alarm occurs in the - Panasonic WJRT416 | WJRT416 User Guide - Page 46
- Favorite10) from the pull-down menu. Step 2 Select the recorder to access and the desired camera channels to be assigned to each area. It is also possible to assign the desired camera channel by dragging the desired camera icon in the tree view onto the desired area icon. Step 3 To cancel all of - Panasonic WJRT416 | WJRT416 User Guide - Page 47
2 tabs; the "Normal Sequence" tab and the "My Favorite Sequence" tab. On the "Normal Sequence" tab, the settings for the sequential display using the cameras connected to the registered recorder can be configured. On the "My Favorite Sequence" tab, the settings for the sequential display using the - Panasonic WJRT416 | WJRT416 User Guide - Page 48
to 0 - 999 minutes. When "0" is entered, the sequential display will not stop until manually stopped. The default is 30 minutes. Dwell Time Set the dwell time (interval of switching from a camera channel to the next camera channel) to 15 - 999 seconds. The default is 60 seconds. Screen Mode Select - Panasonic WJRT416 | WJRT416 User Guide - Page 49
a jpeg image (jpeg). To cancel the applied background image, click the [Clear] button. Step 3 Click the [Layout] button. Step 4 Locate each of the camera icons onto the actual positions on the background image. Step 5 Click the [OK] button. → The "Map Edit" window will close. Step 6 Click the [Close - Panasonic WJRT416 | WJRT416 User Guide - Page 50
Info.: The camera name and the set image quality will be displayed. Default: All checkboxes are checked Alarm Sound Setup Select "On" or "Off" to determine whether or not to sound the alarm buzzer (will be heard from the PC speaker) when the software receives an alarm notification. Default: On - Panasonic WJRT416 | WJRT416 User Guide - Page 51
video format. Choose Directory Designate the directory in which downloaded recorded images or captured images are to be stored. Transport ini" file in the "RT4 Monitoring Software" folder. (The directory path is "C:\Program Files\Panasonic\RT4 Monitoring Software".) Notes: • Depending on the - Panasonic WJRT416 | WJRT416 User Guide - Page 52
downloaded recorded images. Start the RT4Viewer Select "RT4Viewer.exe" from the "Start" menu ("Start" - "All Programs" - "Panasonic" - "RT4 Monitoring Software" information, refer to the installation guide of the recorder. • When using the downloaded viewer software, "Search File(S)" under "File - Panasonic WJRT416 | WJRT416 User Guide - Page 53
volume. Property display area The following information of the downloaded recorded image currently being played will be displayed. Camera channel, start time, end time, image quality, event type, playback speed Notes: • When using the viewer software copied on a DVD-R or a CD-R, the "Mpeg" folder - Panasonic WJRT416 | WJRT416 User Guide - Page 54
Playback downloaded recorded images Select "Open File(O)" under "File(F)" on the menu bar. → The file selection window will be displayed. Select the desired file to be played - Panasonic WJRT416 | WJRT416 User Guide - Page 55
on the "Advanced Setup" window of the monitoring software can be searched. (When the monitoring software is started, the "Advanced Setup" window can Select Channel Check the checkbox of the desired camera channel to be searched. To select all the camera channels, check the "All" checkbox. Time - Panasonic WJRT416 | WJRT416 User Guide - Page 56
Alteration check Check whether the downloaded recorded image selected in the playback list display area has been altered or not. Screenshot 1 Open the desired image to be checked. ( page 54) Step 1 - Panasonic WJRT416 | WJRT416 User Guide - Page 57
system administrator if it is not lit. Refer to page 13 in the installation guide. • Is the valid IP address set? Refer to a system administrator for camera channel. • If the PC in use that does not meet the system requirements, it may cause problems such as slow 5 imaging or the software - Panasonic WJRT416 | WJRT416 User Guide - Page 58
in use that does not meet the system requirements, audio may be interrupted. Reference pages - 5 • Check the login status. 18 • To play the downloaded image file, use the RT4Viewer. 52 • The network traffic may be heavy or the bandwidth is getting narrower. - • Close all applications except - Panasonic WJRT416 | WJRT416 User Guide - Page 59
. For U.S., Canadian and Puerto Rican fields: Panasonic System Solutions Company, Unit Company of Panasonic Corporation of North America Security Systems www.panasonic.com/security For customer support, call 1.877.733.3689 Executive Office: Three Panasonic Way 2H-2, Secaucus, New Jersey 07094 Zone
-
 1
1 -
 2
2 -
 3
3 -
 4
4 -
 5
5 -
 6
6 -
 7
7 -
8
-
9
-
10
-
11
-
12
-
13
-
14
-
15
-
16
-
17
-
18
-
19
-
20
-
21
-
22
-
23
-
24
-
25
-
26
-
27
-
28
-
29
-
30
-
31
-
32
-
33
-
34
-
35
-
36
-
37
-
38
-
39
-
40
-
41
-
42
-
43
-
44
-
45
-
46
-
47
-
48
-
49
-
50
-
51
-
52
-
53
-
54
-
55
-
56
-
57
-
58
-
59
 |
 |

Before attempting to connect or operate this product,
please read these instructions carefully and save this manual for future use.
Monitoring Software
Digital Disk Recorder
Operating Instructions
Model No.
WJ-RT416
ERROR
SEQUENCE
SETUP
ESC
SEARCH
COPY
STOP
PLAY
PAUSE
REC
REC STOP
SET
HDD
1
2
3
1
2
3
4
5
6
7
8
9
10/0
11
12
13
14
15
16
4
5
6
ALARM
MULTI
SCREEN
TIMER
ALARM
RESET
OPERATE
REV
FWD
SKIP
Digital Disk Recorder WJ-RT416