Ricoh Aficio MP 1600 Printer Reference - Page 29
Installing the Printer Driver, Quick Install - driver download
 |
View all Ricoh Aficio MP 1600 manuals
Add to My Manuals
Save this manual to your list of manuals |
Page 29 highlights
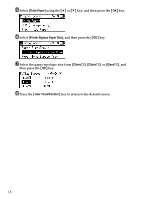
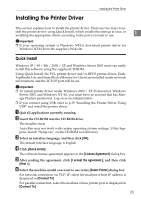
Installing the Printer Driver Installing the Printer Driver This section explains how to install the printer driver. There are two ways to in- stall the printer driver: using Quick Install, which installs the settings at once, or installing the appropriate driver according to the port you want to use. 1 Important ❒ If your operating system is Windows NT4.0, download printer driver for Windows NT4.0 from the supplier's Web site. Quick Install Windows 95 / 98 / Me / 2000 / XP and Windows Server 2003 users can easily install this software using the supplied CD-ROM. Using Quick Install, the PCL printer driver and/or RPCS printer driver, DeskTopBinder Lite and SmartDeviceMonitor for Client are installed under network environment, and the TCP/IP port will be set. Important ❒ To install printer driver under Windows 2000 / XP Professional, Windows Server 2003, and Windows NT 4.0, you must have an account that has Manage Printers permission. Log on as an Administrator. ❒ If you connect using USB, refer to p.39 "Installing the Printer Driver Using USB" and install the printer driver. A Quit all applications currently running. B Insert the CD-ROM into the CD-ROM drive. The installer starts. Auto Run may not work with certain operating system settings. If this happens, launch "Setup.exe" on the CD-ROM root directory. C Select an interface language, and then click [OK]. The default interface language is English. D Click [Quick Install]. The software license agreement appears in the [License Agreement] dialog box. E After reading the agreement, click [I accept the agreement.], and then click [Next >]. F Select the machine model you want to use in the [Select Printer] dialog box. For network connection via TCP/IP, select the machine whose IP address is displayed in [Connect To]. For parallel connection, select the machine whose printer port is displayed in [Connect To]. 23
-
 1
1 -
2
-
3
-
4
-
5
-
6
-
7
-
8
-
9
-
10
-
11
-
12
-
13
-
14
-
15
-
16
-
17
-
18
-
19
-
20
-
21
-
22
-
23
-
 24
24 -
 25
25 -
 26
26 -
 27
27 -
 28
28 -
 29
29 -
 30
30 -
 31
31 -
 32
32 -
 33
33 -
 34
34 -
35
-
36
-
37
-
38
-
39
-
40
-
41
-
42
-
43
-
44
-
45
-
46
-
47
-
48
-
49
-
50
-
51
-
52
-
53
-
54
-
55
-
56
-
57
-
58
-
59
-
60
-
61
-
62
-
63
-
64
-
65
-
66
-
67
-
68
-
69
-
70
-
71
-
72
-
73
-
74
-
75
-
76
-
77
-
78
-
79
-
80
-
81
-
82
-
83
-
84
-
85
-
86
-
87
-
88
-
89
-
90
-
91
-
92
-
93
-
94
-
95
-
96
-
97
-
98
-
99
-
100
-
101
-
102
-
103
-
104
-
105
-
106
-
107
-
108
 |
 |