Ricoh P C600 User Guide - Page 18
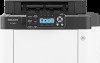
Exterior: Rear view, Front cover, Tray 1, Paper size dial, Bypass tray, Paper guides, Tray Extension
 |
View all Ricoh P C600 manuals
Add to My Manuals
Save this manual to your list of manuals |
Page 18 highlights
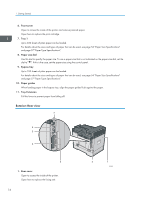
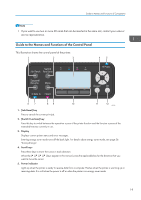
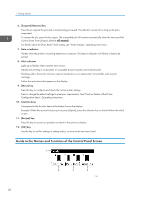
1. Getting Started 6. Front cover Open to access the inside of the printer and remove jammed paper. Open here to replace the print cartridge. 7. Tray 1 Up to 500 sheets of plain paper can be loaded. For details about the sizes and types of paper that can be used, see page 54 "Paper Size Specifications" and page 57 "Paper Type Specifications". 8. Paper size dial Use this dial to specify the paper size. To use a paper size that is not indicated on the paper size dial, set the dial to " ". If this is the case, set the paper size using the control panel. 9. Bypass tray Up to 100 sheets of plain paper can be loaded. For details about the sizes and types of paper that can be used, see page 54 "Paper Size Specifications" and page 57 "Paper Type Specifications". 10. Paper guides When loading paper in the bypass tray, align the paper guides flush against the paper. 11. Tray Extension Pull this fence to prevent paper from falling off. Exterior: Rear view 7 6 5 4 3 1. Rear cover Open to access the inside of the printer. Open here to replace the fusing unit. 16 2 1 EAG363
-
 1
1 -
2
-
3
-
4
-
5
-
6
-
7
-
8
-
9
-
10
-
11
-
12
-
 13
13 -
 14
14 -
 15
15 -
 16
16 -
 17
17 -
 18
18 -
 19
19 -
 20
20 -
 21
21 -
 22
22 -
 23
23 -
24
-
25
-
26
-
27
-
28
-
29
-
30
-
31
-
32
-
33
-
34
-
35
-
36
-
37
-
38
-
39
-
40
-
41
-
42
-
43
-
44
-
45
-
46
-
47
-
48
-
49
-
50
-
51
-
52
-
53
-
54
-
55
-
56
-
57
-
58
-
59
-
60
-
61
-
62
-
63
-
64
-
65
-
66
-
67
-
68
-
69
-
70
-
71
-
72
-
73
-
74
-
75
-
76
-
77
-
78
-
79
-
80
-
81
-
82
-
83
-
84
-
85
-
86
-
87
-
88
-
89
-
90
-
91
-
92
-
93
-
94
-
95
-
96
-
97
-
98
-
99
-
100
-
101
-
102
-
103
-
104
-
105
-
106
-
107
-
108
-
109
-
110
-
111
-
112
-
113
-
114
-
115
-
116
-
117
-
118
-
119
-
120
-
121
-
122
-
123
-
124
-
125
-
126
-
127
-
128
 |
 |
