Ricoh P C600 User Guide - Page 27
Check the contents of the package., Remove the HDD cover., Loosen the screws by using a coin
 |
View all Ricoh P C600 manuals
Add to My Manuals
Save this manual to your list of manuals |
Page 27 highlights
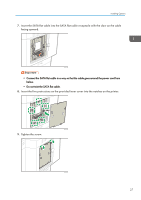
1. Check the contents of the package. Installing Options 1 2 1. Hard disk 2. Flat cable 3. Power cord 2. Remove the HDD cover. 3 EAG373 EAG355 3. Loosen the screws by using a coin, and then slide the inner cover to the top to remove it. 1 1 2 EAG356 The figure below shows the location to attach the hard disk drive. It also shows the locations of the receptacles to plug the power cord and the SATA flat cable. 25
-
 1
1 -
2
-
3
-
4
-
5
-
6
-
7
-
8
-
9
-
10
-
11
-
12
-
13
-
14
-
15
-
16
-
17
-
18
-
19
-
20
-
21
-
 22
22 -
 23
23 -
 24
24 -
 25
25 -
 26
26 -
 27
27 -
 28
28 -
 29
29 -
 30
30 -
 31
31 -
 32
32 -
33
-
34
-
35
-
36
-
37
-
38
-
39
-
40
-
41
-
42
-
43
-
44
-
45
-
46
-
47
-
48
-
49
-
50
-
51
-
52
-
53
-
54
-
55
-
56
-
57
-
58
-
59
-
60
-
61
-
62
-
63
-
64
-
65
-
66
-
67
-
68
-
69
-
70
-
71
-
72
-
73
-
74
-
75
-
76
-
77
-
78
-
79
-
80
-
81
-
82
-
83
-
84
-
85
-
86
-
87
-
88
-
89
-
90
-
91
-
92
-
93
-
94
-
95
-
96
-
97
-
98
-
99
-
100
-
101
-
102
-
103
-
104
-
105
-
106
-
107
-
108
-
109
-
110
-
111
-
112
-
113
-
114
-
115
-
116
-
117
-
118
-
119
-
120
-
121
-
122
-
123
-
124
-
125
-
126
-
127
-
128
 |
 |

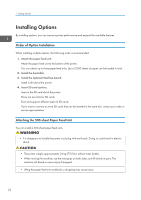
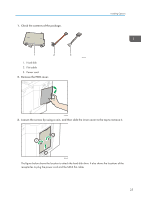
1.
Check the contents of the package.
3
2
1
EAG373
1.
Hard disk
2.
Flat cable
3.
Power cord
2.
Remove the HDD cover.
EAG355
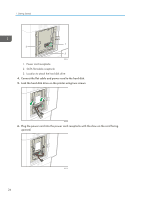
3.
Loosen the screws by using a coin, and then slide the inner cover to the top to remove it.
1
1
2
EAG356
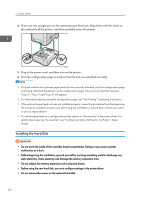
The figure below shows the location to attach the hard disk drive. It also shows the locations of the
receptacles to plug the power cord and the SATA flat cable.
Installing Options
25