Ricoh P C600 User Guide - Page 29
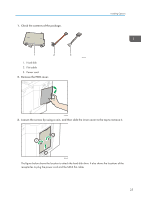
Insert the five protrusions on the provided inner cover into the notches on the printer.
 |
View all Ricoh P C600 manuals
Add to My Manuals
Save this manual to your list of manuals |
Page 29 highlights
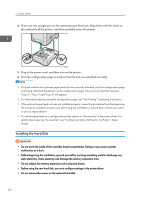
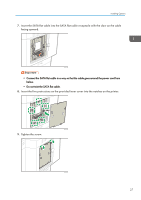
Installing Options 7. Insert the SATA flat cable into the SATA flat cable receptacle with the claw on the cable facing upward. EAG376 • Connect the SATA flat cable in a way so that the cable goes around the power cord from below. • Do not twist the SATA flat cable. 8. Insert the five protrusions on the provided inner cover into the notches on the printer. EAG360 9. Tighten the screw. EAG361 27
-
 1
1 -
2
-
3
-
4
-
5
-
6
-
7
-
8
-
9
-
10
-
11
-
12
-
13
-
14
-
15
-
16
-
17
-
18
-
19
-
20
-
21
-
22
-
23
-
 24
24 -
 25
25 -
 26
26 -
 27
27 -
 28
28 -
 29
29 -
 30
30 -
 31
31 -
 32
32 -
 33
33 -
 34
34 -
35
-
36
-
37
-
38
-
39
-
40
-
41
-
42
-
43
-
44
-
45
-
46
-
47
-
48
-
49
-
50
-
51
-
52
-
53
-
54
-
55
-
56
-
57
-
58
-
59
-
60
-
61
-
62
-
63
-
64
-
65
-
66
-
67
-
68
-
69
-
70
-
71
-
72
-
73
-
74
-
75
-
76
-
77
-
78
-
79
-
80
-
81
-
82
-
83
-
84
-
85
-
86
-
87
-
88
-
89
-
90
-
91
-
92
-
93
-
94
-
95
-
96
-
97
-
98
-
99
-
100
-
101
-
102
-
103
-
104
-
105
-
106
-
107
-
108
-
109
-
110
-
111
-
112
-
113
-
114
-
115
-
116
-
117
-
118
-
119
-
120
-
121
-
122
-
123
-
124
-
125
-
126
-
127
-
128
 |
 |

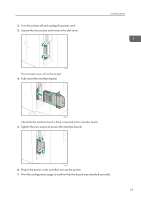
7.
Insert the SATA flat cable into the SATA flat cable receptacle with the claw on the cable
facing upward.
EAG376
•
Connect the SATA flat cable in a way so that the cable goes around the power cord from
below.
•
Do not twist the SATA flat cable.
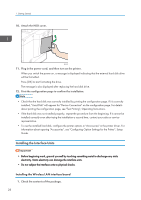
8.
Insert the five protrusions on the provided inner cover into the notches on the printer.
EAG360
9.
Tighten the screw.
EAG361
Installing Options
27