Ricoh P C600 User Guide - Page 36
configuration see Test Printing, Operating Instructions.
 |
View all Ricoh P C600 manuals
Add to My Manuals
Save this manual to your list of manuals |
Page 36 highlights
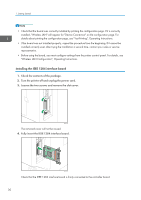
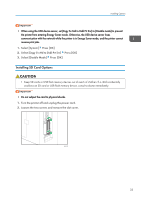
1. Getting Started 3. Insert the SD card into the slot until it clicks. EAG346 If you insert only one SD card, use the upper slot. If you insert two SD cards simultaneously, use both slots. If you insert the optional VM card, use only the lower slot. If you want to use two or more SD cards simultaneously, contact your service representative. 4. Tighten the two screws to secure the slot cover. 5. Plug in the power cord, and then turn on the printer. 6. Check that the SD card was installed correctly. • You can confirm that the SD card was installed correctly by checking the control panel menu or configuration page. • VM card: Make sure [JavaTM/X] appears when the [Switch Functions] key is pressed. • Camera direct print card: Printing the configuration page, if the camera direct print card is installed properly, "PictBridge" will appear for "Printer Language" in "System Reference". For details about printing the configuration page, see "Test Printing", Operating Instructions. • XPS card: Printing the configuration page, if the XPS card is installed properly, "XPS" will appear for "Printer Language" in "System Reference". For details about printing the configuration page, see "Test Printing", Operating Instructions. • If the card is not installed properly, repeat the procedure from the beginning. If it cannot be installed correctly even after trying the installation a second time, contact your sales or service representative. • Do not touch the card while the printer is in use. It may come loose, even if pushed only slightly. The slot cover must be reattached. 34
-
 1
1 -
2
-
3
-
4
-
5
-
6
-
7
-
8
-
9
-
10
-
11
-
12
-
13
-
14
-
15
-
16
-
17
-
18
-
19
-
20
-
21
-
22
-
23
-
24
-
25
-
26
-
27
-
28
-
29
-
30
-
 31
31 -
 32
32 -
 33
33 -
 34
34 -
 35
35 -
 36
36 -
 37
37 -
 38
38 -
 39
39 -
 40
40 -
 41
41 -
42
-
43
-
44
-
45
-
46
-
47
-
48
-
49
-
50
-
51
-
52
-
53
-
54
-
55
-
56
-
57
-
58
-
59
-
60
-
61
-
62
-
63
-
64
-
65
-
66
-
67
-
68
-
69
-
70
-
71
-
72
-
73
-
74
-
75
-
76
-
77
-
78
-
79
-
80
-
81
-
82
-
83
-
84
-
85
-
86
-
87
-
88
-
89
-
90
-
91
-
92
-
93
-
94
-
95
-
96
-
97
-
98
-
99
-
100
-
101
-
102
-
103
-
104
-
105
-
106
-
107
-
108
-
109
-
110
-
111
-
112
-
113
-
114
-
115
-
116
-
117
-
118
-
119
-
120
-
121
-
122
-
123
-
124
-
125
-
126
-
127
-
128
 |
 |
