Samsung SCH U340 User Manual (ENGLISH) - Page 46
Contacts, Groups, New Group, Enter New Name, Move an Entry to Another Group, Create a New Group
 |
UPC - 635753463200
View all Samsung SCH U340 manuals
Add to My Manuals
Save this manual to your list of manuals |
Page 46 highlights
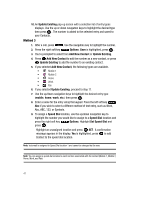
View Groups 1. Press MENU, Contacts is highlighted, press . 2. Press Groups. The following groups appear in the display. • No Group • Business • Colleague • Family • Friends 3. Use the navigation key to highlight the desired group, then press to access the group and view its contents. VIEW Move an Entry to Another Group 1. Press the right soft key Contacts. Use the navigation key to highlight the contact you wish to move. 2. Press the left soft key Edit. Use the up/down navigation key to scroll to the Group option. 3. Press the left soft key Set. Choose from the following groups: • No Group • Business • Colleague • Family • Friends 4. Use the navigation key to highlight the group containing the entry that you wish to move, then press . 5. Press SAVE. The selection has been saved to the designated group. Create a New Group In addition to the five groups already in your phone, you can create additional groups (a maximum of 30). New groups can be named anything you like as long as their names are within the 32-character limit. 1. Press MENU, Contacts is highlighted, press . 2. Press Groups. Your existing groups appear in the display. 3. Press the left soft key New. A New Group pop-up menu displays with the "Enter New Name" field highlighted. 4. Enter the Groups name. 5. Press SAVE to save. The Groups list now displays the new group added. 43
-
 1
1 -
2
-
3
-
4
-
5
-
6
-
7
-
8
-
9
-
10
-
11
-
12
-
13
-
14
-
15
-
16
-
17
-
18
-
19
-
20
-
21
-
22
-
23
-
24
-
25
-
26
-
27
-
28
-
29
-
30
-
31
-
32
-
33
-
34
-
35
-
36
-
37
-
38
-
39
-
40
-
 41
41 -
 42
42 -
 43
43 -
 44
44 -
 45
45 -
 46
46 -
 47
47 -
 48
48 -
 49
49 -
 50
50 -
 51
51 -
52
-
53
-
54
-
55
-
56
-
57
-
58
-
59
-
60
-
61
-
62
-
63
-
64
-
65
-
66
-
67
-
68
-
69
-
70
-
71
-
72
-
73
-
74
-
75
-
76
-
77
-
78
-
79
-
80
-
81
-
82
-
83
-
84
-
85
-
86
-
87
-
88
-
89
-
90
-
91
-
92
-
93
-
94
-
95
-
96
-
97
-
98
-
99
-
100
-
101
-
102
-
103
-
104
-
105
-
106
-
107
-
108
-
109
-
110
-
111
-
112
-
113
-
114
 |
 |
