Samsung U940 User Manual (ENGLISH) - Page 67
Picture, Message, Contacts, Enter, Add Quick Text, MY PICTURES, Sounds, MY SOUNDS, Subject
 |
UPC - 635753470048
View all Samsung U940 manuals
Add to My Manuals
Save this manual to your list of manuals |
Page 67 highlights
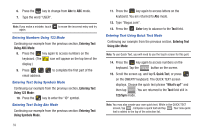
3. Tap 2. Picture Message. 4. Use the QWERTY keyboard to enter the phone number or Email address of the recipient, or tap the Contacts button (to the right of the To field) to select up to 10 Contacts contacts as recipients. Note: You can tap the button to the right of the To field to select Contacts contacts as recipients. While in the To field, tap 123/Sym to change Text Entry Mode. Choose Abc, ABC, 123, Symbols and Domain Extensions modes of text entry, or press key to switch from yellow numbers/symbols to white letters on the QWERTY keyboard. 5. Tap Add to add a recipient From Contacts, Recent Calls or Groups, or to send the picture To Online Album. Note: If you do not select an option, tap Back to return to the message. 6. If necessary, press the Text field. Enter key to advance to the 7. Type in your message using the QWERTY keyboard. Press key to switch between Abc and 123/Sym mode. Press key to switch between Abc, ABC, and abc modes. 8. You may tap Options on the screen to Add Quick Text. Note: If you do not select an option, tap Back to return to your message. 9. Press key if necessary and press to advance to the Picture field. Tap My Pics to access MY PICTURES folder. Tap the desired picture and press SET to attach the image. 10. In the Sounds field, tap Sounds to access MY SOUNDS folder. Tap the desired sound to attach the audio clip and press SET to attach the audio clip. 11. In the Subject field, enter the subject line using the QWERTY keyboard. You may tap Options to Add Quick Text. 12. Press key if necessary and press to advance to the My Name Card field. Tap Add to select My Name Card or an entry from your Contacts list. 13. Once all fields are complete, tap SEND to send the message to the intended recipient(s). Messaging 64
-
 1
1 -
2
-
3
-
4
-
5
-
6
-
7
-
8
-
9
-
10
-
11
-
12
-
13
-
14
-
15
-
16
-
17
-
18
-
19
-
20
-
21
-
22
-
23
-
24
-
25
-
26
-
27
-
28
-
29
-
30
-
31
-
32
-
33
-
34
-
35
-
36
-
37
-
38
-
39
-
40
-
41
-
42
-
43
-
44
-
45
-
46
-
47
-
48
-
49
-
50
-
51
-
52
-
53
-
54
-
55
-
56
-
57
-
58
-
59
-
60
-
61
-
 62
62 -
 63
63 -
 64
64 -
 65
65 -
 66
66 -
 67
67 -
 68
68 -
 69
69 -
 70
70 -
 71
71 -
 72
72 -
73
-
74
-
75
-
76
-
77
-
78
-
79
-
80
-
81
-
82
-
83
-
84
-
85
-
86
-
87
-
88
-
89
-
90
-
91
-
92
-
93
-
94
-
95
-
96
-
97
-
98
-
99
-
100
-
101
-
102
-
103
-
104
-
105
-
106
-
107
-
108
-
109
-
110
-
111
-
112
-
113
-
114
-
115
-
116
-
117
-
118
-
119
-
120
-
121
-
122
-
123
-
124
-
125
-
126
-
127
-
128
-
129
-
130
-
131
-
132
-
133
-
134
-
135
-
136
-
137
-
138
-
139
-
140
-
141
-
142
-
143
-
144
-
145
-
146
-
147
-
148
-
149
-
150
-
151
-
152
-
153
-
154
-
155
-
156
 |
 |
