Sanyo VDC-HD3300 VDC-HD3300 Manual - Page 20
Quick Operation Guide 5/10
 |
UPC - 086483075087
View all Sanyo VDC-HD3300 manuals
Add to My Manuals
Save this manual to your list of manuals |
Page 20 highlights
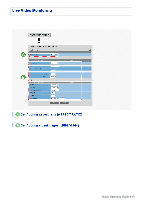
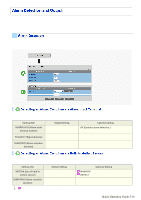
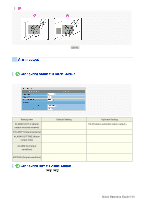
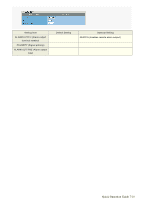
If you are operating the camera for the first time, check the factory default alarm detection conditions on the ALARM SETTINGS screen. Change the default settings as desired. For details, refer to the "ALARM SETTINGS" section. You can configure the camera to detect alarm conditions via the "alarm input terminals" or "built-in motion sensor". For how to configure the camera to detect alarm conditions via the alarm input terminals, refer to the "Alarm Input/Output Terminal Connections" section. Connecting an alarm switch, infrared sensor, or other external device to the ALARM IN1/2 terminal enables the camera to detect alarm conditions such as entry of an intruder. Setting Item ALARM IN1/2 (Alarm input terminal number) POLARITY (Signal polarity) DURATION (Alarm retention duration) Default Setting Optional Setting OFF (Disables alarm detection.) ON (Enables alarm detection.) NO (Ex.: Detects an alarm when NC (Ex.: Detects an alarm when door is opened.) door is closed) 5SEC (Ex.: Records alarm video 10SEC to 5MIN, CC (Retains the alarm state as long for 5 sec.) as the alarm signal persists.) The camera uses the built-in motion sensor to detect alarm conditions. The motion sensor detects an alarm condition in two ways as follows. Setting Item Default Setting MOTION (Use of built-in motion sensor) OFF (Disables alarm detection.) DURATION (Alarm retention 5SEC (Ex.: Records alarm duration) video for 5 sec.) Optional Setting A MASKING B DETECT 10SEC to 5MIN, CC (Retains an alarm state as long as the motion alarm persists.) A Disabling motion detection in masked areas Quick Operation Guide 5/10
-
 1
1 -
2
-
3
-
4
-
5
-
6
-
7
-
8
-
9
-
10
-
11
-
12
-
13
-
14
-
 15
15 -
 16
16 -
 17
17 -
 18
18 -
 19
19 -
 20
20 -
 21
21 -
 22
22 -
 23
23 -
 24
24 -
 25
25 -
26
-
27
-
28
-
29
-
30
-
31
-
32
-
33
-
34
-
35
-
36
-
37
-
38
-
39
-
40
-
41
-
42
-
43
-
44
-
45
-
46
-
47
-
48
-
49
-
50
-
51
-
52
-
53
-
54
-
55
-
56
-
57
-
58
-
59
-
60
-
61
-
62
-
63
-
64
-
65
-
66
-
67
-
68
-
69
-
70
-
71
-
72
-
73
-
74
-
75
-
76
-
77
-
78
-
79
-
80
-
81
-
82
-
83
-
84
-
85
-
86
-
87
-
88
-
89
-
90
-
91
-
92
-
93
-
94
-
95
-
96
-
97
-
98
-
99
-
100
-
101
-
102
-
103
-
104
-
105
-
106
-
107
-
108
-
109
-
110
-
111
-
112
-
113
-
114
-
115
-
116
 |
 |
