Sanyo VDC-HD3300 VDC-HD3300 Manual - Page 88
Working with Administrator Configuration Screens 40/50
 |
UPC - 086483075087
View all Sanyo VDC-HD3300 manuals
Add to My Manuals
Save this manual to your list of manuals |
Page 88 highlights
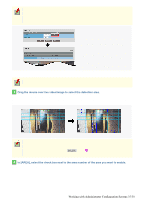
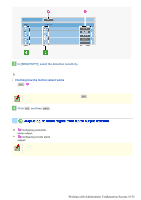
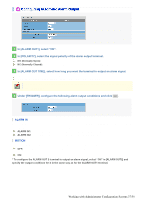
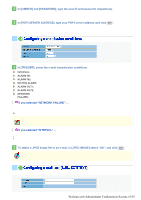
1 In [MAIL ADDRESS], type the recipient e-mail addresses. Here, you can type up to five e-mail addresses (up to 64 alphanumeric characters for each). 2 Select the check box for each e-mail address to which you want to send e-mails. You can send e-mails to the selected e-mail address(es). 3 To attach an image file to an e-mail, select the [IMAGE] check box of the corresponding recipient address and click SET . The attached image file will have the following file name: CAMERA ID +_yymmddhhmmss.jpg CAMERA ID is the leading four characters of the camera title. However, any of the following symbols, if included, will be replaced by a "-" (hyphen): / (slash), \ (backslash), ? (question mark), * (asterisk), : (colon), ; (semicolon), ' (single quote), " (double quote), < (less-than sign), > (greater-than sign), ¦ (broken bar) * To send a test e-mail, click TEST . A test e-mail is sent to each recipient e-mail address for which you selected the check box in Step 2 . The subject (SUBJECT) of this test e-mail will be "TEST". To perform an authentication check, you need to configure the authentication conditions. 1 In [AUTHENTICATION], select the authentication method. NO USE, POP3, SMTP Working with Administrator Configuration Screens 40/50
-
 1
1 -
2
-
3
-
4
-
5
-
6
-
7
-
8
-
9
-
10
-
11
-
12
-
13
-
14
-
15
-
16
-
17
-
18
-
19
-
20
-
21
-
22
-
23
-
24
-
25
-
26
-
27
-
28
-
29
-
30
-
31
-
32
-
33
-
34
-
35
-
36
-
37
-
38
-
39
-
40
-
41
-
42
-
43
-
44
-
45
-
46
-
47
-
48
-
49
-
50
-
51
-
52
-
53
-
54
-
55
-
56
-
57
-
58
-
59
-
60
-
61
-
62
-
63
-
64
-
65
-
66
-
67
-
68
-
69
-
70
-
71
-
72
-
73
-
74
-
75
-
76
-
77
-
78
-
79
-
80
-
81
-
82
-
 83
83 -
 84
84 -
 85
85 -
 86
86 -
 87
87 -
 88
88 -
 89
89 -
 90
90 -
 91
91 -
 92
92 -
 93
93 -
94
-
95
-
96
-
97
-
98
-
99
-
100
-
101
-
102
-
103
-
104
-
105
-
106
-
107
-
108
-
109
-
110
-
111
-
112
-
113
-
114
-
115
-
116
 |
 |
