Sanyo VDC-HD3300 VDC-HD3300 Manual - Page 74
Working with Administrator Configuration Screens 26/50
 |
UPC - 086483075087
View all Sanyo VDC-HD3300 manuals
Add to My Manuals
Save this manual to your list of manuals |
Page 74 highlights
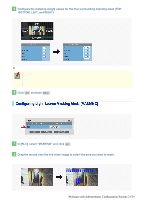
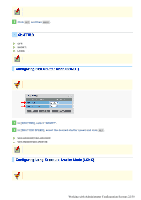
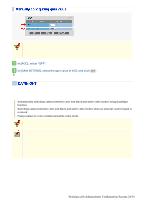
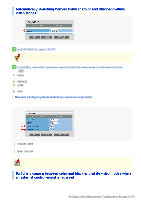
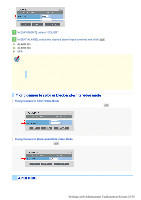
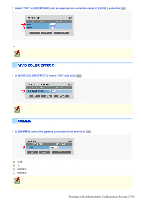
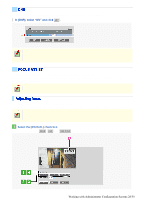
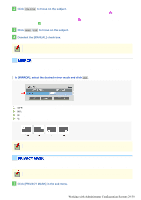
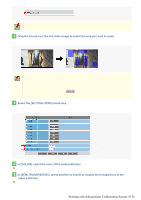
1 In [DAY/NIGHT], select "COLOR". 2 In [EXT ALARM], select the desired alarm input terminal and click SET . ALARM IN1: Sets the ALARM IN1 terminal as the Day/Night switching terminal. ALARM IN2: Sets the ALARM IN2 terminal as the Day/Night switching terminal. OFF: Fixing Camera to Color Video Mode You need to enable the ALARM IN1/2 terminal and configure the signal polarity in [POLARITY] on the ALARM SETTINGS screen. Depending on the [POLARITY] setting, the camera will be switched between the color and black-andwhite video modes as follows (commonly applied to CAM1 and CAM2): If [POLARITY] is set to "NO": Color mode when open; Black-and-white mode when closed If [POLARITY] is set to "NC": Color mode when closed; Black-and-white mode when open If you set [EXT ALARM] to "ALARM IN1" or "ALARM IN2", the corresponding alarm input terminal will serve dedicatedly as a Day/Night switching terminal, so you can see only the item [POLARITY] on the ALARM SETTINGS screen. Fixing Camera to Color Video Mode In [DAY/NIGHT] and [EXT ALARM], select "COLOR" and "OFF", respectively, and click SET . Fixing Camera to Black-and-White Video Mode In [DAY/NIGHT], select "B/W" and click SET . You can use the contour compensation function to make the whole video image clearer. Working with Administrator Configuration Screens 26/50
-
 1
1 -
2
-
3
-
4
-
5
-
6
-
7
-
8
-
9
-
10
-
11
-
12
-
13
-
14
-
15
-
16
-
17
-
18
-
19
-
20
-
21
-
22
-
23
-
24
-
25
-
26
-
27
-
28
-
29
-
30
-
31
-
32
-
33
-
34
-
35
-
36
-
37
-
38
-
39
-
40
-
41
-
42
-
43
-
44
-
45
-
46
-
47
-
48
-
49
-
50
-
51
-
52
-
53
-
54
-
55
-
56
-
57
-
58
-
59
-
60
-
61
-
62
-
63
-
64
-
65
-
66
-
67
-
68
-
 69
69 -
 70
70 -
 71
71 -
 72
72 -
 73
73 -
 74
74 -
 75
75 -
 76
76 -
 77
77 -
 78
78 -
 79
79 -
80
-
81
-
82
-
83
-
84
-
85
-
86
-
87
-
88
-
89
-
90
-
91
-
92
-
93
-
94
-
95
-
96
-
97
-
98
-
99
-
100
-
101
-
102
-
103
-
104
-
105
-
106
-
107
-
108
-
109
-
110
-
111
-
112
-
113
-
114
-
115
-
116
 |
 |
