Sanyo VDC-HD3300 VDC-HD3300 Manual - Page 56
Working with Administrator Configuration Screens 8/50
 |
UPC - 086483075087
View all Sanyo VDC-HD3300 manuals
Add to My Manuals
Save this manual to your list of manuals |
Page 56 highlights
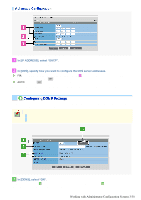
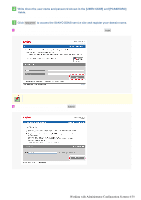
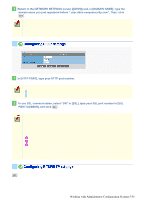
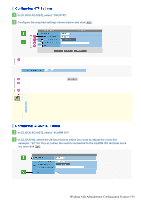
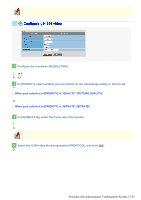
3 In [DATE/TIME FORMAT], select the date/time display format and click SET . M/D/Y, Y/M/D, D/M/Y 1 In [TIME ZONE], select the region where the camera is used. 2 In [DAYLIGHT SAVING MODE], select whether or not to use the daylight saving mode. Although an appropriate setting is automatically selected according to the [TIME ZONE] setting, you can change it manually. NO USE: Disables the daylight saving mode. USE: Enables the daylight saving mode. 3 In [DAYLIGHT SAVING], select when to start (in [ON]) and end (in [OFF]) the daylight saving mode and click SET . Although an appropriate setting is automatically selected according to the [TIME ZONE] setting, you can change it manually. In [CLOCK ADJUST], select how you want to automatically adjust the camera's internal clock. OFF: Disables the clock adjustment function. ON (NTP): Enables automatic clock adjustment that retrieves the date and time information from the NTP server. You need to configure the NTP settings. LOGIN Enables automatic clock adjustment that retrieves the date and time information from the PC (PC): when an admin user logs into it. ALARM IN1: Enables automatic clock adjustment that adjusts the clock to the specified time based on the signal received from the device connected to the ALARM IN1 terminal. You need to configure the [CLOCK IN] setting. It is recommended to select "ON (NTP)" when the camera is connected to the Internet. If the camera is not connected to the Internet, select "LOGIN (PC)" or, using the supplied monitoring software "VA-SW3050Lite", enable the clock adjustment function (24-hour interval) in the clock setting. Working with Administrator Configuration Screens 8/50
-
 1
1 -
2
-
3
-
4
-
5
-
6
-
7
-
8
-
9
-
10
-
11
-
12
-
13
-
14
-
15
-
16
-
17
-
18
-
19
-
20
-
21
-
22
-
23
-
24
-
25
-
26
-
27
-
28
-
29
-
30
-
31
-
32
-
33
-
34
-
35
-
36
-
37
-
38
-
39
-
40
-
41
-
42
-
43
-
44
-
45
-
46
-
47
-
48
-
49
-
50
-
 51
51 -
 52
52 -
 53
53 -
 54
54 -
 55
55 -
 56
56 -
 57
57 -
 58
58 -
 59
59 -
 60
60 -
 61
61 -
62
-
63
-
64
-
65
-
66
-
67
-
68
-
69
-
70
-
71
-
72
-
73
-
74
-
75
-
76
-
77
-
78
-
79
-
80
-
81
-
82
-
83
-
84
-
85
-
86
-
87
-
88
-
89
-
90
-
91
-
92
-
93
-
94
-
95
-
96
-
97
-
98
-
99
-
100
-
101
-
102
-
103
-
104
-
105
-
106
-
107
-
108
-
109
-
110
-
111
-
112
-
113
-
114
-
115
-
116
 |
 |
