Sanyo VDC-HD3300 VDC-HD3300 Manual - Page 65
Working with Administrator Configuration Screens 17/50
 |
UPC - 086483075087
View all Sanyo VDC-HD3300 manuals
Add to My Manuals
Save this manual to your list of manuals |
Page 65 highlights
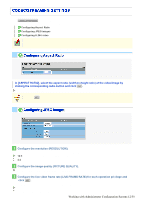
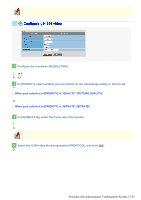
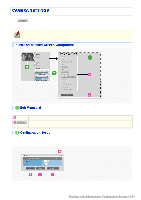
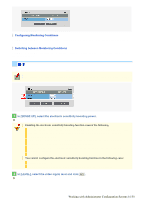
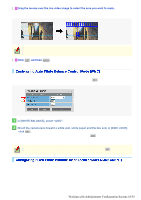
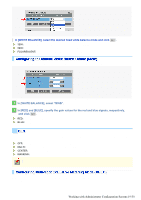
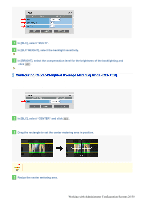
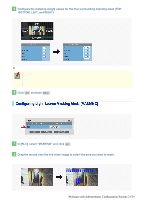
Select and configure the white balance adjustment mode. ATW: Auto trace white balance AWC: Auto white balance control 3200: Fixed white balance (for indoors) 5600: Fixed white balance (for outdoors) FLUORESCENT: Fixed white balance (for fluorescent lighting) MWB: Manual white balance The configured settings will be applied to "CAM1" or "CAM2", whichever you selected under [VIEW]. Auto trace white balance (ATW) automatically adjusts the white balance to provide optimal colors, even if the light source for the target object is changed. Enable the smart ATW function here because ATW may not produce desirable results if a single solid color occupies a large part of the subject. 1 In [WHITE BALANCE], select "ATW". 2 In [SMART ATW], select "ON" and click SET . The camera now adjusts the white balance automatically based on the color information on the subject. Do not use the smart ATW function in environments where the color temperature fluctuates. In an outdoor environment for example, smart ATW may not produce desirable results because the color temperature fluctuates depending on the time of the day (at sunrise, daytime, and sunset), weather (sunny or cloudy), and other conditions. 1 In [MASKING], select "ON" and click SET . The ATW masking screen appears. Mask the light source by the following procedure. Working with Administrator Configuration Screens 17/50
-
 1
1 -
2
-
3
-
4
-
5
-
6
-
7
-
8
-
9
-
10
-
11
-
12
-
13
-
14
-
15
-
16
-
17
-
18
-
19
-
20
-
21
-
22
-
23
-
24
-
25
-
26
-
27
-
28
-
29
-
30
-
31
-
32
-
33
-
34
-
35
-
36
-
37
-
38
-
39
-
40
-
41
-
42
-
43
-
44
-
45
-
46
-
47
-
48
-
49
-
50
-
51
-
52
-
53
-
54
-
55
-
56
-
57
-
58
-
59
-
 60
60 -
 61
61 -
 62
62 -
 63
63 -
 64
64 -
 65
65 -
 66
66 -
 67
67 -
 68
68 -
 69
69 -
 70
70 -
71
-
72
-
73
-
74
-
75
-
76
-
77
-
78
-
79
-
80
-
81
-
82
-
83
-
84
-
85
-
86
-
87
-
88
-
89
-
90
-
91
-
92
-
93
-
94
-
95
-
96
-
97
-
98
-
99
-
100
-
101
-
102
-
103
-
104
-
105
-
106
-
107
-
108
-
109
-
110
-
111
-
112
-
113
-
114
-
115
-
116
 |
 |
