Sharp PN-T322B Service Manual - Page 25
Setting up the PC (TOUCH panel driver), SYSTEM REQUIREMENTS, INSTALLING THE TOUCH PANEL DRIVER
 |
View all Sharp PN-T322B manuals
Add to My Manuals
Save this manual to your list of manuals |
Page 25 highlights
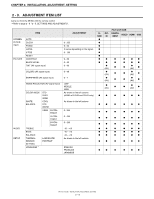
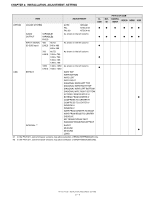
CHAPTER 2. INSTALLATION, ADJUSTMENT, SETTING 3. SETTING UP THE PC (TOUCH PANEL DRIVER) 3 - 1. SYSTEM REQUIREMENTS To use the touch panel, the touch panel must be connected to a computer, and the touch panel driver and Pen Software must be installed on the computer from the provided CD-ROM. System requirements for each software program are as follows. Computer OS PC/AT compatible computer with a USB 1.1 port and able to output a resolution of 1366 x 768. (CD-ROM drive required for software installation.) n Windows XP (32-bit or 64-bit version) n Windows Vista (32-bit or 64-bit version) n Windows 7 (32-bit or 64-bit version) 3 - 2. INSTALLING THE TOUCH PANEL DRIVER The touch panel driver is a program that enables you to use to the touch panel to operate the PC that is connected to the touch panel. In Windows XP/Vista, install Touch Screen Calibration Utility after you install the touch panel driver. The Touch Screen Calibration Utility calibrates positioning so that the mouse cursor moves correctly to the touched position on the screen. CAUTION n This can only be done by a user with administrator authority. n If an older version of the touch panel driver is installed, remove (uninstall) the old version before installing the touch panel driver. 3Refer to page 2 - 12 "3 - 4. UNINSTALLING". n If you are using a USB hub, use a self-powered hub (a hub capable of supplying a 500 mA current). The touch panel will not operate correctly if a bus-powered USB is used. n Do not touch the touch panel when connecting the USB cable. If you touch the touch panel, this may be detected as an element failure in the infrared transmitter/receiver and malfunctioning will result. In this case, disconnect and then reconnect the USB cable. 1 ) Start your PC. 2 ) Exit all applications that are running. 3 ) Connect the USB cable for the touch panel to the PC. To the USB terminal of the PC 9 ) When the installation finished screen appears, click "Finish". If a message appears prompting you to restart your computer, restart. This completes the installation of the touch panel driver. In Windows 7, perform calibration using "Tablet PC Settings" in Control Panel. In Windows XP/Vista, install Touch Screen Calibration Utility after you install the touch panel driver. 1 Double-click "TSCU_xxxx.exe" (Touch Screen Calibration Utility) in the "TouchPanel" folder. USB cable 4 ) Insert the supplied CD-ROM into the CD-ROM drive of your PC. 5 ) Open the CD-ROM drive in "Computer" or "My Computer". 6 ) Double-click the "TouchPanel" folder. 7 ) Double-click "NextWindow_2500_Driver_xxxx_Generic.exe" (Touch Panel Driver). MEMO n "xxxx" shows the version. 8 ) Click "Next". Follow the on-screen instructions to install the touch panel driver. n When the "User Account Control" screen appears, click "Yes" (or "Allow"). n If the "Windows Security" screen appears, click "Install" (or "Install this driver software anyway"). MEMO n "xxxx" shows the version. 2 Click "Next". Follow the on-screen instructions to install the Touch Screen Calibration Utility. n When the "User Account Control" screen appears, click "Yes" (or "Allow"). 3 When the installation finished screen appears, click "Finish". This completes the installation of the Touch Screen Calibration Utility. The first time you use the touch panel, start the Touch Screen Calibration Utility and perform calibration. PN-T321/T322B INSTALLATION, ADJUSTMENT, SETTING 2 - 10
-
 1
1 -
2
-
3
-
4
-
5
-
6
-
7
-
8
-
9
-
10
-
11
-
12
-
13
-
14
-
15
-
16
-
17
-
18
-
19
-
 20
20 -
 21
21 -
 22
22 -
 23
23 -
 24
24 -
 25
25 -
 26
26 -
 27
27 -
 28
28 -
 29
29 -
 30
30 -
31
-
32
-
33
-
34
-
35
-
36
-
37
-
38
-
39
-
40
-
41
-
42
-
43
-
44
-
45
-
46
-
47
-
48
-
49
-
50
-
51
-
52
-
53
-
54
-
55
-
56
-
57
-
58
-
59
-
60
-
61
-
62
-
63
-
64
-
65
-
66
-
67
-
68
-
69
-
70
-
71
-
72
-
73
-
74
-
75
-
76
-
77
-
78
-
79
-
80
 |
 |
