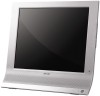
Sony MFM-HT75W User Manual
Sony MFM-HT75W Manual
 |
View all Sony MFM-HT75W manuals
Add to My Manuals
Save this manual to your list of manuals |
Sony MFM-HT75W manual content summary:
- Sony MFM-HT75W | User Manual - Page 1
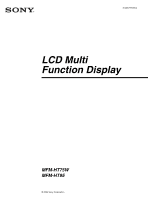
2-345-277-01(1) LCD Multi Function Display MFM-HT75W MFM-HT95 © 2004 Sony Corporation - Sony MFM-HT75W | User Manual - Page 2
Information Services Center 1-800-222-7669 or http://www.sony.com/ Declaration of Conformity Trade Name: Model: Responsible Party: Address: Telephone Number: SONY MFM-HT75W/HT95 Sony Electronics Inc. 16450 W. Bernardo Dr, San Diego, CA 92127 U.S.A. 858-942-2230 This device complies with part 15 - Sony MFM-HT75W | User Manual - Page 3
and "" are not mentioned in each case in this manual. http://www.sony.net/ Precautions 5 Identifying parts and controls 6 Setup 9 Setup 1: Open the stand 9 Setup 2: Connect the cables 9 Setup 3: Connect the power cord 12 Setup 4: Replace the connector cover 12 Setup 5: Turn on the display - Sony MFM-HT75W | User Manual - Page 4
Automatic brightness adjustment function (light sensor 35 Automatic picture quality adjustment function (for PC 2 only) . . . 35 Turning off the display automatically (for TV/VIDEO 1/VIDEO 2 only 36 Troubleshooting 36 On-screen messages 36 Trouble symptoms and remedies 38 Specifications 41 4 - Sony MFM-HT75W | User Manual - Page 5
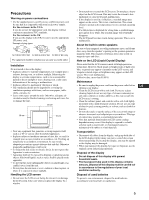
Near any equipment that generates a strong magnetic field, such as a TV or various other household appliances. • In places subject to inordinate amounts of similar additive as this may scratch the LCD screen's coating. • Clean the cabinet, panel, and controls with a soft cloth lightly moistened with - Sony MFM-HT75W | User Manual - Page 6
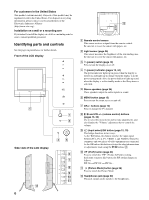
parts and controls See the pages in parentheses for further details. Front of the LCD display 5 1 2 Side view of the LCD display qs 6 43 6 7 8 9 0 qa qd A Remote control sensor This sensor receives a signal from the remote control change the TV channel. H M/m and VOL+/- (volume control) buttons ( - Sony MFM-HT75W | User Manual - Page 7
cover (page 9) Remove this cover when you connect cables or cords. Rear of the LCD display qf qg qh 12 qj qk 1 PC 1 2 PC 2 VHF/UHF VIDEO 2 IN VIDEO 1 IN 1 ql 1 w; 2 2 P PC 1 connectors 1 DVI-D input connector (digital RGB) for PC 1 (page 9) This connector inputs digital RGB video signals - Sony MFM-HT75W | User Manual - Page 8
Remote control 8 9 0 qa MUTING DISPLAY SLEEP 1 PC1 PC2 VIDEO1 VIDEO2 TV MENU OK 1 2 3 4 123 456 5 789 qs JUMP 0 ENT 6 VOL CH qd 7 DISPLAY A 1 (power) switch (page 12) Press to turn the display on or off. B Input - Sony MFM-HT75W | User Manual - Page 9
your carton: • LCD display • Remote control • Size AAA batteries (2) • Power cord • HD15-HD15 video signal cable (analog RGB) • DVI-D video signal cable (digital RGB) • Audio cord (stereo miniplug) • 75-ohm coaxial cable • CD-ROM (utility software for Windows/Macintosh, Operating Instructions, etc - Sony MFM-HT75W | User Manual - Page 10
using the VIDEO 1 jacks If you intend to connect video equipment that has component video output jacks, such as a DVD player, follow the instructions below. Using a video signal cable (not supplied) and an audio cord (not supplied), connect the video equipment to the display's VIDEO 1 jacks. rear - Sony MFM-HT75W | User Manual - Page 11
. rear of the display S video video (yellow) audio-L (white) x Connecting an antenna If you intend to connect an antenna to receive the TV signal, follow the instructions below. Using the 75-ohm coaxial cable (supplied), connect an antenna to the display's VHF/UHF jack. to the VHF/UHF jack audio - Sony MFM-HT75W | User Manual - Page 12
AC IN power cord (supplied) Setup 4: Replace the connector cover While pressing the hooks, push DVI-D: PC 1 HD15: PC 2 TV channels : VIDEO 1 or : VIDEO 2 Input signal configuration DVI using the input select buttons on the remote control. • When you select the TV input, the number of the selected - Sony MFM-HT75W | User Manual - Page 13
MFM-HT95 Analog RGB Digital RGB Horizontal frequency 28-86 kHz 28-64 kHz Vertical frequency 48-85 Hz1) 60 Hz Resolution 1280 × 1024 or less 1280 × 1024 or less 1) If the resolution that the remote control will not be used for an extended period. • Handle the remote control with care. - Sony MFM-HT75W | User Manual - Page 14
to exit the menu screen after Auto Program is completed. Changing the TV channel Press the 0-9 buttons to input a channel number. The channel channels, you need to set the "Cable" menu to "Off" by following the instructions below. 1 Press the MENU button. 2 Press the M/m buttons to select press - Sony MFM-HT75W | User Manual - Page 15
TV/VIDEO 1/VIDEO 2 only)" on page 32. x Using the Parental Control feature Select control options in the "Parent" menu. For details, see "Parent menu" on page 25. Button operations (remote control changes as follows. MFM-HT75W: Normal t Full t Wide Zoom t Zoom t Normal... MFM-HT95: Normal t Full - Sony MFM-HT75W | User Manual - Page 16
you use the buttons on the remote control 1 Display the main menu. Press the MENU button to display the main menu on the screen. Picture DVI-D: PC 1 MENU , Mode: Backlight: Contrast: Brightness: Color: Hue: Sharpness: Color Temp.: Gamma: Picture Mode Reset NR: Dynamic Picture: Movie 100 70 - Sony MFM-HT75W | User Manual - Page 17
Sharpness Picture DVI-D: PC 1 Mode: Backlight: Contrast: Brightness: Color: Hue: Sharpness: Color Temp.: Gamma: Picture Mode Reset NR: on the screen. Picture : TV Mode: Backlight: Picture: Brightness: Color: Hue: Sharpness: Color Temp.: Gamma: Picture Mode Reset NR: Dynamic Picture: Vivid - Sony MFM-HT75W | User Manual - Page 18
the color intensity and press the OK button. x Adjusting "Hue" (for TV/VIDEO 2 only) You can change the color tones of the picture displayed. to adjust the hue and press the OK button. x Adjusting "Sharpness" (for TV/VIDEO 1/ VIDEO 2 only) You can adjust the sharpness of the edges of images - Sony MFM-HT75W | User Manual - Page 19
select "Gamma" and press the OK button. The "Gamma" menu appears on the screen. Picture DVI-D: PC 1 Mode: Backlight: Contrast: Brightness: Color: Hue: Sharpness: Color Temp.: Gamma: Picture Mode Reset NR: Dynamic Picture: Movie 100 70 50 9300K Gamma1 Gamma2 Gamma3 Gamma4 Select 1280 × 1024/60 - Sony MFM-HT75W | User Manual - Page 20
select "Picture Mode Reset" and press the OK button. The "Picture Mode Reset" menu appears on the screen. Picture DVI-D: PC 1 Mode on the screen. Picture : TV Mode: Backlight: Picture: Brightness: Color: Hue: Sharpness: Color Temp.: Gamma: Picture Mode Reset NR: Dynamic Picture: Vivid 100 - Sony MFM-HT75W | User Manual - Page 21
each available input. • Surround • Treble • Bass • Balance • Auto Volume Audio Surround: Treble: Bass: Balance: Auto Volume: MTS: Audio Reset : TV SRS WOW 0 0 0 On Stereo • MTS • Audio Reset x Setting "Surround" Select Set OK Exit MENU 1 Press the MENU button. The main menu appears on the - Sony MFM-HT75W | User Manual - Page 22
Normal Full Wide Zoom Zoom Select MFM-HT95 Screen Zoom : Auto Adjust Phase : Pitch : H Center : V Center : Set OK Exit MENU : TV Normal Full 16 : 9 Select Set OK Exit MENU 4 Press the M/m buttons to select the desired mode and press the OK button. • OK: To reset the all items in the "Audio - Sony MFM-HT75W | User Manual - Page 23
the MFM-HT95 • Normal: Original size. • Full: A picture is enlarged horizontally (linear) to fill the 5:4 screen. Useful for viewing 4:3 signal or Letter Box signal need to make further adjustments to the picture quality You can manually adjust the picture's sharpness (phase/pitch) and position ( - Sony MFM-HT75W | User Manual - Page 24
Adjusting the picture's sharpness manually (Phase/Pitch) (for PC 2 only) You can adjust the picture's sharpness as follows. 1 Set the resolution to 1280 × 768 (MFM-HT75W), or 1280 × 1024 (MFM-HT95) on the computer. 2 Load the CD-ROM. 3 Start the CD-ROM, select the area and model, and display the - Sony MFM-HT75W | User Manual - Page 25
. Sony's predetermined ratings are also available. See page 28 for a description of the ratings. The TV's Parental Control feature functions by receiving the rating signal from your local broadcasting station or cable service provider. x Activating the Parental Control - Sony MFM-HT75W | User Manual - Page 26
to be blocked from "Custom" once you have activated the Parental Control feature (page 25), follow the procedure below. For a detailed description Press the M/m buttons to select "Movie Rating" and press the OK button. Parent : TV Movie Rating G: - PG: - PG-13: - R: - NC-17: - X: - - Sony MFM-HT75W | User Manual - Page 27
- Select Set OK Exit MENU U.S.A. Rating Parent : TV U.S.A. Rating Rating TV-Y: - TV-Y7: - TV-G: - TV-PG: - TV-14: - TV-MA: - Content FV: - D:- L: - S: - blocked. Example: TV rating in the U.S.A. Parent TV Rating Rating TV-Y: - TV-Y7: - TV-G: - TV-PG: - TV-14: TV-MA: : TV Content FV: - Sony MFM-HT75W | User Manual - Page 28
Sony has predetermined based on the viewer's age. Each rating allows you to view certain programs, as follows: Option Description Child Suitable for children under the age of 7. Viewable U.S. movie ratings: G, NR, and N/A Viewable U.S. TV ratings: TV-Y, TV-G, and TV Suggested - monitored first by - Sony MFM-HT75W | User Manual - Page 29
's predetermined ratings These are original ratings that Sony has predetermined based on the viewer's age. French Language ratings: G, 8 ans+, and 13 ans+ Viewable U.S. TV ratings: TV-Y, TV-Y7, TV- G, TV-PG, TV-14, and TV-NR For descriptions of Child, Youth, and Y.Adult (Young Adult) ratings - Sony MFM-HT75W | User Manual - Page 30
: Menu Position Menu Lock : Demo Mode : All Reset DVI-D: PC 1 On English Off Off • Demo Mode • All Reset Select 1280 × 1024/60 Hz Set OK Exit MENU to select the desired input source and press the OK button. • TV: A TV program is displayed in the sub-picture area. • VIDEO 1: The - Sony MFM-HT75W | User Manual - Page 31
the OK button. The "Sub Position" menu appears on the screen. Option PIP On PIP Setting : Sub : Sub Size : Sub Position Audio Select : DVI-D: PC 1 PIP On TV Large Select 1280 × 1024/60 Hz Set OK Exit MENU 7 Press the M/m buttons to select the desired position and press the OK button. You - Sony MFM-HT75W | User Manual - Page 32
"Caption Vision" (for TV/VIDEO 1/ VIDEO 2 only) You can display Caption Vision if the broadcaster offers this service. 1 Press the MENU button : Input Sensing : Language : Menu Position Menu Lock : Demo Mode : All Reset DVI-D: PC 1 On English Select 1280 × 1024/60 Hz Set OK Exit MENU 4 - Sony MFM-HT75W | User Manual - Page 33
select "Menu Lock" and press the OK button. The "Menu Lock" menu appears on the screen. Option DVI-D: PC 1 PIP : Caption Vision : Input Sensing : Language : Menu Position Menu Lock Demo Mode : All Reset On English On Off Select 1280 × 1024/60 Hz Set OK Exit MENU 4 Press the M/m buttons to - Sony MFM-HT75W | User Manual - Page 34
(DVI Digital Monitor Power management) for Digital input compliant, the display will automatically reduce power consumption as shown below. MFM-HT75W Power mode Power consumption 1 (power) indicator normal operation 68 W (max.) green active off* 1.2 W (max.) (deep sleep)** orange MFM-HT95 - Sony MFM-HT75W | User Manual - Page 35
. When you select the input from VIDEO 1, VIDEO 2, or TV, "Vivid" is selected as the default.) Also, when you MFM-HT95 Horizontal frequency: 28-86 kHz Vertical frequency: 48-85 Hz (resolution - Sony MFM-HT75W | User Manual - Page 36
TV/VIDEO 1/VIDEO 2 only) You can set the display to turn off automatically after a predetermined period of time (15, 30, 45, 60, or 90 minutes). Press the SLEEP button on the remote control If "Resolution i 1280 × 1024" is displayed (MFM-HT95) This indicates that the resolution is not supported by - Sony MFM-HT75W | User Manual - Page 37
If "Cable Disconnected" appears on the screen This indicates that the video signal cable has been disconnected from the currently selected connector. I NFORMA T I ON DV I - D : PC1 Cab l e D i s c onne c t ed If "Power will be turned off by off timer soon." appears on the screen This indicates - Sony MFM-HT75W | User Manual - Page 38
may be fuzzy. Set the resolution to 1280 × 768 on your computer. • If you replaced an old display with this display, reconnect the old display and do the following. Select "SONY" from the "Manufacturers" list and select "MFM-HT75W or MFM-HT95" from the "Models" list on the Windows device selection - Sony MFM-HT75W | User Manual - Page 39
equipment connected, and not caused by the display • Set the resolution to 1280 × 768 (MFM-HT75W), or 1280 × 1024 (MFM-HT95) on your computer. Picture is ghosting. • Eliminate the use of video cable extensions and/or video switch boxes. • Check that all plugs are firmly seated in their sockets - Sony MFM-HT75W | User Manual - Page 40
make the box disappear. Example INFORMATION Model : MFM-HT75W Ser.No. : 1234567 Manufactured : 2005-## Model name Serial number Week and year of manufacture If any problem persists, call your authorized Sony dealer and give the following information: • Model name: MFM-HT75W or MFM-HT95 • Serial - Sony MFM-HT75W | User Manual - Page 41
MFM-HT75W) 19 inch (48 cm) (MFM-HT95) Display resolution: MFM-HT75W Horizontal: Max. 1280 dots Vertical: Max. 768 lines MFM-HT95 Horizontal: Max. 1280 dots Vertical: Max. 1024 lines Signal input PC 1 Signal format: Digital RGB (DVI (100% modulation) TV TV system: American TV standard (NTSC) Channel
-
 1
1 -
 2
2 -
 3
3 -
 4
4 -
 5
5 -
 6
6 -
 7
7 -
8
-
9
-
10
-
11
-
12
-
13
-
14
-
15
-
16
-
17
-
18
-
19
-
20
-
21
-
22
-
23
-
24
-
25
-
26
-
27
-
28
-
29
-
30
-
31
-
32
-
33
-
34
-
35
-
36
-
37
-
38
-
39
-
40
-
41
 |
 |
2-345-277-
01
(1)
© 2004 Sony Corporation
LCD Multi
Function Display
MFM-HT75W
MFM-HT95