Sony VPL CX85 Operating Instructions - Page 12
Location and Function of Controls, Top/Front/Left Side, Rear/Right Side/Bottom - projector
 |
UPC - 027242644274
View all Sony VPL CX85 manuals
Add to My Manuals
Save this manual to your list of manuals |
Page 12 highlights
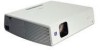
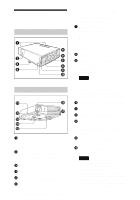
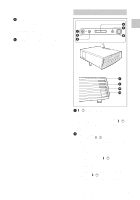
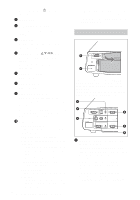
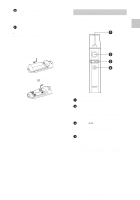
Location and Function of Controls Top/Front/Left Side 1 5 6 2 7 3 8 4 9 q; Rear/Right Side/Bottom qa qh qs qj qd qf qg 1 Control panel For details, see "Control Panel" on page 13. 2 Lens protector (lens cover) The lens protector automatically opens when the power is turned on. 3 Powered tilt adjuster 4 Front remote control detector 5 Ventilation holes (exhaust) 6 Access lamp 12 GB Location and Function of Controls Lights during access to the Memory Stick. Do not remove the Memory Stick while the access lamp is lit. 7 Memory Stick slot The Memory Stick can be inserted. Never insert an object other than the Memory Stick. For details, see the attached "Operating Instructions for Memory Stick" stored in the CD-ROM. 8 Speaker 9 Wireless LAN card slot The supplied wireless LAN card can be inserted. Never insert anything other than the supplied wireless LAN card. Notes Remove the wireless LAN card from the wireless LAN card slot when storing the projector in the carrying case. For details, see Operating Instruction for Air Shot (stored in the CD-ROM). q; Wireless LAN card eject button qa Rear remote control detector qs Ventilation holes (intake) qd Adjuster (hind pad) Turn the adjuster to the right or left for minor tilt adjustment of the projected picture. qf Ventilation holes (intake)/Lamp cover qg Ventilation holes (intake)/Air filter cover Notes • Do not place anything near the ventilation holes as this may cause internal heat build-up. • Do not place your hand or objects near the ventilation holes as this may cause a heat build-up. • To maintain optimal performance, clean the air filter every 1000 hours.
-
 1
1 -
2
-
3
-
4
-
5
-
6
-
 7
7 -
 8
8 -
 9
9 -
 10
10 -
 11
11 -
 12
12 -
 13
13 -
 14
14 -
 15
15 -
 16
16 -
 17
17 -
18
-
19
-
20
-
21
-
22
-
23
-
24
-
25
-
26
-
27
-
28
-
29
-
30
-
31
-
32
-
33
-
34
-
35
-
36
-
37
-
38
-
39
-
40
-
41
-
42
-
43
-
44
-
45
-
46
-
47
-
48
-
49
-
50
-
51
-
52
-
53
-
54
-
55
-
56
-
57
-
58
-
59
-
60
-
61
-
62
-
63
-
64
-
65
-
66
-
67
-
68
-
69
-
70
-
71
-
72
-
73
-
74
-
75
-
76
-
77
-
78
-
79
-
80
-
81
-
82
-
83
-
84
-
85
-
86
-
87
-
88
-
89
-
90
-
91
-
92
-
93
-
94
-
95
-
96
-
97
-
98
-
99
-
100
-
101
-
102
-
103
-
104
-
105
-
106
-
107
-
108
-
109
-
110
-
111
-
112
-
113
-
114
-
115
-
116
-
117
-
118
-
119
-
120
-
121
-
122
-
123
-
124
-
125
-
126
-
127
-
128
-
129
-
130
-
131
-
132
-
133
-
134
-
135
-
136
-
137
-
138
-
139
-
140
-
141
-
142
-
143
-
144
-
145
-
146
-
147
-
148
-
149
-
150
-
151
-
152
-
153
-
154
-
155
-
156
-
157
-
158
-
159
-
160
-
161
-
162
-
163
-
164
-
165
-
166
-
167
-
168
-
169
-
170
-
171
-
172
-
173
-
174
-
175
-
176
-
177
-
178
-
179
-
180
-
181
-
182
-
183
-
184
-
185
-
186
-
187
-
188
-
189
-
190
-
191
-
192
 |
 |