Sony VPL CX85 Operating Instructions - Page 16
APA Auto Pixel Alignment key, Memory Stick key - projector manual
 |
UPC - 027242644274
View all Sony VPL CX85 manuals
Add to My Manuals
Save this manual to your list of manuals |
Page 16 highlights
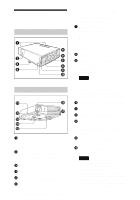
1 I / 1 (on/standby) key 2 MUTING keys Cut off the picture and sound. • PIC: Cuts off the picture. Press again to restore the picture. • AUDIO: Press to temporarily cut off the audio output from the speaker, and the output on the AUDIO jack in the OUTPUT section. Press again or press VOLUME + key to restore the sound. 3 INPUT key 4 TILT/KEYSTONE (Vertical/ horizontal trapezoidal distortion correction) key Adjusts the tilt of the projector, or the horizonal/vertical trapezoidal distortion of the image manually. Each time you press this key, the Tilt menu, the V Keystone menus and Side Shot menu are displayed. Use the arrow keys (M/m/
-
 1
1 -
2
-
3
-
4
-
5
-
6
-
7
-
8
-
9
-
10
-
 11
11 -
 12
12 -
 13
13 -
 14
14 -
 15
15 -
 16
16 -
 17
17 -
 18
18 -
 19
19 -
 20
20 -
 21
21 -
22
-
23
-
24
-
25
-
26
-
27
-
28
-
29
-
30
-
31
-
32
-
33
-
34
-
35
-
36
-
37
-
38
-
39
-
40
-
41
-
42
-
43
-
44
-
45
-
46
-
47
-
48
-
49
-
50
-
51
-
52
-
53
-
54
-
55
-
56
-
57
-
58
-
59
-
60
-
61
-
62
-
63
-
64
-
65
-
66
-
67
-
68
-
69
-
70
-
71
-
72
-
73
-
74
-
75
-
76
-
77
-
78
-
79
-
80
-
81
-
82
-
83
-
84
-
85
-
86
-
87
-
88
-
89
-
90
-
91
-
92
-
93
-
94
-
95
-
96
-
97
-
98
-
99
-
100
-
101
-
102
-
103
-
104
-
105
-
106
-
107
-
108
-
109
-
110
-
111
-
112
-
113
-
114
-
115
-
116
-
117
-
118
-
119
-
120
-
121
-
122
-
123
-
124
-
125
-
126
-
127
-
128
-
129
-
130
-
131
-
132
-
133
-
134
-
135
-
136
-
137
-
138
-
139
-
140
-
141
-
142
-
143
-
144
-
145
-
146
-
147
-
148
-
149
-
150
-
151
-
152
-
153
-
154
-
155
-
156
-
157
-
158
-
159
-
160
-
161
-
162
-
163
-
164
-
165
-
166
-
167
-
168
-
169
-
170
-
171
-
172
-
173
-
174
-
175
-
176
-
177
-
178
-
179
-
180
-
181
-
182
-
183
-
184
-
185
-
186
-
187
-
188
-
189
-
190
-
191
-
192
 |
 |

GB
16
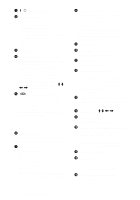
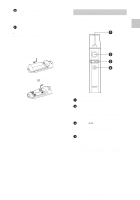
Location and Function of Controls
1
I
/
1
(on/standby) key
2
MUTING keys
Cut off the picture and sound.
•
PIC:
Cuts off the picture. Press again
to restore the picture.
•
AUDIO:
Press to temporarily cut off
the audio output from the speaker, and
the output on the AUDIO jack in the
OUTPUT section. Press again or press
VOLUME + key to restore the sound.
3
INPUT key
4
TILT/KEYSTONE (Vertical/
horizontal trapezoidal distortion
correction) key
Adjusts the tilt of the projector, or the
horizonal/vertical trapezoidal distortion
of the image manually.
Each time you
press this key, the Tilt menu, the V
Keystone menus and Side Shot menu are
displayed.
Use the arrow keys (
M
/
m
/
<
/
,
) for adjustment.
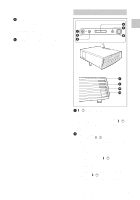
5
(Memory Stick) key
Displays the Memory Stick Home.
When the input signal is other than
Memory Stick
, it switches to
Memory
Stick
. When there are the files to be
displayed in the Memory Stick Home,
the slide show begins.
For details, see Operating Instructions
for Memory Stick (stored in the CD-
ROM).
6
FREEZE key
Freezes the picture projected. To cancel
the frozen picture, press the key again.
7
AIR SHOT key
Displays the Air Shot Home.
When the input signal is other than Air
Shot, it switches to Air Shot.
When using the Air Shot, the list box of
the computers that can be connected
appears.
For details on Air Shot, see Operating
Instruction for Air Shot (stored in the
CD-ROM).
8
Keys that emulate a mouse
These keys function as mouse buttons of
a computer only when the projector is
connected to the computer using the
USB cable.
For details, see “Controlling the
Computer Using the Supplied Remote
Commander (When Using the USB
Cable)” on page 28.
9
ENTER key
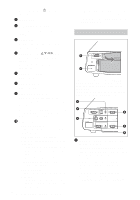
q;
FUNCTION 1, 2, 3 keys
These keys do not work in this unit.
qa
Strap holder
For attaching a strap.
qs
RESET/ESCAPE key
Functions as a RESET key.
Resets the value of an item to its factory
preset value or returns the enlarged
image to its original size. This key
functions when the menu or a setting
item is displayed on the screen.
qd
D ZOOM (Digital Zoom) +/– key
Enlarges the image at a desired location
on the screen.
qf
Arrow keys (
M
/
m
/
<
/
,
)
qg
MENU/TAB key
Functions as a MENU key.
qh
APA (Auto Pixel Alignment) key
Automatically adjusts a picture to its
clearest while a signal is input from a
computer.
For details on APA, see “Smart APA” in
the SET SETTING menu on page 36.
qj
VOLUME +/– keys
qk
LENS key
Each time you press this key, Focus
adjustment menu and Zoom adjustment
menu are displayed alternately.
ql
PJ/NETWORK (Projector/
Network) selector switch
Normally, set to “PJ”.