Sony VPL CX85 Operating Instructions - Page 36
The SET SETTING Menu, Menu Items - parts
 |
UPC - 027242644274
View all Sony VPL CX85 manuals
Add to My Manuals
Save this manual to your list of manuals |
Page 36 highlights
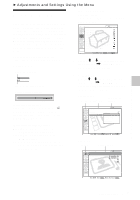
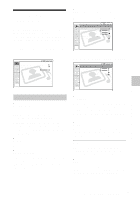
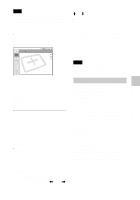
Since the data is recalled from the preset memory about the following signals, you can use these preset data by adjusting "H Size." Make fine adjustment by adjusting "Shift." Signal Super Mac-2 SGI-1 Macintosh 19" Macintosh 21" Sony News PC-9821 1280 × 1024 WS Sunmicro Memory No. SIZE 23 1312 23 1320 25 1328 27 1456 36 1708 36 1600 37 1664 Note When the aspect ratio of input signal is other than 4:3, a part of the screen is displayed in black. GB 36 The SET SETTING Menu The SET SETTING Menu The SET SETTING menu is used for changing the settings of the projector. SET SETTING Input-A Smar t APA: On Auto Input Search: Off Input-A Signal Sel.: Computer Input-C Select: Air Shot Color System: Auto Speaker: On Stand-by Mode: Standard Power Saving: Off IR Receiver: Front & Rear Illumination: On Panel Key Lock: Off Menu Items Smart APA Activates or deactivates the Smart APA 1). On: Normally select this setting. When a signal is input from a computer, the APA functions automatically so that the picture can be seen clearly. Once the specified input signal has been adjusted by the "Smart APA," it will not be readjusted even when the cable is disconnected and connected again or the input channel is changed. You can adjust the picture by pressing APA key on the Remote Commander even if the "Smart APA" set to "On." Off: The APA functions when you press the APA key on the Remote Commander. Notes • Press the APA key when the full image is displayed on the screen. If the projected image includes much black portion around it, the APA function will not work properly and some parts of the image may not be displayed on the screen. • You can cancel the adjustment by pressing the APA key again while "Adjusting" appears on the screen. • The picture may not be adjusted properly depending on the kinds of input signals.
-
 1
1 -
2
-
3
-
4
-
5
-
6
-
7
-
8
-
9
-
10
-
11
-
12
-
13
-
14
-
15
-
16
-
17
-
18
-
19
-
20
-
21
-
22
-
23
-
24
-
25
-
26
-
27
-
28
-
29
-
30
-
 31
31 -
 32
32 -
 33
33 -
 34
34 -
 35
35 -
 36
36 -
 37
37 -
 38
38 -
 39
39 -
 40
40 -
 41
41 -
42
-
43
-
44
-
45
-
46
-
47
-
48
-
49
-
50
-
51
-
52
-
53
-
54
-
55
-
56
-
57
-
58
-
59
-
60
-
61
-
62
-
63
-
64
-
65
-
66
-
67
-
68
-
69
-
70
-
71
-
72
-
73
-
74
-
75
-
76
-
77
-
78
-
79
-
80
-
81
-
82
-
83
-
84
-
85
-
86
-
87
-
88
-
89
-
90
-
91
-
92
-
93
-
94
-
95
-
96
-
97
-
98
-
99
-
100
-
101
-
102
-
103
-
104
-
105
-
106
-
107
-
108
-
109
-
110
-
111
-
112
-
113
-
114
-
115
-
116
-
117
-
118
-
119
-
120
-
121
-
122
-
123
-
124
-
125
-
126
-
127
-
128
-
129
-
130
-
131
-
132
-
133
-
134
-
135
-
136
-
137
-
138
-
139
-
140
-
141
-
142
-
143
-
144
-
145
-
146
-
147
-
148
-
149
-
150
-
151
-
152
-
153
-
154
-
155
-
156
-
157
-
158
-
159
-
160
-
161
-
162
-
163
-
164
-
165
-
166
-
167
-
168
-
169
-
170
-
171
-
172
-
173
-
174
-
175
-
176
-
177
-
178
-
179
-
180
-
181
-
182
-
183
-
184
-
185
-
186
-
187
-
188
-
189
-
190
-
191
-
192
 |
 |