Toshiba DMF102XKU Owner's Manual - English - Page 39
Connecting to A Computer
 |
UPC - 022265003084
View all Toshiba DMF102XKU manuals
Add to My Manuals
Save this manual to your list of manuals |
Page 39 highlights
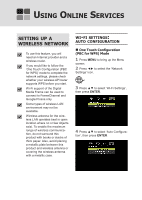
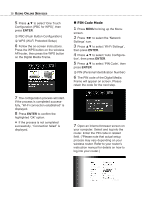
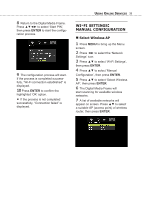
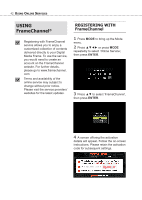
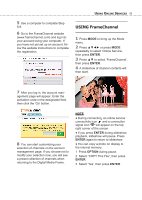
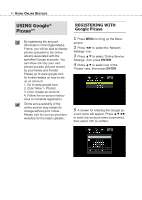
8 Return to the Digital Media Frame. Press to select 'Start PIN', then press ENTER to start the configuration process. 9 The configuration process will start. If the process is completed successfully, "Wi-Fi connection established" is displayed. 10 Press ENTER to confirm the highlighted 'OK' option. ● If the process is not completed successfully, "Connection failed" is displayed. USING ONLINE SERVICES 39 WI-FI SETTINGS: MANUAL CONFIGURATION ■ Select Wireless AP 1 Press MENU to bring up the Menu screen. 2 Press ◄► to select the 'Network Settings' icon. 3 Press ▲▼ to select 'Wi-Fi Settings', then press ENTER. 4 Press ▲▼ to select 'Manual Configuration', then press ENTER. 5 Press ▲▼ to select 'Select Wireless AP', then press ENTER. 6 The Digital Media Frame will start scanning for available wireless networks. 7 A list of available networks will appear on screen. Press ▲▼ to select a suitable AP (access point) of wireless router, then press ENTER.
-
 1
1 -
2
-
3
-
4
-
5
-
6
-
7
-
8
-
9
-
10
-
11
-
12
-
13
-
14
-
15
-
16
-
17
-
18
-
19
-
20
-
21
-
22
-
23
-
24
-
25
-
26
-
27
-
28
-
29
-
30
-
31
-
32
-
33
-
 34
34 -
 35
35 -
 36
36 -
 37
37 -
 38
38 -
 39
39 -
 40
40 -
 41
41 -
 42
42 -
 43
43 -
 44
44 -
45
-
46
-
47
-
48
-
49
-
50
-
51
-
52
-
53
-
54
-
55
-
56
-
57
-
58
-
59
-
60
-
61
-
62
-
63
-
64
-
65
-
66
-
67
-
68
-
69
-
70
-
71
-
72
-
73
-
74
-
75
-
76
-
77
-
78
 |
 |
