Western Digital WDBADB5000Axxx User Manual - Page 11
Installing on a Mac OS X Tiger/Leopard/Snow Leopard, Devices, Cancel, Use as Backup
 |
View all Western Digital WDBADB5000Axxx manuals
Add to My Manuals
Save this manual to your list of manuals |
Page 11 highlights
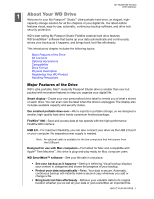
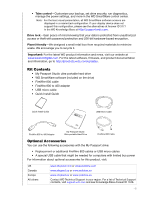
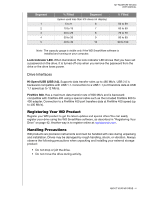
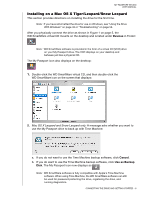
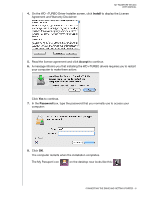
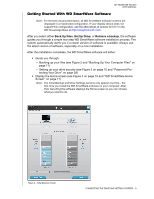
MY PASSPORT STUDIO USER MANUAL Installing on a Mac OS X Tiger/Leopard/Snow Leopard This section provides directions on installing the drive for the first time. Note: If you have reformatted the drive for use on Windows, see "Using the Drive With Windows" on page 48 or "Troubleshooting" on page 56. After you physically connect the drive as shown in Figure 1 on page 5, the WD SmartWare virtual CD mounts on the desktop and is listed under Devices in Finder: Note: WD SmartWare software is provided in the form of a virtual CD (VCD) drive on your My Passport drive. The VCD displays on your desktop and behaves just like a physical CD. The My Passport icon also displays on the desktop: 1. Double-click the WD SmartWare virtual CD, and then double-click the WD SmartWare icon on the screen that displays: 2. Mac OS X Leopard and Snow Leopard only: A message asks whether you want to use the My Passport drive to back up with Time Machine: a. If you do not want to use the Time Machine backup software, click Cancel. b. If you do want to use the Time Machine backup software, click Use as Backup Disk. The My Passport icon now displays as . Note: WD SmartWare software is fully compatible with Apple's Time Machine software. When using Time Machine, the WD SmartWare software can still be used for password protecting the drive, registering the drive, and running diagnostics. CONNECTING THE DRIVE AND GETTING STARTED - 6
-
 1
1 -
2
-
3
-
4
-
5
-
 6
6 -
 7
7 -
 8
8 -
 9
9 -
 10
10 -
 11
11 -
 12
12 -
 13
13 -
 14
14 -
 15
15 -
 16
16 -
17
-
18
-
19
-
20
-
21
-
22
-
23
-
24
-
25
-
26
-
27
-
28
-
29
-
30
-
31
-
32
-
33
-
34
-
35
-
36
-
37
-
38
-
39
-
40
-
41
-
42
-
43
-
44
-
45
-
46
-
47
-
48
-
49
-
50
-
51
-
52
-
53
-
54
-
55
-
56
-
57
-
58
-
59
-
60
-
61
-
62
-
63
-
64
-
65
-
66
-
67
-
68
-
69
-
70
-
71
-
72
-
73
-
74
-
75
-
76
 |
 |