Yamaha MOXF8 Owner's Manual - Page 30
Using Controllers, display called up via the [SF2] INS A/[SF3] INS B
 |
View all Yamaha MOXF8 manuals
Add to My Manuals
Save this manual to your list of manuals |
Page 30 highlights
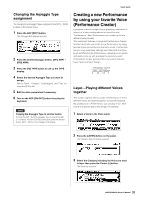
Quick Guide 3 Select the Effect Category and Type of Insertion Effect B with the same instruction as step 2. 4 Select the Effect connection of Insertion A and B. Move the cursor to the position shown below then use the [INC]/[DEC] buttons or [DATA] dial. Insertion Effect connection 5 Set the output destination of each Element/Key. Move the cursor to "EL:OUT" (for the Normal Voice) or "KEY:OUT" (For the Drum Voice) then use the [INC]/[DEC] buttons or [DATA] dial. Element Out 1 - 8 HINT You can use the following operation to simultaneously adjust the volume of Elements 1 - 8 together: 1 Press the Knob Function 1 button (at the left of Knobs 1 - 4) and Knob Function 2 button (at the left of Knobs 5 - 8) simultaneously. The six lamps light and the KNOB FUNCTION pop-up window will appear. 2 Turn one of the knobs to adjust the Element volume. 3 After completing editing, press the [EXIT] button to return to the Voice Play display. Knob Function 1 button Knob 1 Knob 2 Knob 3 Knob 4 Knob 5 Knob 6 Knob 7 Knob 8 6 If necessary, edit the Effect parameters on the display called up via the [SF2] INS A/[SF3] INS B buttons. Try narrowing in on your desired sound by finely editing the parameters provided for each Effect Type. 7 After setting the parameters, press the [STORE] button to store your settings as a User Voice. Knob Function 2 button HINT Using Controllers Multiple controllers are assigned to each preset Voice, allowing you to apply various changes and effects to the Voice in real time. For convenience, abbreviations of the important or characteristic controllers for that Voice are shown following the Voice name in the display. However, some Voices may have indications for controllers that are not actually available on the instrument itself. These can be used, though, by transmitting the corresponding MIDI control number from an internal sequencer, an external sequencer, or an external MIDI controller. Controller Indication AS1 AS2 AF1 AF2 FC1 FC2 MW RB Controller Name ASSIGN 1 knob ASSIGN 2 knob ASSIGNABLE FUNCTION [1] button ASSIGNABLE FUNCTION [2] button Foot Controller not included on panel Modulation Wheel not included on panel MIDI Control Number (default setting) 16 17 86 87 11 4 1 22 30 MOXF6/MOXF8 Owner's Manual
-
 1
1 -
2
-
3
-
4
-
5
-
6
-
7
-
8
-
9
-
10
-
11
-
12
-
13
-
14
-
15
-
16
-
17
-
18
-
19
-
20
-
21
-
22
-
23
-
24
-
 25
25 -
 26
26 -
 27
27 -
 28
28 -
 29
29 -
 30
30 -
 31
31 -
 32
32 -
 33
33 -
 34
34 -
 35
35 -
36
-
37
-
38
-
39
-
40
-
41
-
42
-
43
-
44
-
45
-
46
-
47
-
48
-
49
-
50
-
51
-
52
-
53
-
54
-
55
-
56
-
57
-
58
-
59
-
60
-
61
-
62
-
63
-
64
-
65
-
66
-
67
-
68
-
69
-
70
-
71
-
72
-
73
-
74
-
75
-
76
-
77
-
78
-
79
-
80
 |
 |
