Yamaha MOXF8 Owner's Manual - Page 38
Connecting a microphone or audio equipment, Playing the keyboard along
 |
View all Yamaha MOXF8 manuals
Add to My Manuals
Save this manual to your list of manuals |
Page 38 highlights
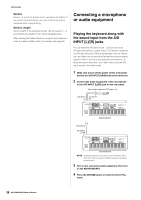
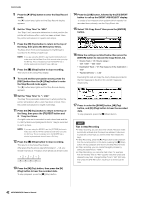
Quick Guide Section From A - P, select the Section which comprises the Pattern. If you create several Sections, you can use them as rhythm variations within a single Song. Section Length Set the length of the selected Section. Set the value to 1 - 4 according to the length of the current Arpeggio types. After creating the Pattern Sections, program their playback order to create a Pattern Chain. For details, see page 49. Connecting a microphone or audio equipment Playing the keyboard along with the sound input from the A/D INPUT [L]/[R] jacks You can have the A/D input sound-such as your voice through a microphone, a guitar, bass, or CD player-assigned as an Audio Input Part. Various parameters such as volume, pan, and effect can be set to this Part and the sound is output together with the sound of your keyboard performance. In these example instructions, you'll learn how to use the A/D input sound in the Voice mode. 1 Make sure to turn off the power of this instrument and set the A/D INPUT [GAIN] knob to the minimum. 2 Connect the audio equipment or the microphone to the A/D INPUT [L]/[R] jack on the rear panel. Stereo audio equipment (CD player, etc.) L A/D INPUT [L] R A/D INPUT [R] Microphone A/D INPUT [L]/[R] MOXF6/MOXF8 38 MOXF6/MOXF8 Owner's Manual MOXF6/MOXF8 NOTE A standard dynamic microphone is recommended. (This instrument does not support phantom-powered condenser microphones.) 3 Turn on the connected audio equipment, then turn on the MOXF6/MOXF8. 4 Press the [VOICE] button to enter the Voice Play mode.
-
 1
1 -
2
-
3
-
4
-
5
-
6
-
7
-
8
-
9
-
10
-
11
-
12
-
13
-
14
-
15
-
16
-
17
-
18
-
19
-
20
-
21
-
22
-
23
-
24
-
25
-
26
-
27
-
28
-
29
-
30
-
31
-
32
-
 33
33 -
 34
34 -
 35
35 -
 36
36 -
 37
37 -
 38
38 -
 39
39 -
 40
40 -
 41
41 -
 42
42 -
 43
43 -
44
-
45
-
46
-
47
-
48
-
49
-
50
-
51
-
52
-
53
-
54
-
55
-
56
-
57
-
58
-
59
-
60
-
61
-
62
-
63
-
64
-
65
-
66
-
67
-
68
-
69
-
70
-
71
-
72
-
73
-
74
-
75
-
76
-
77
-
78
-
79
-
80
 |
 |
