Yamaha MOXF8 Owner's Manual - Page 43
Creating a bass part via Realtime, Recording, Punch In/Out
 |
View all Yamaha MOXF8 manuals
Add to My Manuals
Save this manual to your list of manuals |
Page 43 highlights
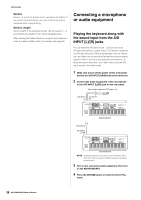
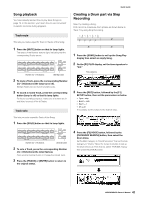
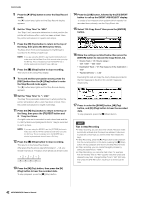
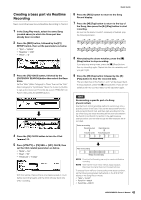
Quick Guide Creating a bass part via Realtime Recording Next, record the bass line via Realtime Recording to Track 2. 1 In the Song Play mode, select the same Song (created above) to which the Drum part has already been recorded. 2 Press the [REC] button, followed by the [F1] SETUP button, then set the parameters as below. • "Type" = "replace" • "Quantize" = "240" • "RecTr" = "2" 3 Press the [F2] VOICE button, followed by the [CATEGORY SEARCH] button then select the Bass Voice. Set the "Main" (Main Category) to "Bass" then set the "Sub" (Sub Category) to "Synth Bass." Move the Cursor [>] button to call up the Voice List. From this list, select "PRE3 E01 Uni Punch" then press the [ENTER] button. 4 Press the [F5] CLICK button to turn the Click ( ) on. 5 Press [UTILITY] [F2] SEQ [SF1] CLICK, then set the Click related parameters as below. • "Mode" = "rec" • "Beat" = "04" • "RecCount" = "1meas" With this setting, there will be a one-measure lead-in count before recording begins and the Click will play back only while recording. 6 Press the [REC] button to return to the Song Record display. 7 Press the [P] (Top) button to return to the top of the Song, then press the [F] (Play) button to start recording. As soon as the lead-in count (1-measure) is finished, play the following notation. 8 After playing the above notation, press the [J] (Stop) button to stop recording. If you play any wrong notes, press the [J] (Stop) button, then try recording again. Repeat as often as necessary until you get it right. 9 Press the [P] (Top) button followed by the [F] (Play) button to hear the recorded data. The recorded data of the Tracks 1 and 2 will be played back. To stop playback, press the [J] (Stop) button. If you are not satisfied with the recorded data, try this operation again. HINT Re-recording a specific part of a Song (Punch In/Out) Use the Punch In/Out recording method to record over only a specific portion of the Track. If you set the start point (Punch In) and end point (Punch Out), and then start recording from the top of the Song, the actual recording will be done only between the Punch In and Punch Out points. In the eight-measure example below, only the third through the fifth measures are rerecorded. Before re-recording Recording start Recording stop Punch In point Punch Out point 1 2 3 4 567 8 After re-recording 1234 5 67 8 Newly recorded data NOTE Punch In/Out Recording can only be used with Realtime recording. NOTE Note that the Punch In/Out method always replaces (destroys) the original data over the specified area. To execute Punch In/Punch Out recording in the above condition, set the following parameters beforehand on the [F1] SETUP display in the Song Record mode. • "Type" = "punch" • Punch In = 003:01 • Punch Out = 006:01 43 MOXF6/MOXF8 Owner's Manual
-
 1
1 -
2
-
3
-
4
-
5
-
6
-
7
-
8
-
9
-
10
-
11
-
12
-
13
-
14
-
15
-
16
-
17
-
18
-
19
-
20
-
21
-
22
-
23
-
24
-
25
-
26
-
27
-
28
-
29
-
30
-
31
-
32
-
33
-
34
-
35
-
36
-
37
-
 38
38 -
 39
39 -
 40
40 -
 41
41 -
 42
42 -
 43
43 -
 44
44 -
 45
45 -
 46
46 -
 47
47 -
 48
48 -
49
-
50
-
51
-
52
-
53
-
54
-
55
-
56
-
57
-
58
-
59
-
60
-
61
-
62
-
63
-
64
-
65
-
66
-
67
-
68
-
69
-
70
-
71
-
72
-
73
-
74
-
75
-
76
-
77
-
78
-
79
-
80
 |
 |
