Yamaha MOXF8 Owner's Manual - Page 48
Creating another Pattern B by using already recorded data, Copying the Pattern data
 |
View all Yamaha MOXF8 manuals
Add to My Manuals
Save this manual to your list of manuals |
Page 48 highlights
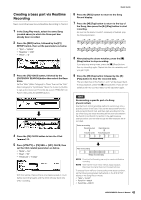
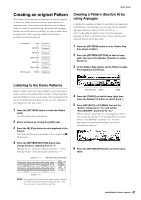
Quick Guide 7 Press the [F2] TYPE button then select the desired Arpeggio Type assigned to the [SF1] - [SF6] buttons. 13 Press [STORE] [F1] SEQ [ENTER] to store the recorded Phrases as a Pattern. This operation will store all the Song/Patterns. Now that you've recorded Section A, go on to the following instructions and create Section B by using the Pattern Copy Job with the already recorded User Phrases. Changing the Arpeggio Type will call up a different Voice since the "VoiceWithARP" parameter is set to "on." If you want to record a drum pattern, for example, set the Category to a drum/percussion-like name then find the desired Arpeggio Type. 8 Press the [REC] button then set the parameters for recording on the [F1] SETUP display as below. • "Type" = "replace" • "Loop" = "off" • "Quantize" = "off" Set the other parameters if necessary. 9 Press the [F5] CLICK button to set the click to on ( ). 10 Press the [F] (Play) button to start recording. Play the keyboard to trigger Arpeggio playback. Since the "Loop" parameter is set to "off," recording will be finished automatically when the end of the Pattern Length is reached. NOTE All the notes generated via Arpeggio playback will be recorded. Recorded Data as a User Phrase The MIDI note sequence data (except for the Voice setting, etc.) recorded in the Pattern mode will be stored as a User Phrase. The stored User Phrase can be assigned to a different Section/Track from the [F4] PATCH display in the Pattern Play mode. This allows you to use already recorded User Phrases for the other different Sections/Tracks. A single Pattern provides memory space for 256 of your own original User Phrases. Creating another Pattern (Section B) by using already recorded data Here, you'll learn how to create a Section B by using recorded data copied from Section A. For example, the drum part and bass part will be copied from Section A, and the guitar part will be created via the same note data as that of the bass part. Copying the Pattern data First, copy all the recorded data from the Section A to Section B by using the Pattern Copy Job. 1 Press [PATTERN] [JOB] to enter the Pattern Job. 2 Press the [F6] PATTERN button, select "01: Copy Pattern" then press the [ENTER] button. The Copy Pattern Job display appears. 3 Select the Pattern number and Section to be copied. For the copy source, select the Pattern number and Section which you have already recorded in the previous section. For the copy destination, select the same Pattern number and "Section B." 11 Press the [F] (Play) button to hear the recorded Phrase. 12 Record Phrases to the other Tracks of Section A as desired using the same operation. Record a bass line to Track 2, then record guitar backing to Track 3 by repeating steps 4 - 11 above. Source Destination 4 Press the [ENTER] button to execute the Pattern Copy Job. All the data of Section A will be copied to Section B. 5 Press the [EXIT] button a few times to return to Pattern Play. 48 MOXF6/MOXF8 Owner's Manual
-
 1
1 -
2
-
3
-
4
-
5
-
6
-
7
-
8
-
9
-
10
-
11
-
12
-
13
-
14
-
15
-
16
-
17
-
18
-
19
-
20
-
21
-
22
-
23
-
24
-
25
-
26
-
27
-
28
-
29
-
30
-
31
-
32
-
33
-
34
-
35
-
36
-
37
-
38
-
39
-
40
-
41
-
42
-
 43
43 -
 44
44 -
 45
45 -
 46
46 -
 47
47 -
 48
48 -
 49
49 -
 50
50 -
 51
51 -
 52
52 -
 53
53 -
54
-
55
-
56
-
57
-
58
-
59
-
60
-
61
-
62
-
63
-
64
-
65
-
66
-
67
-
68
-
69
-
70
-
71
-
72
-
73
-
74
-
75
-
76
-
77
-
78
-
79
-
80
 |
 |
