Yamaha YSP 4000 Owner's Manual - Page 125
Using iPod™, Connection, Controlling iPod™
 |
UPC - 027108928760
View all Yamaha YSP 4000 manuals
Add to My Manuals
Save this manual to your list of manuals |
Page 125 highlights
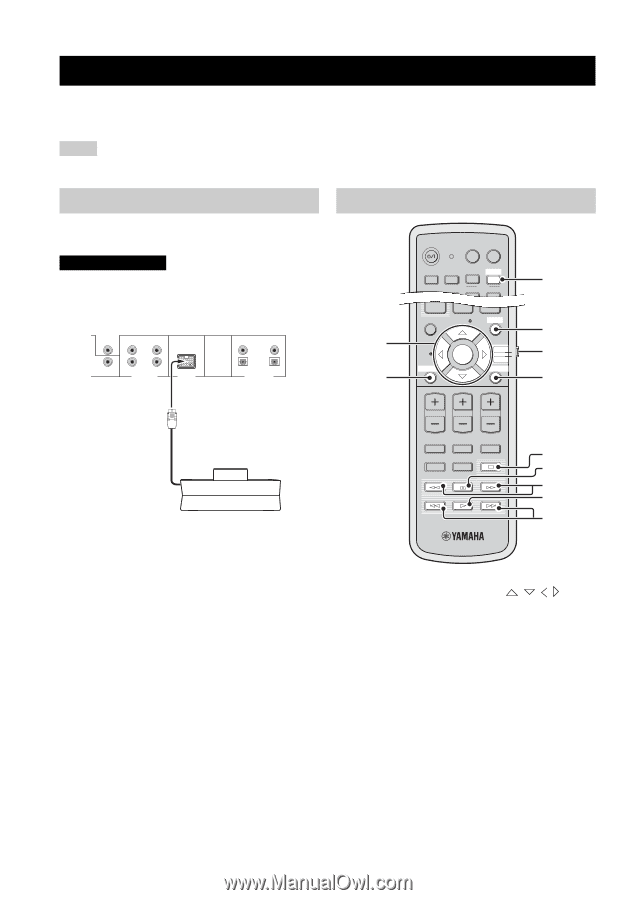
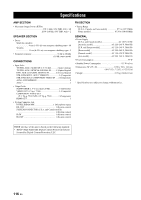
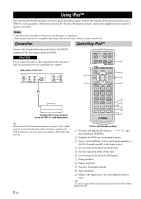
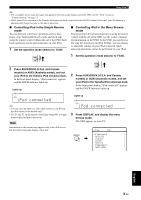
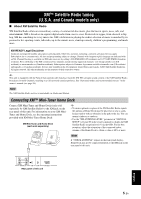
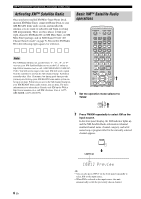
USING IPOD™ Using iPod™ This unit has the DOCK terminal on the rear panel that allows you to connect the Yamaha iPod universal dock (such as YDS-10, sold separately). Station your iPod in the Yamaha iPod universal dock, and use the supplied remote control to operate your iPod. Notes • Only iPod (Click and Wheel), iPod nano, and iPod mini are supported. • Some features may not be compatible depending on the model or the software version of your iPod. Connection Controlling iPod™ Connect the Yamaha iPod universal dock to the DOCK terminal of this unit using a dedicated cable. CAUTION Do not connect this unit or other components to the main power until all connections between components are complete. Rear panel of this unit SUBWOOFER AUX 1 TV/STB AUX 1 AUDIO IN DOCK DVD AUX 2 COAXIAL OPTICAL TV/STB AUX 1 DIGITAL IN 1 2 STANDBY/ON POWER POWER AV TV DVD STOBFF 0 DOCK AUX1 AUX2 AUX3 TV INPUT1 MACRO TV SUR. DECODE +10 ENHANCER ENTRY MENU CAT/ A-E DISPLAY ENTER TV/AV YSP RETURN VOLUME CH TV VOL 3 4 5 6 Yamaha iPod universal dock (such as YDS-10, sold separately) MUTE TV INPUT TV MUTE CODE SET CH LEVEL TEST 7 8 9 0 A y When your iPod and external component using the AUX 3 input jack are connected to this unit at the same time, and when the DOCK indicator is lit in the front panel display, iPod output takes priority. (U.S.A. and Canada models) 1 Navigate through the iPod menu ( / / / ) and starts playback (ENTER). 2 Displays the OSD (on-screen menu) menu. 3 Selects AUX3/DOCK (U.S.A. and Canada models) or AUX3 (Australia model) as the input source. 4 Use to return to the previous iPod menu. 5 Sets the operation mode of this unit. 6 Use to return to the previous iPod menu. 7 Stops playback. 8 Pauses playback. 9 Searches forward/backward. 0 Starts playback. A Skips to the beginning of the current/previous/next track. y 8 and 9 toggle between play and pause operations in the Simple Remote mode. 2 En
-
 1
1 -
2
-
3
-
4
-
5
-
6
-
7
-
8
-
9
-
10
-
11
-
12
-
13
-
14
-
15
-
16
-
17
-
18
-
19
-
20
-
21
-
22
-
23
-
24
-
25
-
26
-
27
-
28
-
29
-
30
-
31
-
32
-
33
-
34
-
35
-
36
-
37
-
38
-
39
-
40
-
41
-
42
-
43
-
44
-
45
-
46
-
47
-
48
-
49
-
50
-
51
-
52
-
53
-
54
-
55
-
56
-
57
-
58
-
59
-
60
-
61
-
62
-
63
-
64
-
65
-
66
-
67
-
68
-
69
-
70
-
71
-
72
-
73
-
74
-
75
-
76
-
77
-
78
-
79
-
80
-
81
-
82
-
83
-
84
-
85
-
86
-
87
-
88
-
89
-
90
-
91
-
92
-
93
-
94
-
95
-
96
-
97
-
98
-
99
-
100
-
101
-
102
-
103
-
104
-
105
-
106
-
107
-
108
-
109
-
110
-
111
-
112
-
113
-
114
-
115
-
116
-
117
-
118
-
119
-
 120
120 -
 121
121 -
 122
122 -
 123
123 -
 124
124 -
 125
125 -
 126
126 -
 127
127 -
 128
128 -
 129
129 -
 130
130 -
131
-
132
-
133
-
134
-
135
-
136
-
137
 |
 |