Yamaha YSP 4000 Owner's Manual - Page 86
Sound Menu, Cimage Location, Atone Control, Bsubwoofer Set
 |
UPC - 027108928760
View all Yamaha YSP 4000 manuals
Add to My Manuals
Save this manual to your list of manuals |
Page 86 highlights
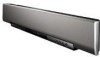
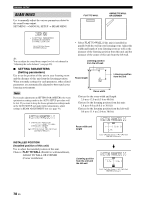
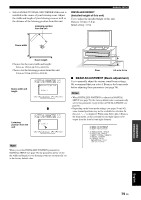
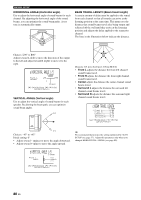
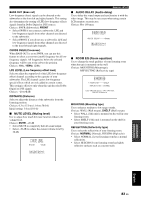
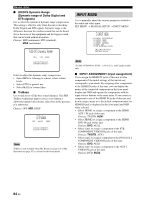
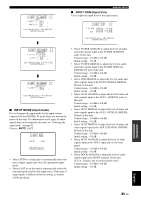
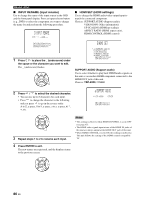
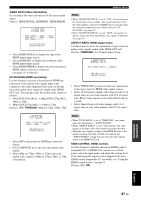
MANUAL SETUP ■ IMAGE LOCATION (Image location) Use to adjust the direction from which the front left and right channel sound is heard so that each sound can be heard closer to the center channel. Use this feature to redirect audio signals if the sound coming from the front left and right channels seems unnatural, such as when your listening position is not the center of your listening room. You can only adjust this parameter when 3 Beam or 5 Beam is selected as the beam mode (see page 56). Choices: ON, OFF Setting range: 0% to 95% Initial setting: 0% C)IMAGE LOCATION . OFF )ON L C R p p LEFT;;;;;;;;;;;0% RIGHT;;;;;;;;;;0% p [ ]/[ ]:Up/Down [ ]/[ ]:Sel [ENTER]:Return p LEFT (Left) Adjusts audio signals toward the left. The higher the percentage, the louder the output from the center. Without adjustment With the front left channel adjusted RIGHT (Right) Adjusts audio signals toward the right. The higher the percentage, the louder the output from the center. Without adjustment With the front right channel adjusted p p p SOUND MENU Use to manually adjust the various parameters related to the sound output. SET MENU → MANUAL SETUP → SOUND MENU 1)SOUND MENU . A)TONE CONTROL B)SUBWOOFER SET C)MUTE LEVEL D)AUDIO DELAY E)ROOM EQ F)DD/DTS Dynamic Range G)TruBass [ ]/[ ]:Up/Down [ENTER]:Enter p p ■ TONE CONTROL (Tone control) You can adjust the tonal quality of sound beams. A)TONE CONTROL - + . TREBLE;;;;;0dB ------ - + BASS;;;;;;;0dB ------ p p p [ ]/[ ]:Up/Down [ ]/[ ]:Sel [ENTER]:Return TREBLE (Treble) Use to adjust the high-frequency response. Choices: -12 dB to +12 dB Initial setting: 0 dB BASS (Bass) Use to adjust the low-frequency response. Choices: -12 dB to +12 dB Initial setting: 0 dB ■ SUBWOOFER SET (Subwoofer settings) Use to manually adjust the various subwoofer settings. B)SUBWOOFER SET . BASS OUT;;;;;FRONT CROSS OVER;;;100Hz LFE LEVEL;;;;;;0dB DISTANCE;;;;;;3.0m p [ ]/[ ]:Up/Down [ ]/[ ]:Sel [ENTER]:Return p p 82 En
-
 1
1 -
2
-
3
-
4
-
5
-
6
-
7
-
8
-
9
-
10
-
11
-
12
-
13
-
14
-
15
-
16
-
17
-
18
-
19
-
20
-
21
-
22
-
23
-
24
-
25
-
26
-
27
-
28
-
29
-
30
-
31
-
32
-
33
-
34
-
35
-
36
-
37
-
38
-
39
-
40
-
41
-
42
-
43
-
44
-
45
-
46
-
47
-
48
-
49
-
50
-
51
-
52
-
53
-
54
-
55
-
56
-
57
-
58
-
59
-
60
-
61
-
62
-
63
-
64
-
65
-
66
-
67
-
68
-
69
-
70
-
71
-
72
-
73
-
74
-
75
-
76
-
77
-
78
-
79
-
80
-
 81
81 -
 82
82 -
 83
83 -
 84
84 -
 85
85 -
 86
86 -
 87
87 -
 88
88 -
 89
89 -
 90
90 -
 91
91 -
92
-
93
-
94
-
95
-
96
-
97
-
98
-
99
-
100
-
101
-
102
-
103
-
104
-
105
-
106
-
107
-
108
-
109
-
110
-
111
-
112
-
113
-
114
-
115
-
116
-
117
-
118
-
119
-
120
-
121
-
122
-
123
-
124
-
125
-
126
-
127
-
128
-
129
-
130
-
131
-
132
-
133
-
134
-
135
-
136
-
137
 |
 |