Yamaha YSP 4000 Owner's Manual - Page 95
Using the audio output being played back
 |
UPC - 027108928760
View all Yamaha YSP 4000 manuals
Add to My Manuals
Save this manual to your list of manuals |
Page 95 highlights
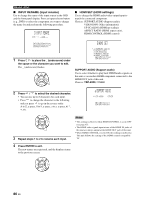
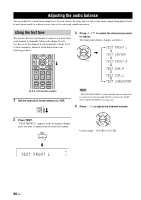
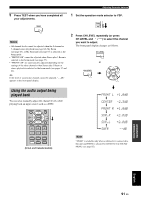
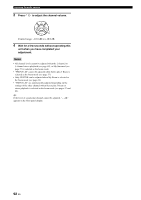
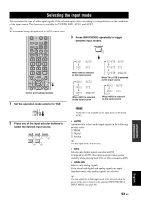
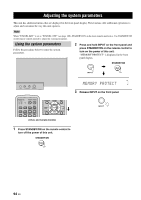
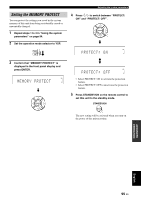
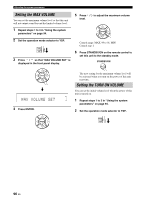
5 Press TEST when you have completed all your adjustments. TEST Adjusting the audio balance 1 Set the operation mode selector to YSP. TV/AV YSP Notes • All channel levels cannot be adjusted when the 2-channel or 5-channel stereo playback (see page 62), My Beam (see page 63), or My Surround (see page 57) is selected as the beam mode. • "FRONT L/R" cannot be adjusted when Stereo plus 3 Beam is selected as the beam mode (see page 57). • "FRONT L/R" are automatically adjusted depending on the settings of the other channels when Stereo plus 3 Beam or stereo playback is selected as the beam mode (see pages 57 and 62). y If the level of a particular channel cannot be adjusted, "- -dB" appears in the front panel display. 2 Press CH LEVEL repeatedly (or press CH LEVEL and / ) to select the channel you want to adjust. The front panel display changes as follows. CH LEVEL or CH LEVEL ENTER Using the audio output being played back You can also manually adjust the channel levels while playing back an input source such as a DVD. ENHANCER ENTRY MENU CAT/ A-E DISPLAY ENTER TV/AV YSP RETURN VOLUME CH TV VOL MUTE TV INPUT TV MUTE CODE SET CH LEVEL TEST (U.S.A. and Canada models) FRONT L +1.0dB CENTER -2.5dB FRONT R +1.0dB SUR.R +2.0dB SUR.L +2.0dB SWFR --dB Note "SWFR" is available only when a subwoofer is connected to this unit and SWFR is selected for BASS OUT in SOUND MENU (see page 82). ADVANCED OPERATION English 91 En
-
 1
1 -
2
-
3
-
4
-
5
-
6
-
7
-
8
-
9
-
10
-
11
-
12
-
13
-
14
-
15
-
16
-
17
-
18
-
19
-
20
-
21
-
22
-
23
-
24
-
25
-
26
-
27
-
28
-
29
-
30
-
31
-
32
-
33
-
34
-
35
-
36
-
37
-
38
-
39
-
40
-
41
-
42
-
43
-
44
-
45
-
46
-
47
-
48
-
49
-
50
-
51
-
52
-
53
-
54
-
55
-
56
-
57
-
58
-
59
-
60
-
61
-
62
-
63
-
64
-
65
-
66
-
67
-
68
-
69
-
70
-
71
-
72
-
73
-
74
-
75
-
76
-
77
-
78
-
79
-
80
-
81
-
82
-
83
-
84
-
85
-
86
-
87
-
88
-
89
-
 90
90 -
 91
91 -
 92
92 -
 93
93 -
 94
94 -
 95
95 -
 96
96 -
 97
97 -
 98
98 -
 99
99 -
 100
100 -
101
-
102
-
103
-
104
-
105
-
106
-
107
-
108
-
109
-
110
-
111
-
112
-
113
-
114
-
115
-
116
-
117
-
118
-
119
-
120
-
121
-
122
-
123
-
124
-
125
-
126
-
127
-
128
-
129
-
130
-
131
-
132
-
133
-
134
-
135
-
136
-
137
 |
 |