Yamaha YSP 4000 Owner's Manual - Page 21
PREPARATION, Installation, Before installing this unit - stand
 |
UPC - 027108928760
View all Yamaha YSP 4000 manuals
Add to My Manuals
Save this manual to your list of manuals |
Page 21 highlights
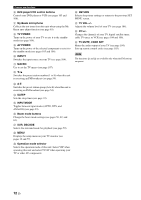
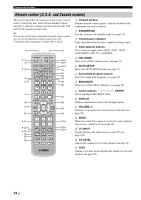
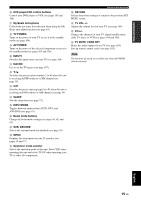
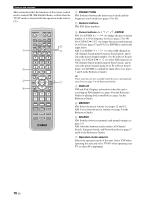
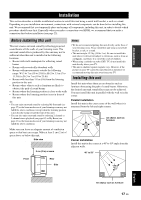
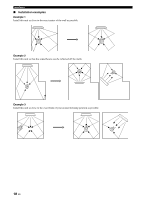
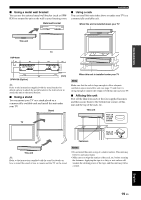
PREPARATION Installation Installation This section describes a suitable installation location to install this unit using a metal wall bracket, a rack or a stand. Depending on your installation environment, connections with external components can be done before installing this unit. We recommend that you temporarily place and arrange all components, including this unit, in order to decide which procedure should come first. Especially when you make a connection over HDMI, we recommend that you make a connection first before installation (see page 22). Before installing this unit This unit creates surround sound by reflecting projected sound beams off the walls of your listening room. The surround sound effects produced by this unit may not be sufficient when this unit is installed in the following locations. • Rooms with walls inadequate for reflecting sound beams • Rooms with acoustically absorbent walls • Rooms with measurements outside the following range: W (3 to 7 m (10 to 23 ft)) x H (2 to 3.5 m (7 to 11.5 ft)) x D (3 to 7 m (10 to 23 ft)) • Rooms with less than 1.8 m (6 ft) from the listening position to this unit • Rooms where objects such as furniture are likely to obstruct the path of sound beams • Rooms where the listening position is close to the walls • Rooms where the listening position is not in front of this unit y • You can enjoy surround sound by selecting My Surround (see page 57) as the beam mode even if your listening room may not fulfill the above conditions (except when the listening position is not directly facing toward the front of this unit). • You can also enjoy surround sound by selecting 2-channel or 5-channel stereo playback (see page 62) or My Beam (see page 63) as the beam mode even if your listening room may not fulfill the above conditions. Notes • We do not recommend putting this unit directly on the floor of your listening room. Please install this unit using a metal wall bracket, a rack, or a stand. • This unit weighs 15.5 kg (34 lbs 3 oz). Be sure to install this unit where it will not fall subject to vibrations, such as from an earthquake, and where it is out of the reach of children. • When using a cathode-ray tube (CRT) TV, do not install this unit directly above your TV. • This unit is shielded against magnetic rays. However, if the picture on your TV screen becomes blurred or distorted, we recommend moving this unit away from your TV. Installing this unit Install this unit where there are no obstacles such as furniture obstructing the path of sound beams. Otherwise, the desired surround sound effects may not be achieved. You may install this unit in parallel with the wall or in the corner. Parallel installation Install this unit in the exact center of the wall when it is measured from the left and right corners. An object, such as furniture Make sure you leave an adequate amount of ventilation space so that heat can escape. Make at least 5 cm (2 in) of space above or below this unit. Side view 5 cm (2 in) or more Corner installation Install this unit in the corner at a 40º to 50º angle from the adjacent walls. 40° to 50° Front Rear Side English An object, such as furniture 17 En
-
 1
1 -
2
-
3
-
4
-
5
-
6
-
7
-
8
-
9
-
10
-
11
-
12
-
13
-
14
-
15
-
 16
16 -
 17
17 -
 18
18 -
 19
19 -
 20
20 -
 21
21 -
 22
22 -
 23
23 -
 24
24 -
 25
25 -
 26
26 -
27
-
28
-
29
-
30
-
31
-
32
-
33
-
34
-
35
-
36
-
37
-
38
-
39
-
40
-
41
-
42
-
43
-
44
-
45
-
46
-
47
-
48
-
49
-
50
-
51
-
52
-
53
-
54
-
55
-
56
-
57
-
58
-
59
-
60
-
61
-
62
-
63
-
64
-
65
-
66
-
67
-
68
-
69
-
70
-
71
-
72
-
73
-
74
-
75
-
76
-
77
-
78
-
79
-
80
-
81
-
82
-
83
-
84
-
85
-
86
-
87
-
88
-
89
-
90
-
91
-
92
-
93
-
94
-
95
-
96
-
97
-
98
-
99
-
100
-
101
-
102
-
103
-
104
-
105
-
106
-
107
-
108
-
109
-
110
-
111
-
112
-
113
-
114
-
115
-
116
-
117
-
118
-
119
-
120
-
121
-
122
-
123
-
124
-
125
-
126
-
127
-
128
-
129
-
130
-
131
-
132
-
133
-
134
-
135
-
136
-
137
 |
 |