Yamaha YSP 4000 Owner's Manual - Page 82
Beam Menu, Asetting Parameters 1/3
 |
UPC - 027108928760
View all Yamaha YSP 4000 manuals
Add to My Manuals
Save this manual to your list of manuals |
Page 82 highlights
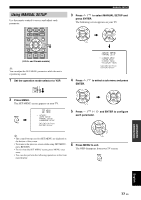
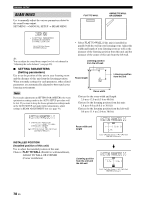
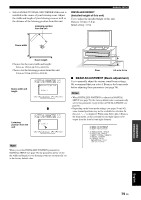
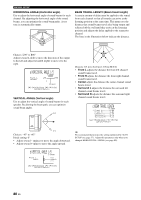
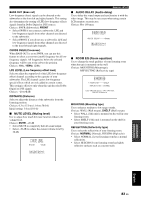
MANUAL SETUP BEAM MENU Use to manually adjust the various parameters related to the sound beam output. SET MENU → MANUAL SETUP → BEAM MENU FLAT TO WALL ANGLE TO WALL OR CORNER p p p p 2)BEAM MENU . A)SETTING PARAMETERS B)BEAM ADJUSTMENT C)IMAGE LOCATION [ ]/[ ]:Up/Down [ENTER]:Enter y You can adjust the sound beam output level of each channel in "Adjusting the audio balance" (see page 90). ■ SETTING PARAMETERS (Setting parameters) Use to set the position of this unit in your listening room and the distance of this unit from the listening position. When you make settings for each parameter, other related parameters are automatically adjusted to best match your listening environment. Note If you make adjustments in SETTING PARAMETERS, the beam optimization settings made in the AUTO SETUP procedure will be lost. If you want to keep the beam optimization settings made in the AUTO SETUP and make further adjustments, adjust settings in BEAM ADJUSTMENT first (see page 79). A)SETTING PARAMETERS 1/3 . INSTALLED POSITION ;;;;;;;FLAT TO WALL INSTALLED HEIGHT ;;;;;;;1.0pm [ ]/[ ]:Up/Down [ ]/[ ]:Sel [ENTER]:Return • Select FLAT TO WALL if this unit is installed in parallel with the wall in your listening room. Adjust the width and length of your listening room as well as the distance of the listening position from this unit and the distance of the center of this unit from the left wall. Listening position from the left wall Room length Listening position from the unit Room width Choices for the room width and length: 2.0 m to 12.0 m (6.5 ft to 40.0 ft) Choices for the listening position from this unit: 1.8 m to 9.0 m (6.0 ft to 30.0 ft) Choices for the listening position from the left wall: 0.6 m to 11.4 m (2.0 ft to 38.0 ft) Room width and length p p A)SETTING PARAMETERS 2/3 | -------[ 5.4m ]- | 4.9m | p [ ]/[ ]:Up/Down [ ]/[ ]:Sel [ENTER]:Return p p p INSTALLED POSITION (Installed position of this unit) Use to adjust the installed position of this unit. Choices: FLAT TO WALL (Parallel to wall installation), ANGLE TO WALL OR CORNER (Corner installation) Listening position from the unit and the left wall p p A)SETTING PARAMETERS 3/3 --------| 2.7m [ 2.5m ] | p [ ]/[ ]:Up/Down [ ]/[ ]:Sel [ENTER]:Return 78 En
-
 1
1 -
2
-
3
-
4
-
5
-
6
-
7
-
8
-
9
-
10
-
11
-
12
-
13
-
14
-
15
-
16
-
17
-
18
-
19
-
20
-
21
-
22
-
23
-
24
-
25
-
26
-
27
-
28
-
29
-
30
-
31
-
32
-
33
-
34
-
35
-
36
-
37
-
38
-
39
-
40
-
41
-
42
-
43
-
44
-
45
-
46
-
47
-
48
-
49
-
50
-
51
-
52
-
53
-
54
-
55
-
56
-
57
-
58
-
59
-
60
-
61
-
62
-
63
-
64
-
65
-
66
-
67
-
68
-
69
-
70
-
71
-
72
-
73
-
74
-
75
-
76
-
 77
77 -
 78
78 -
 79
79 -
 80
80 -
 81
81 -
 82
82 -
 83
83 -
 84
84 -
 85
85 -
 86
86 -
 87
87 -
88
-
89
-
90
-
91
-
92
-
93
-
94
-
95
-
96
-
97
-
98
-
99
-
100
-
101
-
102
-
103
-
104
-
105
-
106
-
107
-
108
-
109
-
110
-
111
-
112
-
113
-
114
-
115
-
116
-
117
-
118
-
119
-
120
-
121
-
122
-
123
-
124
-
125
-
126
-
127
-
128
-
129
-
130
-
131
-
132
-
133
-
134
-
135
-
136
-
137
 |
 |